Try everything in your space - WebXR
- 5 minutes read - 1045 words
Today’s websites are designed first for mobile and then for other platforms, and it is getting important to bring mobile XR functionality into the websites. Google’s scene viewer is bringing WebXR for mass adoption. Theoretically any 3D model can be tried in your space, and you can easily built AR experience for your website.
eCommerce has already transformed into mCommerse, and now taking steps into xCommerse (XR Commerce). 3D Model viewer is very common requirement for across different domains, and it will be the basic requirement of developing for Metaverse as well as for any digital business in future. The most explored/talked about feature is “Try before buy”, or building AR experience while visualizing the products.
I have explained WebXR — the new Web earlier, and how we can built XR experience directly on our website using additional tools such as babylon.js, AFrame.js, threejs, directly in Unity or so. In this article, I will explain easier way to build WebXR with almost no code. In the graphics below, you see my son with a tiger in my room. This experience is available out of the box by google on most of android devices today.
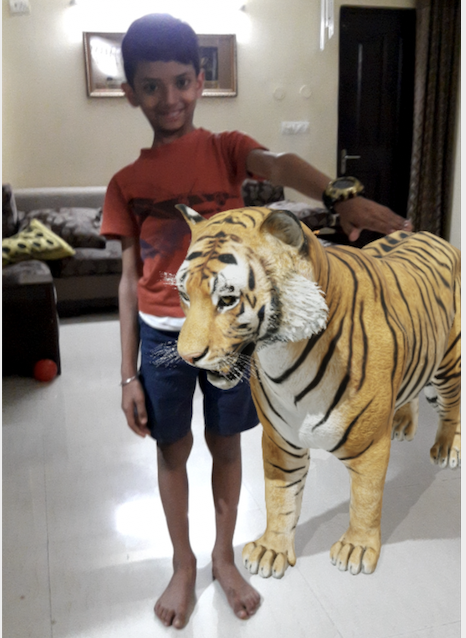
This experience can be easily extendable to any products. At the end of this I will also explain how we can customize this experience of your choice.
Google Scene Viewer
Google scene viewer, is an immersive viewer that enables 3D and AR experiences from your website or Android app. It lets users of Android mobile devices easily preview, place, view, and interact with web-hosted 3D models in their environment.
Scene Viewer can be invoked from a web-link from a web browser or from android app, or it can be embedded in html with special tags <model-viewer>.
Google Model Editor
Google does have free tool called Model Editor where you can create test and validate. Here is the link . It allows customise to properties, and produce embeddable code.
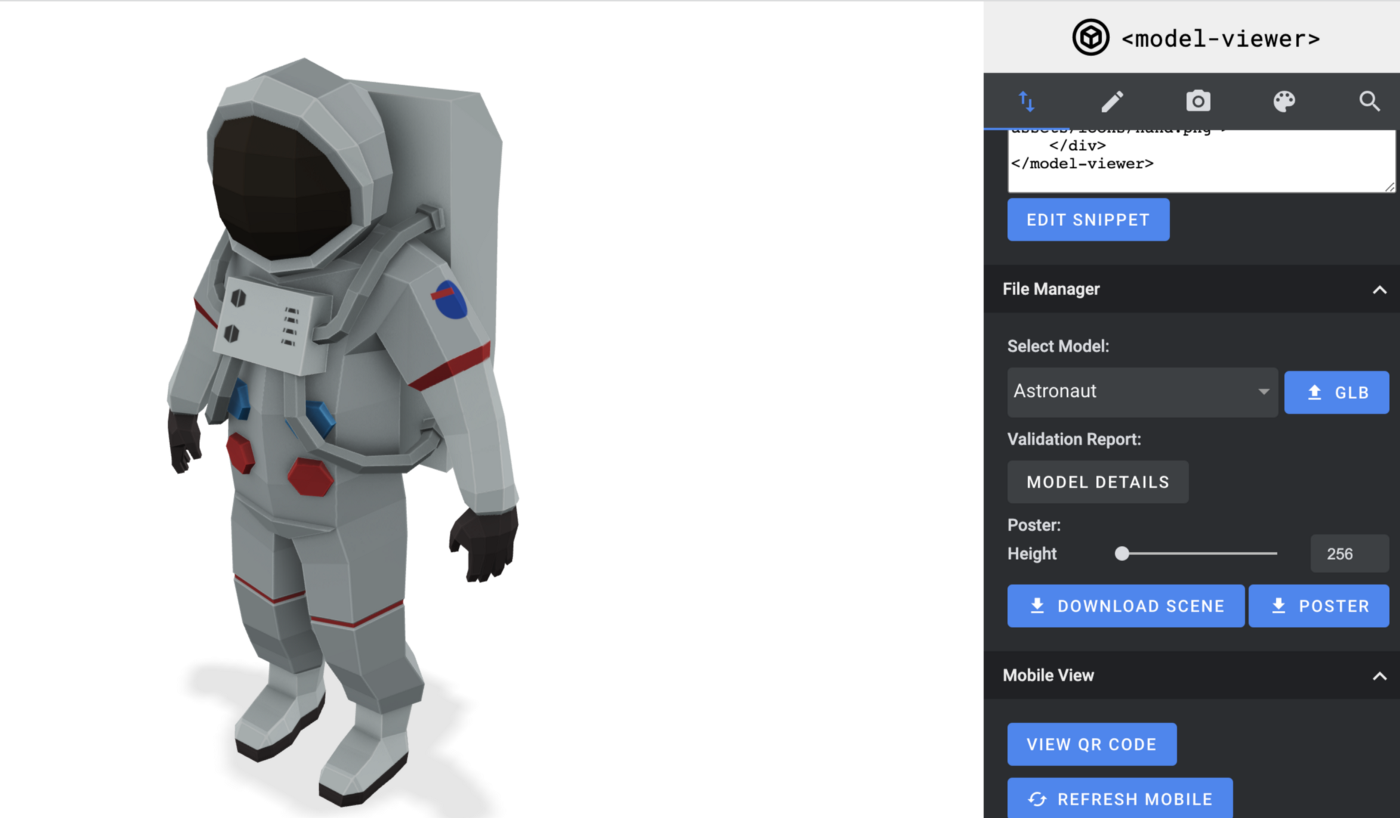
<model-viewer bounds="tight" src="Astronaut.glb" ar ar-modes="webxr scene-viewer quick-look" camera-controls environment-image="neutral" poster="poster.webp" shadow-intensity="1">
    <div class="progress-bar hide" slot="progress-bar">
        <div class="update-bar"></div>
    </div>
    <button slot="ar-button" id="ar-button">
        View in your space
    </button>
    <div id="ar-prompt">
        <img src="ar_hand_prompt.png">
    </div>
</model-viewer>
I just made the downloaded scene and made it public here, and you can browse the it as URL : https://thinkuldeep.com/modelviewer/ on your android phone browser. You can rotate the model, and if you click on “View in your space”, it will ask a camera permission and bring the model in your space. You can interact with it.
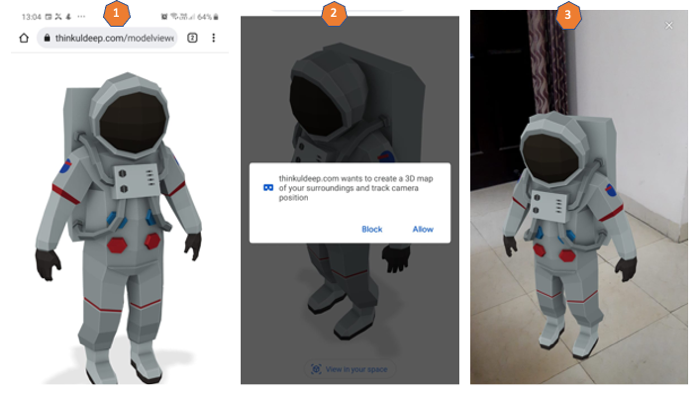
The whole experience would not take more than 5 minutes.
You may ask there does Scene Viewer come into picture? The above example usage embedded mode, and android browser interpret it in native Scene Viewer, based on what ar-modes provided on the HTML tag <model-viewer>.
Let’s explore other ways of using Scene Viewer in next section.
Launching Scene Viewer with a URL
We can open any android app or intent with the app using a mapped url, it is called deep-linking, or a direct url with intent scheme (intent://).
In the above example, we have published a 3D model Astronaut.glb, and here is the URL for launching Scene Viewer.
intent://arvr.google.com/scene-viewer/1.0?file=https://thinkuldeep.com/modelviewer/Astronaut.glb&mode=ar_only#Intent;scheme=https;package=com.google.ar.core;action=android.intent.action.VIEW;S.browser_fallback_url=https://developers.google.com/ar;end;
Let’s add a link to this URL on the same index.html page in above example.
<a href = “URL”> Lunch Directly in Scene Viewer </a>
Browse the URL https://thinkuldeep.com/modelviewer/ again, and you will see a link “Launch Directly in Scene Viewer” on the top, clicking on that would open Scene Viewer as described below. It asks to scan the space, and once it detects a plane, it will bring the 3D model in to the space.
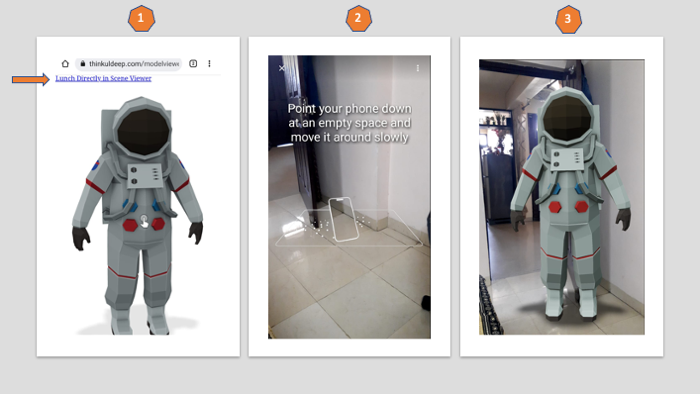
So to make it work we just need publicly accessible URL of the 3D model, that means we can experience for all our products in XR if their 3D model are available.
Building Custom Model Viewer
Google scene viewer is proprietary from google, we may not customize it beyond the configurability supported by Google. In this section, we will discuss some easy options for building a customer model viewer.
As described in last section, we can always open any app/intent from android browser with intent url. So for each model on our website, we can pass filepath as parameter in the intent URL, and respective linked app can intercept the filepath and load (or download if needed) the model as per their business requirement.
This way would work for the websites in our control, but what if that follows google’s scene viewer approach? we may not ask everyone for change their URLs as per our need.
Intercept the URL
Only way left is Android Webview, we need to intercept the url intent://arvr.google.com/scene-viewer, if we found it, then find the file parameter from url.
...
myWebView = new WebView(this);
myWebView.setWebViewClient(new WebViewClient() {
    public boolean shouldOverrideUrlLoading(WebView view, String url) {
        Uri uri = Uri.parse(url);
        if (url.startsWith("intent://arvr.google.com/scene-viewer")) {
            String filePath = uri.getQueryParameter("file");
            responseCallback.OnSuccess(filePath);
            return true;
        }
        view.loadUrl(url);
        return true;
    }
});
...
Detailed approach for intercepting URL is defined in this article. A responseCallback can take the filepath to the originating 3D app such as Unity.
Download the model
Once we get the path in Unity, we can download the model, and store it locally.
private IEnumerator GetFileRequest(string url, Action<UnityWebRequest> callback)
{
  filePath = Path.Combine(streamingAssetsPath, GetFileNameFromUrl(url));
  using UnityWebRequest request = UnityWebRequest.Get(url);
  request.downloadHandler = new DownloadHandlerFile(filePath);
  var operation = request.SendWebRequest();
  while (!operation.isDone)
  {
    yield return null;
  }

  callback(request);
}
Show the downloaded model
Once download is complete, initialize the model. We can use GLTFUtility as GLTF importer.
private void DownloadModel(string url)
{
  StartCoroutine(GetFileRequest(url, request =>
  {
    if (request.isNetworkError || request.isHttpError)
    {
      Debug.Log($"{request.error} :{request.downloadHandler.text}");
    }
    else
    {
      model = Importer.LoadFromFile(filePath);       model.transform.SetParent(parent); //set the parent
    }
  }));
}
This way we can view any 3D model implemented using google’s sceneviewer approach in our custom model viewer.
Conclusion
I have presented some easy ways to enabled your website with XR features such as “Try in your space”, I recommend to use the google suggested approach the first one. The second approach with custom model viewer need to be validated on security aspects, and there might be good options in future with OpenXR. I hope google will add more model in these approaches, and we will see very generic and open approaches to meet the need of Metaverse.
This article is originally published at Medium
#xr #ar #vr #unity #webxr #immersive-web #metaverse #google #android #spatial web #general #tutorial #technology