Enterprise XR - Interoperability
- 9 minutes read - 1741 wordsIn the previous article, we discussed implementing multi-factor authentication for an andorid application, and in the article we will cover another enterprise aspect, Interoperability.
Interoperability is key aspect when we build enterprise solutions using XR technologies. The enterprises have digital assets in form of mobile apps, libraries, system APIs, and they can’t just throw away these existing investments, in fact, the XR apps must be implemented in such a way that it is interoperable with them seamlessly. This article describes interoperability between XR apps and other native apps. It takes Unity as the XR app development platform and explains how a Unity-based app can be interoperable with the existing Java-based android libraries.
Read the below article by Raju Kandaswamy, it describes steps to integrate the XR app built using Unity into any android app.
Embedding Unity App inside Native Android application While unity provides android build out of the box, there are scenarios where we would like to do a part unity and part… medium.com
The article below describes interoperability in the opposite of what Raju has described, we will try to integrate an existing Android Library into the Unity-based XR App.
Build an Android Library
In the last article, we have implemented a user authenticator. Let’s now expose a simple user authenticator implementation as an android library.
-
goto
File > New > New Module > Select Android Library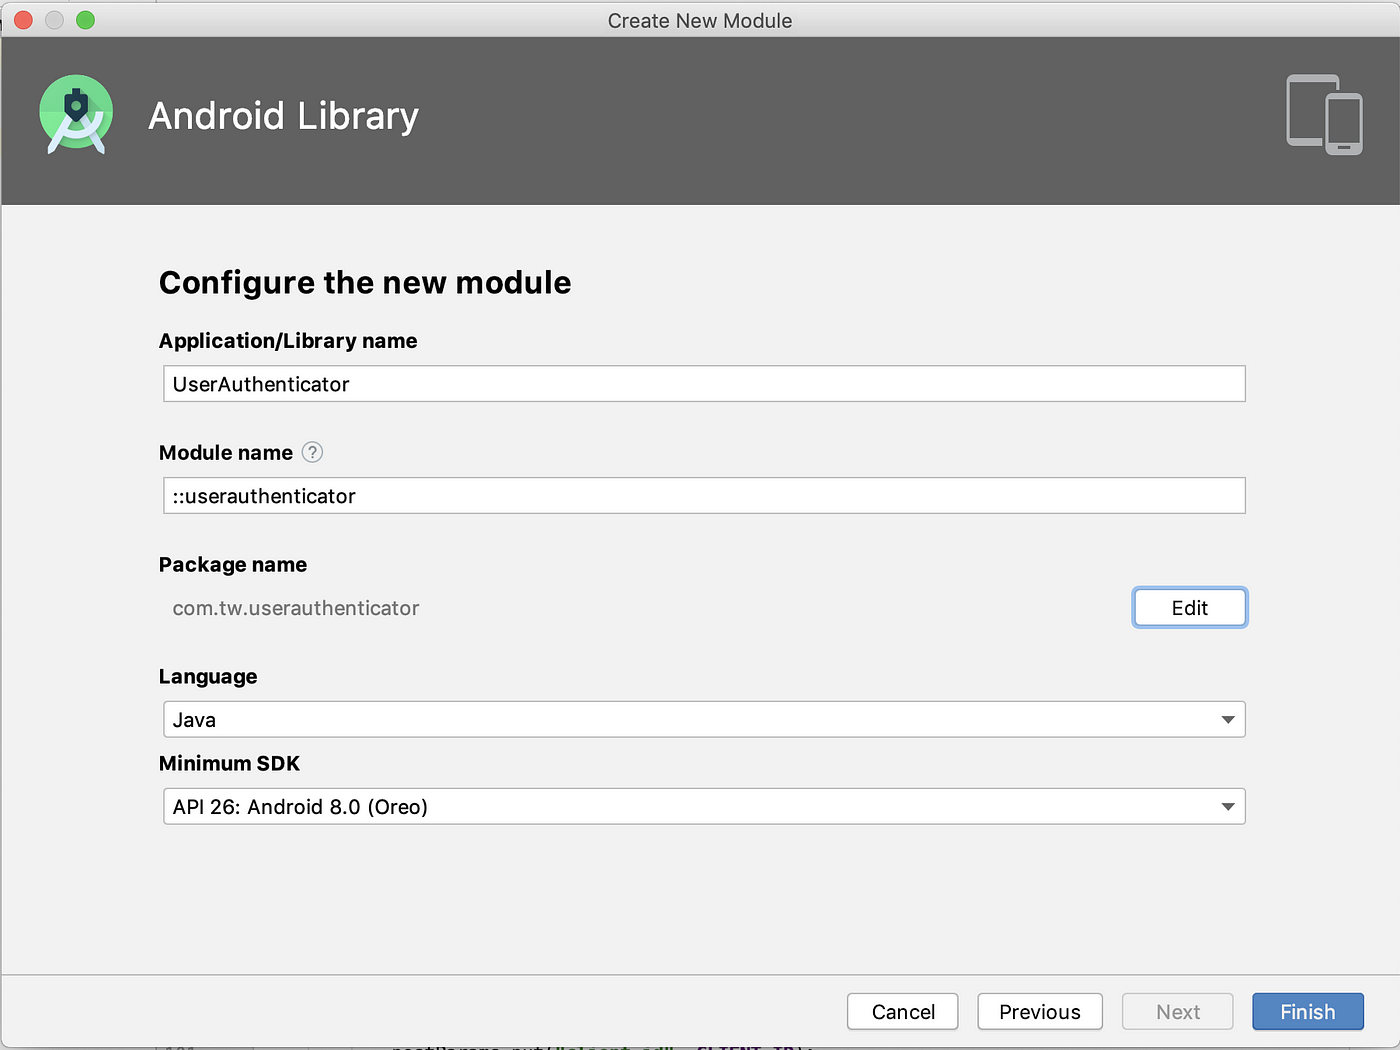
-
Implement a UserAuthenticator with simple authentication logic. Each method is accepting an argument context, but currently, it is not being used so you may ignore it for now.
public class UserAuthenticator {
    private static UserAuthenticator instance = new UserAuthenticator();
    private String loggedInUserName;
    private UserAuthenticator(){ }
    public static UserAuthenticator getInstance(){
        return instance;
    }
    public String login(String name, Context context){
       if(loggedInUserName == null || loggedInUserName.isEmpty()){
           loggedInUserName = name;
           return name + " Logged-In successfully ";
       }
       return "A user is already logged in";
    }
    public String logout(Context context){
        if(loggedInUserName != null && !loggedInUserName.isEmpty()){
            loggedInUserName = "";
            return "Logged-Out successfully ";
        }
        return "No user is logged in!";
    }
    public String getLoggedInUser(Context context){
        return loggedInUserName;
    }
}
- Go to
Build > Make Module “userauthenticator”— It will generate aar file. underbuild/outputs/aar
This is the library that can be integrated with Unity in C#. The next section describes how it can be used in Unity.
Build an XR app in Unity
Let’s now build the XR app in unity to access the API exposed by the android library implemented in the last step. Unity refers to the external libraries as a plugin.
-
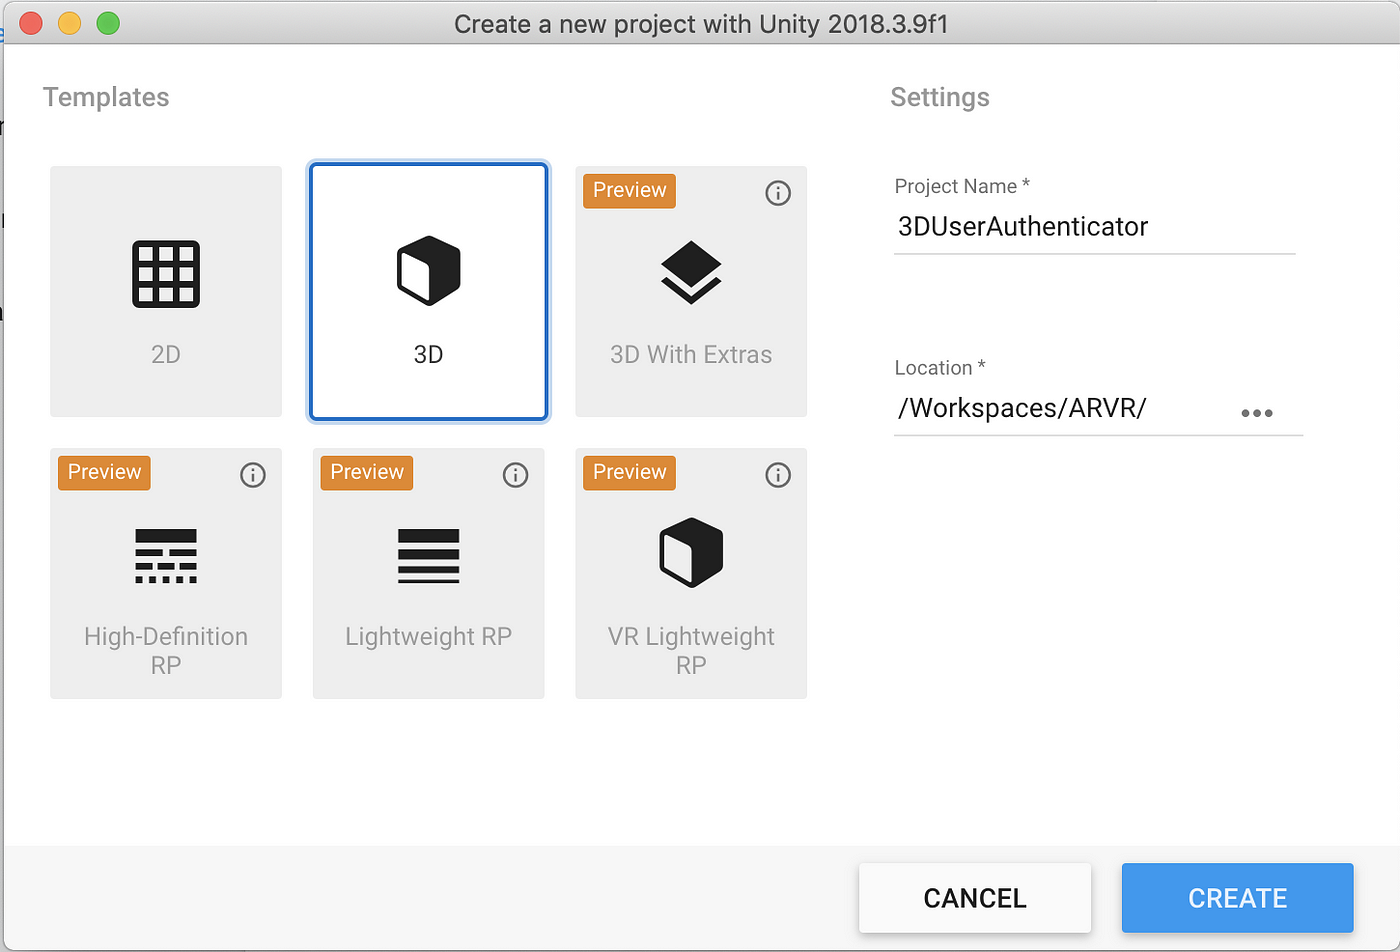
Create unity project
-
We have 3 APIs in
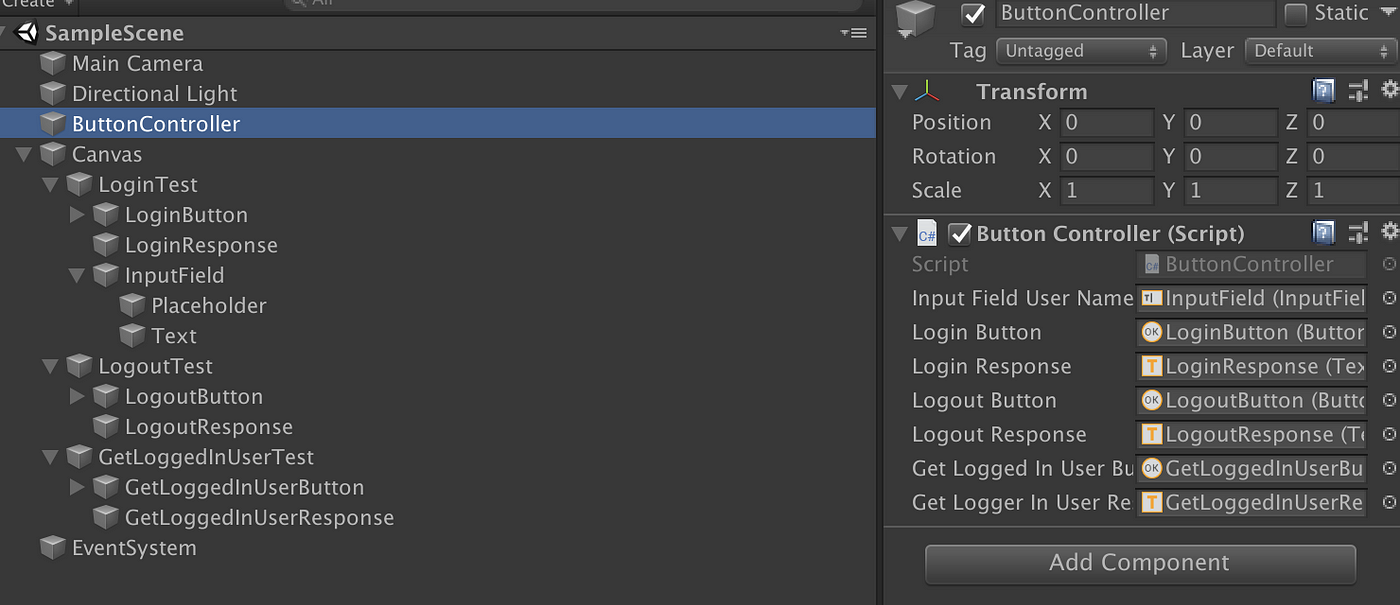
UserAuthenticatorof the android library, let’s build a 3D UI layout with buttons, text elements. as follows. The source code is shared at the end of the article.
-
Add a script
ButtonController. This script describes the ways to access java classes.`UnityEngine.AndroidJavaClass` - Load a given class in Unity, using reflection we may invoke any static method of the class. `UnityEngine.AndroidJavaObject` - Keep the java object and automatically dispose of it once it's done. Using reflection we can invoke any method of the object.
public class ButtonController : MonoBehaviour
{
    private AndroidJavaObject _userAuthenticator;
...
    void Start()
    {
        AndroidJavaClass userAuthenticatorClass = new AndroidJavaClass("com.tw.userauthenticator.UserAuthenticator");
        _userAuthenticator = userAuthenticatorClass.CallStatic<AndroidJavaObject>("getInstance");
        loginButton.onClick.AddListener(OnLoginClicked);
        logoutButton.onClick.AddListener(OnLogoutClicked);
        getLoggedInUserButton.onClick.AddListener( OnGetLoggedUserClicked);
    }
    private void OnLoginClicked()
    {
        loginResponse.text = _userAuthenticator.Call<string>("login", inputFieldUserName.text, getUnityContext());
    }
    private void OnLogoutClicked()
    {
        logoutResponse.text = _userAuthenticator.Call<string>("logout", getUnityContext());
    }
    private void OnGetLoggedUserClicked()
    {
        getLoggerInUserResponse.text = _userAuthenticator.Call<string>("getLoggedInUser", getUnityContext());
    }
    private AndroidJavaObject getUnityContext()
    {
        AndroidJavaClass unityClass = new AndroidJavaClass("com.unity3d.player.UnityPlayer");
        AndroidJavaObject unityActivity = unityClass.GetStatic<AndroidJavaObject>("currentActivity");
        return unityActivity;
    }
}
-
Attached the ButtonController script to an empty game object. Link all the buttons, texts, and input field components.
-
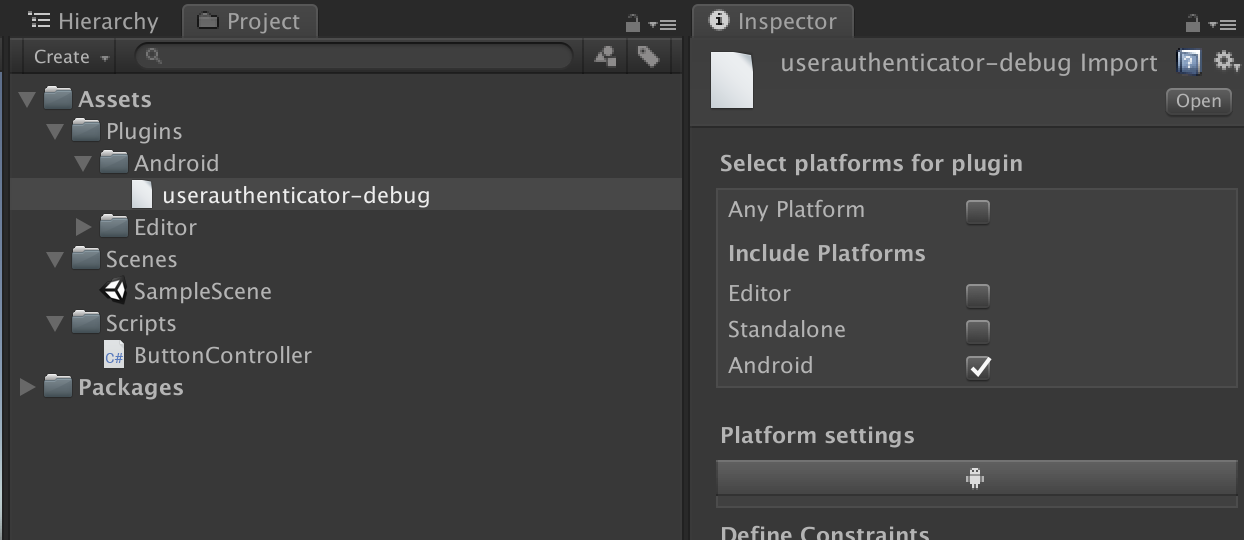
Copy the android library in /Assets/Plugins/Android folder.
-
Switch to Android as a Platform if not already done. — Go to
File > Build Settings > Select Android as a Platform > Click of Switch Platform. -
Update the player settings — Go to
File > Build Settings > Player Settingscorrect the package name and min API level in “Other Settings” -
Connect your android device, and click on Build and Run. or export the project and test it in Android studio.
Here is a demo. Type in the user name, and click on login, it will call the Android API from the library and show the value returned by the library in the text next to the button.
Save way button works, test the logic you have written in the library.

With this, we are done with basic integration. The next section describes an approach with callback methods.
Integration using Callbacks.
Callbacks are important, as the android system may not be always running result synchronously, there are multiple event and listeners which works on callbacks.
- Let’s implement a callback interface in the android library.
public interface IResponseCallBack {
    void OnSuccess(String result);
    void OnFailure(String erorrmessage);
}
- Update the UserAuthenticator implementation to call the OnSuccess and OnFailure Callbacks.
public class UserAuthenticator {
...
public void login(String name, IResponseCallBack callBack, Context context){
   if(loggedInUserName == null || loggedInUserName.isEmpty()){
       loggedInUserName = name;
       callBack.OnSuccess (loggedInUserName + " Logged-In successfully ");
   } else {
       callBack.OnFailure("A user is already logged in");
   }
}
public void logout(IResponseCallBack callBack, Context context){
    if(loggedInUserName != null && !loggedInUserName.isEmpty()){
        loggedInUserName = "";
        callBack.OnSuccess ("Logged-Out successfully ");
    } else {
        callBack.OnFailure("No user is logged in!");
    }
}
...
}
- Build the Android library again and replace it in Unity project Assets/Plugins/Android
- Update corresponding in
ButtonControllerof Unity. Implement the Java interface usingUnityEngine.AndroidJavaProxy.
private AuthResponseCallback _loginCallback;
private AuthResponseCallback _logoutCallback;
void Start()
{
   ...
    _loginCallback = new AuthResponseCallback(loginResponse);
    _logoutCallback = new AuthResponseCallback(logoutResponse);
}

private class AuthResponseCallback : AndroidJavaProxy
{
    private Text _reponseText;
    public AuthResponseCallback(Text _reponseText) : base("com.tw.userauthenticator.IResponseCallBack") { }
    void OnSuccess(string result)
    {
        _reponseText.text = result;
        _reponseText.color = Color.black;
    }
    void OnFailure(string errorMessage)
    {
        _reponseText.text = errorMessage;
        _reponseText.color = Color.red;
    }
}
private void OnLoginClicked()
{
    _userAuthenticator.Call("login", _loginCallback, inputFieldUserName.text, getUnityContext());
}
private void OnLogoutClicked()
{
   _userAuthenticator.Call("logout", _logoutCallback, getUnityContext());
}
here is the demo to show the failure response in red color.
The response callback implementation sets the color in the text fields.
Code Branch till this point is added here — Android Library, Unity App

In the next section, we will discuss more complex integration with native components and intents.
Single Sign-On Integration using device native WebView
In this section, we will integrate the android’s web view with the unity app, and also see invocation using Intents.
Refactor Android Library
Let’s refactor the android app we have implemented the last article, and use it as a library. Also, learn to pass the arguments to Intent and gets the response from it.
- Wrap the WebView invocation in an activity — It takes URL, returnURI as input. It intercepts the returnURI and parse the “code” from it and returns in a ResultReceiver callback.
public class WebViewActivity extends AppCompatActivity {
    ...
    @Override
    protected void onCreate(Bundle savedInstanceState) {
        super.onCreate(savedInstanceState);
        final String interceptScheme = getIntent().getStringExtra(INTENT_INPUT_INTERCEPT_SCHEME);
        final String url = getIntent().getStringExtra(INTENT_INPUT_URL);
        webView = new WebView(this);

        webView.setWebViewClient(new WebViewClient() {
            public boolean shouldOverrideUrlLoading(WebView view, String url) {
                Uri uri = Uri.parse(url);
                if (interceptScheme !=null && interceptScheme.equalsIgnoreCase(uri.getScheme() +"://" +uri.getHost())) {
                    String code = uri.getQueryParameter("code");

                    ResultReceiver resultReceiver = getIntent().getParcelableExtra(INTENT_RESPONSE_CALLBACK);
                    if(resultReceiver!=null) {
                        Bundle bundle = new Bundle();
                        bundle.putString("code", code);
                        resultReceiver.send(INTENT_RESULT_CODE, bundle);
                   }
                    finish();
                    return true;
                }
                view.loadUrl(url);
                return true;
            }
        });
        WebSettings settings = webView.getSettings();
        settings.setJavaScriptEnabled(true);
        setContentView(webView);
        webView.loadUrl(url);
    }
    ...
}
- User Authenticators Login method invokes the web-view activity with an SSO URL, and callback.
public void login(IResponseCallBack callBack, Context context){
   if(accessToken == null || accessToken.isEmpty()){
       Intent intent = new Intent(context, WebViewActivity.class);
      intent.putExtra(WebViewActivity.INTENT_INPUT_INTERCEPT_SCHEME,
       HttpAuth.REDIRECT_URI);
       intent.putExtra(WebViewActivity.INTENT_INPUT_URL,
       HttpAuth.AD_AUTH_URL);
       intent.putExtra(WebViewActivity.INTENT_RESPONSE_CALLBACK, new
       CustomReceiver(callBack));
       context.startActivity(intent);
   } else {
       callBack.OnFailure("A user is already signed in");
   }
}
CustomReceiver.OnReceivedResultgets an access_token using thecodereturned by the web-view activity.access_tokenis then saved in theUserAuthenticator.
public class CustomReceiver extends ResultReceiver{
    private  IResponseCallBack callBack;
    CustomReceiver(IResponseCallBack responseCallBack){
        super(null);
        callBack = responseCallBack;
    }
    @Override
    protected void onReceiveResult(int resultCode, Bundle resultData) {
        if(WebViewActivity.INTENT_RESULT_CODE == resultCode){
            String code = resultData.getString(INTENT_RESULT_PARAM_NAME);
            AsyncTask<String, Void, String> getToken = new GetTokenAsyncTask(callBack);
            getToken.execute(code);
        } else {
            callBack.OnFailure("Not a valid code");
        }
    }
}
- The
access_tokenis used in getting the user name from the Azure Graph API. This completes the refactoring. The source code is attached at the end.
public void getUser(IResponseCallBack callBack){
    if(loggedInUserName == null || loggedInUserName.isEmpty()){
        if(accessToken != null && !accessToken.isEmpty()){
      try {
     new GetProfileAsyncTask(callBack).execute(accessToken).get();
            } catch (Exception e) {
                callBack.OnFailure("Failure:" + e.getMessage());
            }
        } else {
            callBack.OnFailure("No active user!");
        }
    } else {
        callBack.OnSuccess(loggedInUserName);
    }
}
All the HTTP communications are wrapped in a utility class HttpAuth, this completes the refactoring of the android library. Since we have added a new activity don’t forget to add it in the android manifest.
Unity App Invoking Native WebView in Android Libary
This example is now doing SSO with the organization’s active directory (AD), the username and password will be accepted at the organization’s AD page.
-
Let’s change the layout a bit. We don’t need an input field now.

-
There is no major change in
ButtonContoller, expect the signature change for the library APIs. Now android handles the intent in a separate thread, and callback in unity may not access the game object elements as they may be disabled when another activity spawned on. Status of unity element may be checked in the main thread. The callbacks now updating few helper variables and the update method updates the unity elements in main there whenever there is any change in the state.
 private void Update()
{
    //set text and color for response lables
}
private class AuthResponseCallback : AndroidJavaProxy
{
    private int index;

    public AuthResponseCallback(int index) : base("com.tw.userauthenticator.IResponseCallBack")
    {
        this.index = index;
    }
    void OnSuccess(string result)
    {
        labels[index] = result;
        colors[index] = Color.black;
    }
    void OnFailure(string errorMessage)
    {
        labels[index] = errorMessage;
        colors[index] = Color.red;
    }
}
- Since the Android library now have an Activity, and it requires a dependency
“androidx.appcompat:appcompat:1.1.0”in Gradle build. We need to use a custom Gradle template in Unity, Go toFile > Build Settings > Player Settings > Publishing Settings. ChooseCustom Gradle Template. It will generate a template file in Plugins. Add the following dependency in the Gradle template. Make sure don’t change
 **DEPS** Build/Export the project and run on Android. You have completed the native integration. Here is a demo of integrated SSO in Unity.
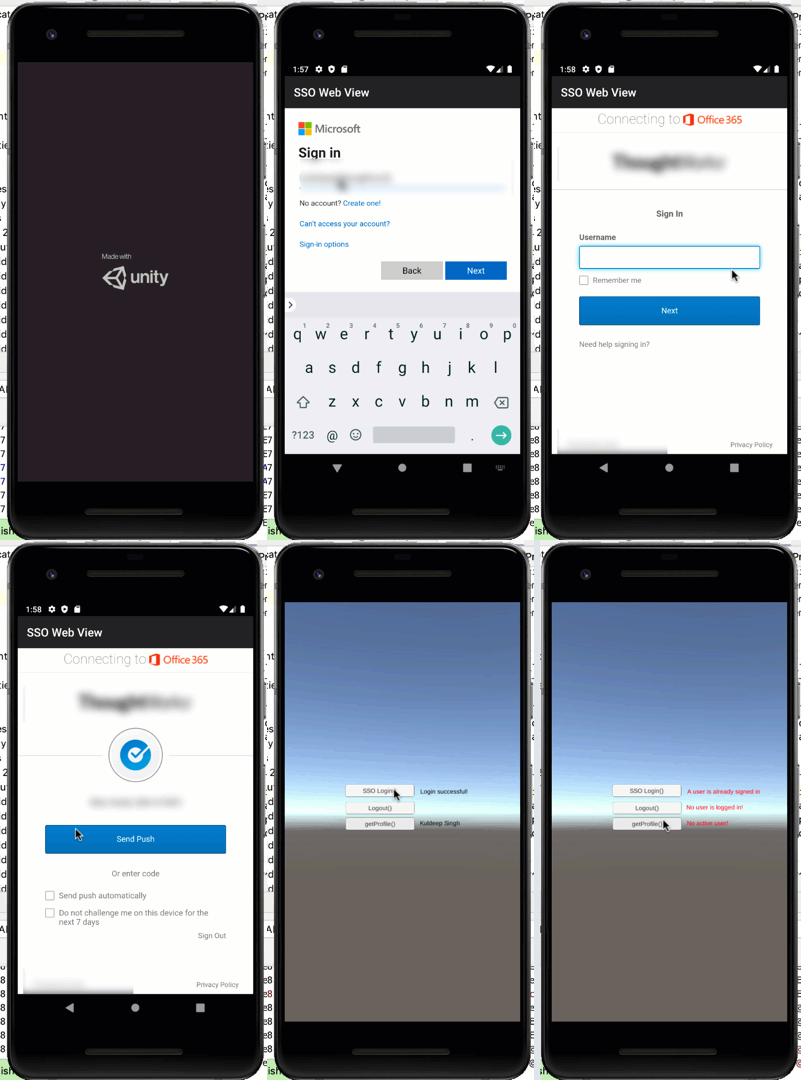
Source code can be found at following git repo — Android Library, Unity App
Conclusion
This article describes the basics of interoperability between XR apps and android native libraries. In the next article, we will how to share the user context across XR apps.
This article was original published on XR Practices Publication
#xr #ar #vr #mr #integration #enterprise #android #unity #tutorial #technology