Run a 2D App in XR Container
- 13 minutes read - 2592 wordsThere are a number of Enterprise XR use cases where we have a need to open the existing 2D apps in the XR devices in a wrapper app, and this article covers a concept, have a look!
After trying the OS level customization on an XR device, you may like to run your XR apps as a system app. Here is a simple article by Raju K
Android System Apps development - Android Emulator Setup and guidelines to develop system applications
Now, you may also want to open existing applications in an XR container, and that’s where the XR container app must be a system app and the above article will help you there, however, this article is about building the XR container itself to open existing Android Activity in an XR container and interact with it.
This article covers building a XR container app using Unity, and ARCore, which renders an activity of another android app, in 3D space.
3D Container Dev Environment Setup
Create a Unity Project
-
If you are new to Unity then follow this simple article by Neelarghya
-
Download and setup XR project using AR Core — the google guidelines,
-
Import the ARCore SDK package into Unity.
-
Remove the main camera, light, and the add prefabs “
ARCore Device” and “Environment Light” available in ARCore SDK. -
Create a Cube and scale it such that it looks like a panel. This is where we would see the android activity.
-
Create a material with add to Cube, and set shader “
Unlit/Texture”, may choose some default image.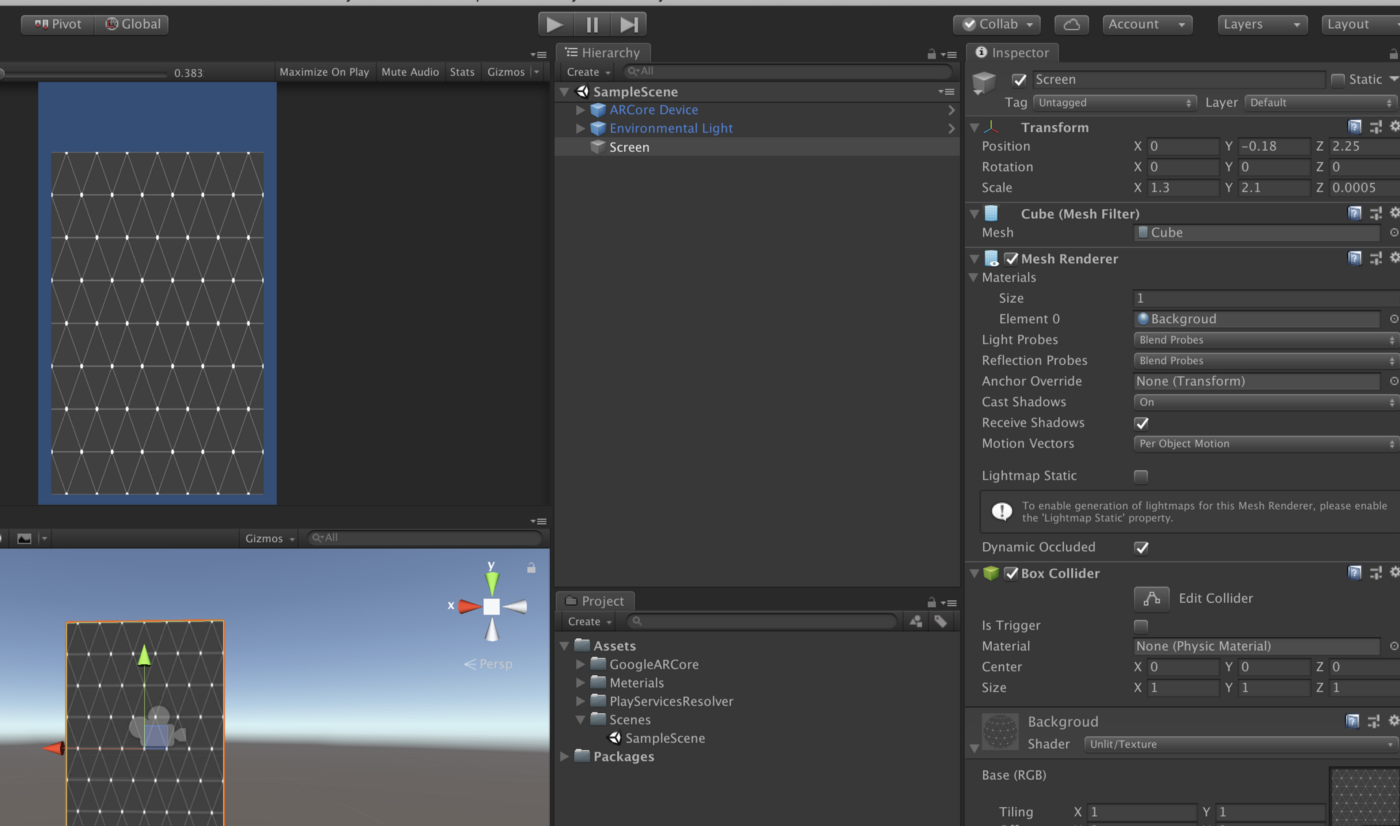
-
Go to File > Build and Settings
-
Switch Build target to Android
-
Change the Player Settings > Other Settings — package name, minimum SDK version 21.
-
Select
ARCore SupportedinXR Settings -
Check export and export the project. It will export the project as an android project at a path say —
EXPORT_PATH
Create an Android Project
- Open Android Studio and create an empty project.
- Create a module in it as a Library

Implement a 2D Wrapper
Copy the Unity Generated Unity Activity
-
Go to Android Studio.
-
Copy
EXPORT_PATH/src/main/java/com/tk/threed/container/UnityPlayerActivity.java— ->AndroidLibrary/main/java/com/tk/activitywrapperlibrary/UnityPlayerActivity.java -
Copy
EXPORT_PATH/libs/unity-classes.jartoLibrary/libs -
File > Sync Project and Gradle Files — this should fix all the errors in
UnityPlayerActivity. -
Now let the
UnityPlayerActivityextend fromActivityGroupinsteadActivity, I know it is deprecated, there are other ways in the latest Android API using fragments, etc, but let’s go with it until I try other ways. Don’t change anything else in this class.public class UnityPlayerActivity extends ActivityGroup { protected UnityPlayer mUnityPlayer; // don't change the name of this variable; referenced from native code // Setup activity layout @Override protected void onCreate(Bundle savedInstanceState) { requestWindowFeature(Window.FEATURE_NO_TITLE); super.onCreate(savedInstanceState); mUnityPlayer = new UnityPlayer(this); setContentView(mUnityPlayer); mUnityPlayer.requestFocus(); } ... }
Implement an App Container
The app container loads the given activity as a view in a given ActivityGroup. It gets initialized with an instance of an Activity Group.
public class AppContainer {
  private static AppContainer instance;
  private ActivityGroup context;
  private AppContainer(ActivityGroup context){
    this.context = context;
  }
  public static synchronized AppContainer
     createInstance(ActivityGroup context) {
       if(instance == null){
         instance = new AppContainer(context);
       }
     return instance;
  }
  public static AppContainer getInstance() {
    return instance;
 }
...
}
-
Add a method to start a given activity by a
LocalActivityManagerand add it to the activity group. It runs in the UI thread, and avoid certain exceptions (not listing them here)public void addActivityView(final Class activityClass, final int viewportWidth, final int viewportHeight){ context.runOnUiThread(new Runnable() { @Override public void run() { Intent intent = new Intent(context, activityClass); LocalActivityManager mgr = context.getLocalActivityManager(); Window w = mgr.startActivity("MyIntentID", intent); activityView = w != null ? w.getDecorView() : null; activityView.requestFocus(); addActivityToLayout(context, viewportWidth, viewportHeight); } }); } -
Add the activity to Layout — this will add the activity to a lower layer so it is not visible in the foreground.
private void addActivityToLayout(Activity context, int viewPortWidth, int viewPortHeight) {
  Rect rect = new Rect(0, 0, viewPortWidth, viewPortHeight);
  FrameLayout.LayoutParams layoutParams = new FrameLayout.LayoutParams(rect.width(), rect.height());
  layoutParams.setMargins(rect.left, rect.top, 0, 0);
  activityView.setLayoutParams(layoutParams);
  activityView.measure(viewPortWidth, viewPortHeight);
  ViewGroup viewGroup = (ViewGroup) context.getWindow().getDecorView().getRootView();
  viewGroup.setFocusable(true);
  viewGroup.setFocusableInTouchMode(true);
  initBitmapBuffer(viewPortWidth, viewPortHeight);
  viewGroup.addView(activityView, 0); //Add at lower layer
}
What? are you serious, if this is not visible in the foreground, how would you see it. Well, we will render the bitmap of this activity view. Remember the screen we created in Unity, we will render this bitmap there, wait and watch!
-
Let’s initialize a bitmap as follows
private Bitmap bitmap;
private Canvas canvas;
private ByteBuffer buffer;
private void initBitmapBuffer(int viewPortWidth, int viewPortHeight) {
  bitmap = Bitmap.createBitmap(viewPortWidth, viewPortHeight, Bitmap.Config.ARGB_8888);
  canvas = new Canvas(bitmap);
  buffer = ByteBuffer.allocate(bitmap.getByteCount());
}
Now the buffer is ready and ready to be consumed. let’s expose a consumption method.
-
Render the texture — Here comes the magic method which renders a given native texture pointer using OpenGL (Don’t ask me details, some help from here). It draws the activity views on a canvas (which has bitmap) and then copies the bitmap’s pixel to the buffer, then it magically writes the row pixel data against the native texture pointer.
public void renderTexture(final int texturePointer) {
  byte[] imageBuffer;
  imageBuffer = getOutputBuffer();
  if (imageBuffer.length > 1) {
    Log.d("d", "render texture");
    //activityView.requestFocus();
    GLES20.glBindTexture(GLES20.GL_TEXTURE_2D, texturePointer);

    GLES20.glTexSubImage2D(GLES20.GL_TEXTURE_2D, 0, 0, 0, activityView.getWidth(),
      activityView.getHeight(), GLES20.GL_RGBA, GLES20.GL_UNSIGNED_BYTE,
      ByteBuffer.wrap(imageBuffer));
  }
}

private byte[] getOutputBuffer() {
  if (canvas != null ) {
    try {
      canvas.drawColor(0, PorterDuff.Mode.CLEAR);
      activityView.draw(canvas);
      bitmap.copyPixelsToBuffer(buffer);
      buffer.rewind();
      return buffer.array();
    }catch (Exception e){
      Log.w("AppContainer", "getOutputBuffer", e);
      return new byte[0];
    }
  } else {
    return new byte[0];
  }
}
Using The App Container
Add just line at the end of UnityPlayerActivity.OnCreate method, and initialize the app container. No more changes here.
@Override protected void onCreate(Bundle savedInstanceState)
{
...
    AppContainer.createInstance(this);
}`
Ok, enough of Java, let’s get back to Unity. A 3D screen is waiting to consume the texture.
Using ActivityWrapper Library
Before we go, let’s build this library, so that it can be included in Unity Project.
-
Go to Build > Make
activitywrapperlibrary -
Copy the library (AAR) from “
activitywrapperlibrary/build/outputs/aar/activitywrapperlibrary-debug.aar” to “Unity Project/Assets/Plugins/Android” -
Add an android manifest file coping from earlier exported path
EXPORT_PATH/src/main, make the following changes. -
Change the name of the main Activity to the activity we defined as the wrapper.
...
<application tools:replace="android:icon,android:theme,android:allowBackup "android:theme="@style/UnityThemeSelector"

...
<activity android:label="@string/app_name"
          android:screenOrientation="fullSensor"
....
android:name="com.tk.activitywrapperlibrary.UnityPlayerActivity" >
    <intent-filter>
      <action android:name="android.intent.action.MAIN" />
      <category android:name="android.intent.category.LAUNCHER" />
      <category android:name="android.intent.category.LEANBACK_LAUNCHER" />
    </intent-filter>
    <meta-data android:name="unityplayer.UnityActivity" android:value="true" />
  </activity>
  <meta-data android:name="unity.build-id" android:value="d92db379-0eb8-4355-a322-0ba760976bb7" />
  <meta-data android:name="unity.splash-mode" android:value="0" />
  <meta-data android:name="unity.splash-enable" android:value="True" />

...
</application>
Now, this newly implemented activity will act as a Main Player Activity and on the start of the unity app, it will start the app container.
But when you try to run this, you will see multiple Manifest merger conflicts, use User the “
tools: replace” at the<application>as well as<activity>level wherever it is required. You can always see merge conflicts in the Android Manifest Viewer of Android Studio.
Other issues will be related to
unity-classes.jarwhich somehow gets packages in the generated library as well as supplied by Unity itself. You need one copy,Somehow “
provided” and “compileOnly” wasn’t working for me while generating library, so I did a quick workaround, please find some better solution for it. I have to excludeunity-classes.jarfrom the main Gradle file of unity project, here is a way to do that. -
Go to File > Build Settings> Player Settings > Publishing Settings > Check on Custom Gradle Template
-
It should generate a file
mainTemplate.gradle, edit the file and add exclude in dependencies in dependencies section as follows... **APPLY_PLUGINS** dependencies { implementation fileTree(dir: 'libs', include: ['*.jar'], excludes: ['unity-classes.jar']) **DEPS**} ...This should fix the build issues in unity. Enough now, we haven’t yet build any 3D activity loader, let’s jump there.
Implement XR Activity Loader
Let’s add more components in the scene, label, and a Load button in Unity.
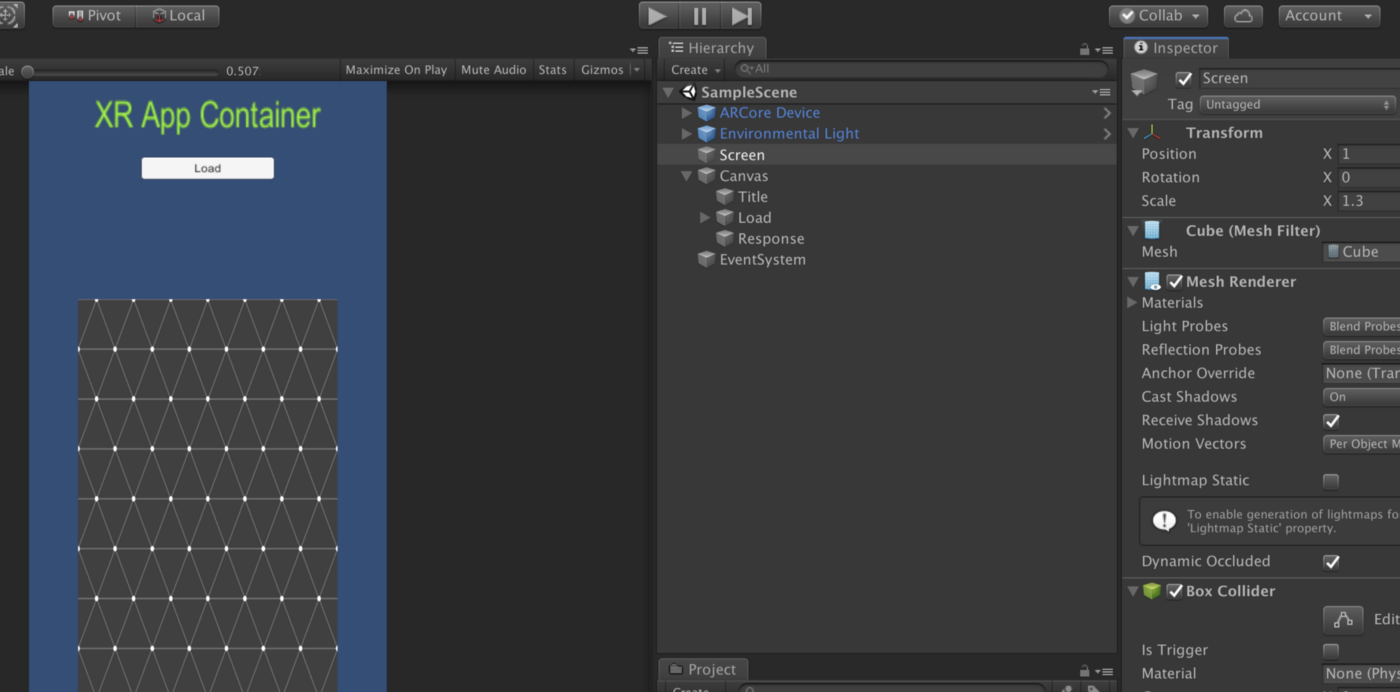
Render the Activity in a 3D Screen
Let’s create a script to render the activity on the screen.
-
Script with the name of the activity class, and height, width as input
public class ActivityLoader : MonoBehaviour { public string activityClassName; public Button load; public Text response; public int width = 1080; public int height = 1920; private AndroidJavaObject m_AppContainer; private IntPtr m_NativeTexturePointer; private Renderer m_Renderer; private Texture2D m_ImageTexture2D; private void Start() { m_Renderer = GetComponent<Renderer>(); load.onClick.AddListener(OnLoad); m_ImageTexture2D = new Texture2D(width, height, TextureFormat.ARGB32, false) {filterMode = FilterMode.Point}; m_ImageTexture2D.Apply(); } ... } -
On clicking the load button, it should load the given activity class. By this time the AppContainer must be initialized, and let’s call it to load the activity in a view.
private void OnLoad() { if (activityClassName != null) { response.text = "Loading " + activityClassName; AndroidJavaClass activityClass = new AndroidJavaClass(activityClassName); AndroidJavaClass appContainerClass = new AndroidJavaClass("com.tk.activitywrapperlibrary.AppContainer"); m_AppContainer = appContainerClass.CallStatic<AndroidJavaObject>("getInstance"); m_AppContainer.Call("addActivityView", activityClass, width, height); m_Renderer.material.mainTexture = m_ImageTexture2D; Debug.LogWarning("Rendering starts"); StartCoroutine(RenderTexture(m_ImageTexture2D.GetNativeTexturePtr())); } else { response.text = "No package found"; } } -
Load the texture, call the magic method now in a coroutine, and keep calling it. I know it’s not optimal, but lets first make it work then we will discuss multiple methods of optimizations.
private IEnumerator RenderTexture(IntPtr nativePointer) { yield return new WaitForEndOfFrame(); while (true) { m_AppContainer.Call("renderTexture", nativePointer.ToInt32()); yield return new WaitForEndOfFrame(); yield return new WaitForEndOfFrame(); yield return new WaitForEndOfFrame(); } } -
Add this script to
ScreenGameObject. Assign button, response. -
What to give in Activity Class Name. Oh! we haven’t created any app activity yet which we want to render here. Let’s do that first.
The 2D App
Let’s build a 2D app that we want to render in the unity 3D container. Go back to the Android Studio, Choose Login Activity while project creation.
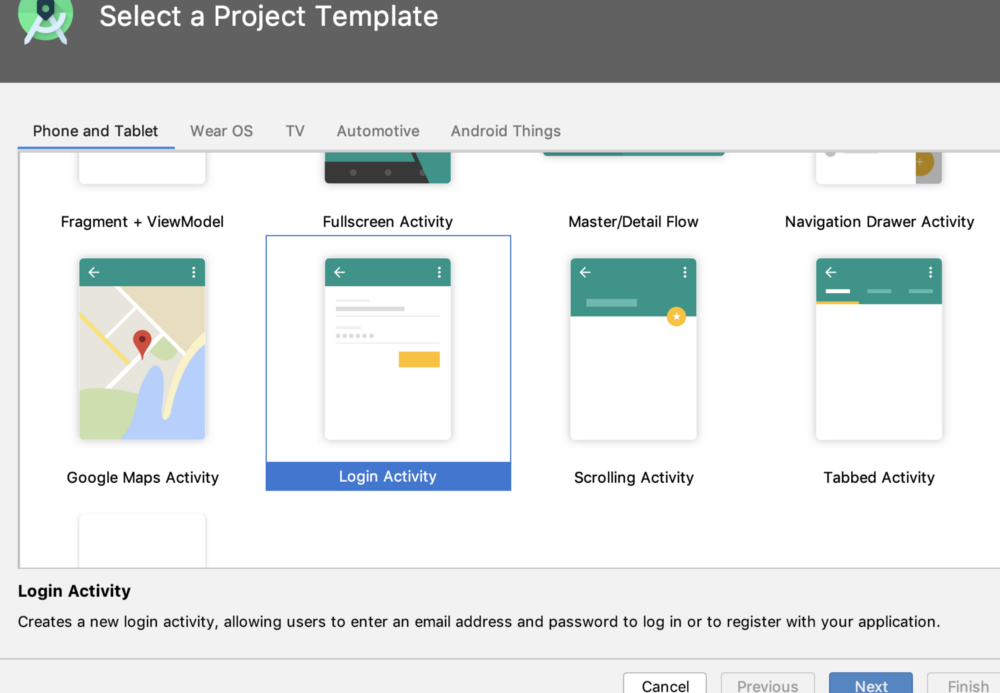
It generates a full login app and input fields and so.
Try to run this app. Just make and deploy to the phone or emulator. and see how it runs.
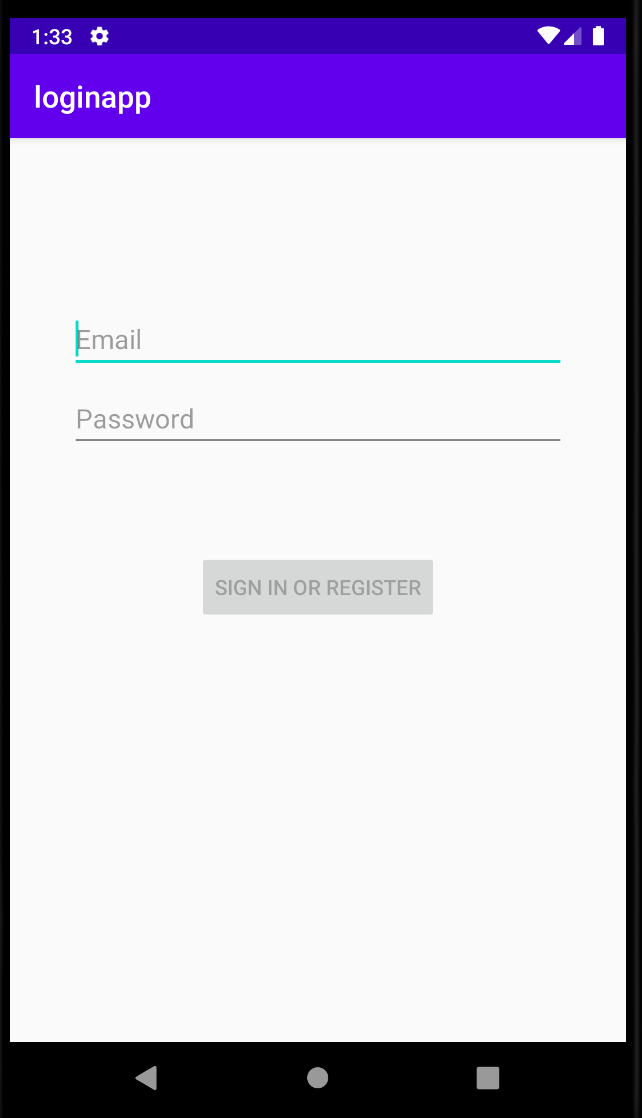
Now we can open this activity from another app if we build our container app as a system app. Ref to article Or we can include this app in Unity as a library. Let’s go with this.
Build it as a Library
To include this app in Unity, we need to build it as a library.
Follow the steps.
-
Open
build.gradleand changeapply plugin: ‘com.android.application’toapply plugin: ‘com.android.library’ -
Remove
applicationId “com.tk.loginapp”fromdefaultConfig -
Update the Android Manifest as follows — remove the intent filters
<?xml version="1.0" encoding="utf-8"?> <manifest xmlns:android="http://schemas.android.com/apk/res/android" package="com.tk.loginapp"> <application android:allowBackup="true" android:icon="@mipmap/ic_launcher" android:label="@string/app_name" android:roundIcon="@mipmap/ic_launcher_round" android:supportsRtl="true" android:theme="@style/AppTheme"> <activity android:name=".ui.login.LoginActivity" android:label="@string/app_name"> </activity> </application> </manifest> -
Click on Sync Now
-
Go to Build > Make module ‘app’
-
It will generate AAR in
app/build/outputs/aar/app-debug.aar
Using the 2D App library in Unity
-
Follow the same steps as earlier, copy the AAR to
Unity Project/Assets/Plugins/Android -
Open file
mainTemplate.gradle, edit the file and copy all the dependencies entries from 2D apps Gradle file and paste in dependencies section as follows... **APPLY_PLUGINS** dependencies { implementation fileTree(dir: 'libs', include: ['*.jar'], excludes: ['unity-classes.jar']) implementation 'androidx.appcompat:appcompat:1.1.0' implementation 'com.google.android.material:material:1.1.0' implementation 'androidx.annotation:annotation:1.1.0' implementation 'androidx.constraintlayout:constraintlayout:1.1.3' implementation 'androidx.lifecycle:lifecycle-extensions:2.2.0' **DEPS**} ... -
Now, the 2D app is fully available in Unity.
-
Let’s define the activity in
/Assets/Plungs/Android/AndroidManifest.xmlIt is better to redefine the activities as per the available themes which we are going to render in 3D.<activity tools:replace="android:theme" android:name="com.tk.loginapp.ui.login.LoginActivity" android:theme="@style/Theme.AppCompat.Light"/> -
If you still run into
InflateExceptionswhile running the app, then follow the article below by Raju K
The InflateException of Death - AppCompat Library woes in Android
Running a 2D Activity in XR Container
So, the time has come to know the class name of the activity, here it is “com.tk.loginapp.ui.login.LoginActivity”.
-
Go to Unity and give this name in the Script of the Screen Game Object.

-
Connect your android phone via USB and Go to File > Build and Run. Wait for the build to complete and here you go.
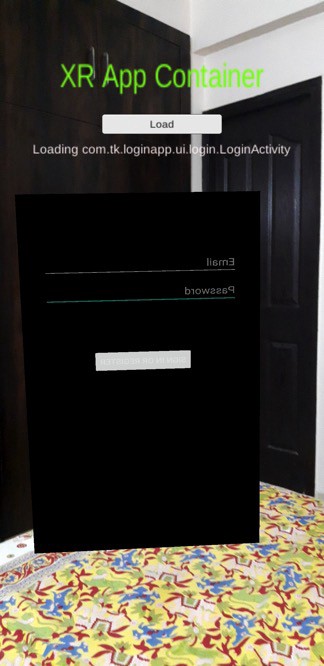
Wow, the login app’s activity is getting rendered in the 3D environment but the texture is mirrored, and the color is not coming as it was in 2D.
I can see the cursor blinking in the text box, which means the texture is continuously getting rendered. See logcat, there is a continuous log of rendering. Great!
Fixing Mirror Issue
Let’s fix the mirroring issue, Luckily Raju K has done good research here, see the article
Unity Shader Graph — Part 1 - In one of the projects that I’m working on recently, there was a need to mirror the texture at runtime.
-
Let’s create a simple Unlit shader that just does mirroring. Right-click and Create > Shader > Unlit Shader > Give it a name and Open.
-
This project will open in the editor. You may directly modify the file (if you don’t want to follow full steps), make the changes in bold.
Shader "Unlit/Mirror" { Properties { _MainTex ("Texture", 2D) = "white" {} [Toggle(MIRROR_X)] _FlipX ("Mirror X", Float) = 0 [Toggle(MIRROR_Y)] _FlipY ("Mirror Y", Float) = 0 } SubShader { ... Pass { ... #pragma multi_compile_fog #pragma multi_compile ___ MIRROR_X #pragma multi_compile ___ MIRROR_Y ... v2f vert (appdata v) { v2f o; o.vertex = UnityObjectToClipPos(v.vertex); float2 untransformedUV = v.uv; #ifdef MIRROR_X untransformedUV.x = 1.0 - untransformedUV.x; #endif // MIRROR_X #ifdef MIRROR_Y untransformedUV.y = 1.0 - untransformedUV.y; #endif // MIRROR_Y o.uv = TRANSFORM_TEX(untransformedUV, _MainTex); UNITY_TRANSFER_FOG(o,o.vertex); return o; } --- } -
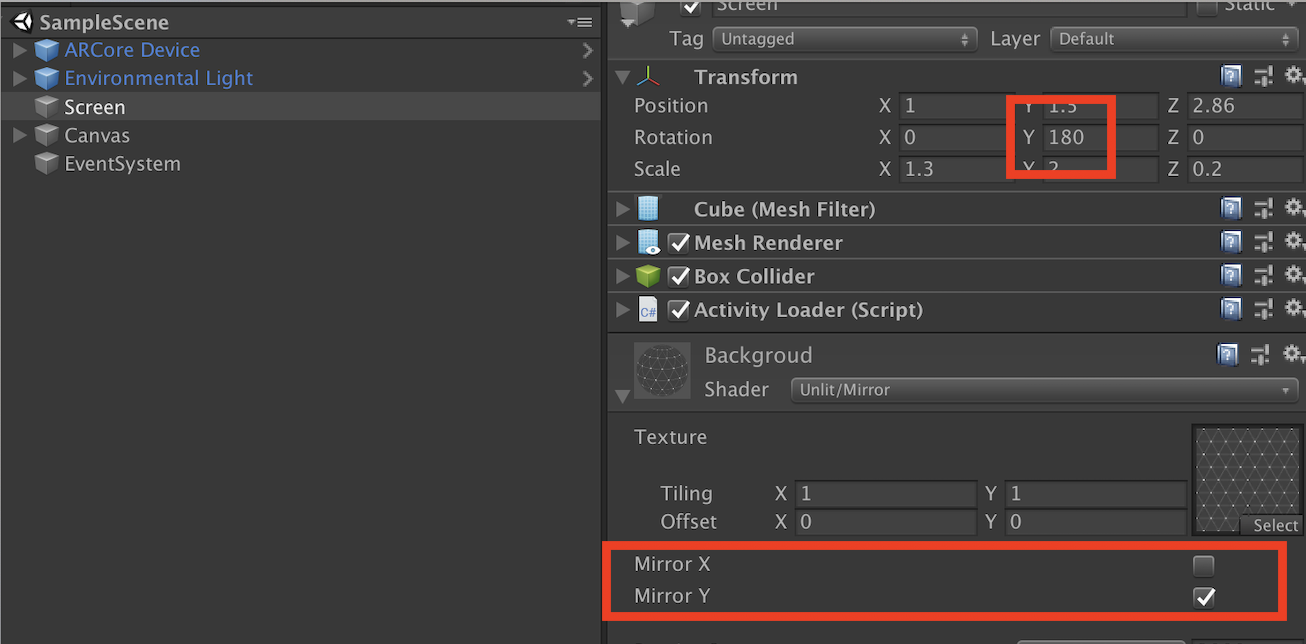
Change shader for the material of Screen GameObject select this newly created shader. Check Mirror Y, and rotation 180.
XR Container in Action
Run the app again. Here you go.
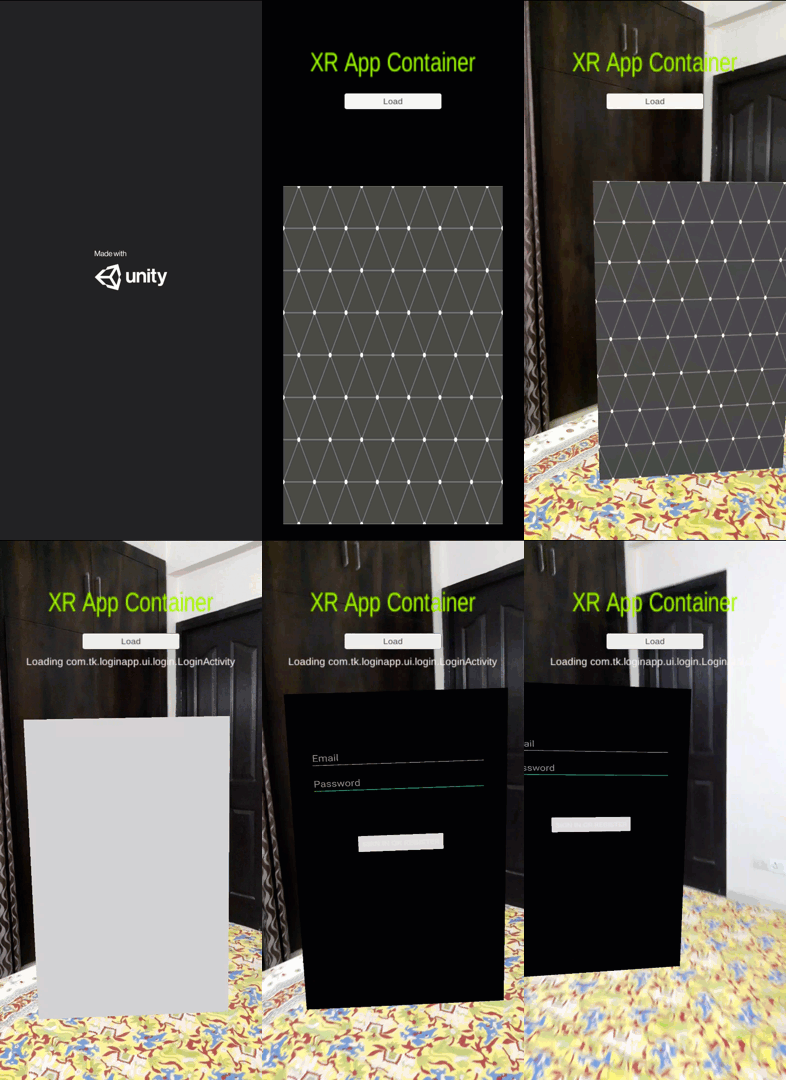
Congratulations! you are able to run your 2D app in an XR container. You can go closer to it.
This is not complete yet, we have just rendered the texture, and the next challenges are implementing all the interactions Gaze, Touch, Gestures, Voice, keyboard inputs for UI controls or work with controllers, etc. However, interactions are also possible, we need to dispatch the events to all the views which are rendering in texture, and the x, y coordinate may be fetched on the texture area by adding a collider on the Screen GameObject. Get the touch, gesture event, and raycast to the object, the raycast hit coordinates, then can be transformed to x, y coordinate on-screen, the dispatch mouse click event at that position in the internal activity-view. Similar ways we can implement drag, key pressed, etc.
Conclusion
Though we are able to run a 2D app’s one activity in an XR app container and but this approach has many flaws
ActivityGroupis deprecated and may soon be removed from android’s future versions.- Since the other activity runs in the background, there would side effects on observers inside the activity. The different apps may need different customizations, and the approach is not scalable to meet all the requirements
- Handling full activity life-cycle is a challenge
- We are controlling only one activity and if that activity is spawning some child activity then there would be issues.
- Building AAR for the existing system app is challenging, even if we build them maintenance would be a nightmare.
- Invoking existing running activity from other app is not allowed due to security, we get over it by building the container as a system app, but still, not all the permissions and access to shared storage would not be possible.
- Multiple versions of android would create conflict and issues while inflating the layout in texture.
This approach is just a Proof of Concept, it may not be a production-ready approach.
There are other approaches you may try out such as
- Customize the Window Manager of the OS, and place the 2D windows in spatial coordinates.
- Use VirtualDisplay and Presentation
- Analyse Oculus TV/VrShell App
Try these out and share your learning in this field, do let me know if you have any other finding. if this can be done in a better way.
This article is original published on XR Practices Publication
#xr #ar #vr #mr #3d #enterprise #android #system #customization #Unity #ARCore #technology