Exploring AndroidThings IoT
- 10 minutes read - 1929 wordsAndroid Things, an android based embedded operating system, is the new “it” thing in the Internet of Things(IOT) space. Developed by Google under the codename “Brillo, a.k.a. Project Brillo”, it takes the usual Android development stack—Android Studio, the official SDK, and Google Play Services—and applies it to the IOT.
Google formally took the veils off of Brillo at its I/O 2015 conference. It is aimed to be used with low-power and memory constrained IOT devices, allowing the developers to build a smart device using Android APIs and Google Services. Google released the first developer preview version in December 2016 with an aim to roll out updates every 6-8 weeks.
Android Things provides a turnkey solution to start building on development boards like Intel Edison, Intel Joule, NXP Pico, NXP Argon i.IMX6UL, and Raspberry Pi 3. At its core, it supports a System-On-Module (SoM) architecture, where a core computing module can be initially used with development boards and then easily scaled to large production runs with custom designs, while continuing to use the same Board Support Package (BSP) from Google.
It provides support for Bluetooth low energy and Wi-Fi. Like the OTA updates for Android Phones, developers can push Google-provided OS updates and custom app updates using the same OTA infrastructure that Google uses for its products and services. It takes advantage of regular best-in-class security updates by building on top of the Android OS. Support for Weave, Google’s IoT communications platform, is on the roadmap and will come in a later developer preview.

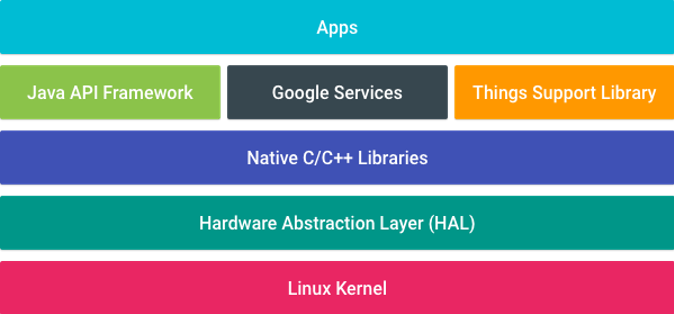
Android Things makes developing connected embedded devices easy by providing the same Android development tools, best-in-class Android framework, and Google APIs that make developers successful on mobile. It extends the core Android framework with additional APIs provided by the Things Support Library.
Difference between Android and Android Things Development
Major differences between the core Android development and Android Things.
-
Android Things platform is streamlined for a single application use. It doesn’t include the standard suite of system apps and content providers. The application uploaded by the developer is automatically launched on startup.
-
Although Android Things supports graphical user interfaces using the same UI toolkit available to traditional Android applications, it doesn’t require a display. On devices where a graphical display is not present, activities are still a primary component of the Android Things app. All input events are delivered to the foreground activity.
-
Android Things expects one application to expose a “home activity” in its manifest as the main entry point for the system to automatically launch on boot. This activity must contain an intent filter that includes both CATEGORY_DEFAULT and IOT_LAUNCHER.
-
Android Things supports a subset of the Google APIs for Android. As a general rule, APIs that require user input or authentication credentials aren’t available to apps.
-
Requesting Permissions at Runtime is not supported because embedded devices aren’t guaranteed to have a UI to accept the runtime dialog. All normal and dangerous permissions declared in the app’s manifest are granted at install time.
-
Since there is no system-wide status bar in Android Things, notifications are not supported.
Let’s start with Android Things
Android Things provide turnkey hardware solutions for certified development boards. As of now, it provides support for Intel Edison, Intel Joules, Raspberry Pi 3, and NXP Pico i.MX6UL.
Flash the image
Binary system image files are available on the official Android Things page. Download the image file and install them on the development board of your choice from the approved list of developer kits. Pre-requisites and install instructions for each of the development boards are provided on the official website. Once Android Things OS has been installed on the device, it can be accessed like any other android device using the Android debug Bridge(adb) tool.
$ adb devices
List of devices attached
Edion61aa    device
AP0C52890C device
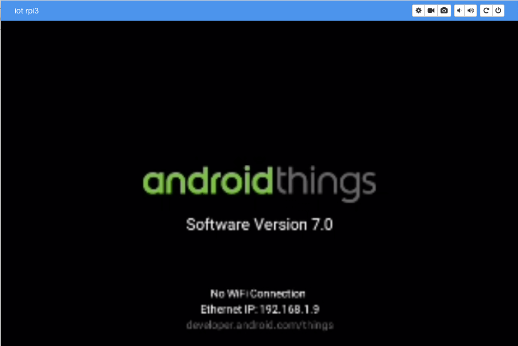
Boot your device. When the boot process finishes, the result is shown below (if your device is attached to a display):

If you get this screenshot it means that Android Internet of things is running successfully. The Android Things Launcher shows information about the board on the display, including the IP address. After flashing your board, it is strongly recommended to connect it to the internet. This allows your device to deliver crash reports and receive updates.
To connect your board to Wi-Fi using adb:
-
Send an intent to the Wi-Fi service that includes the SSID and passcode of your local network:
$ adb shell am startservice \
  -n com.google.wifisetup/.WifiSetupService \
  -a WifiSetupService.Connect \
  -e ssid <Network_SSID> \
  -e passphrase <Network_Passcode>
Note: You can remove the passphrase argument if your network doesn’t require a passcode.
-
Verify that the connection was successful through logcat:
$ adb logcat -d | grep Wifi ... V WifiWatcher: Network state changed to CONNECTED V WifiWatcher: SSID changed: ... I WifiConfigurator: Successfully connected to ... -
Test that you can access a remote IP address:
$ adb shell ping 8.8.8.8
Building First Android Things App
Things apps use the same structure as those designed for phones and tablets. This similarity means you can modify your existing apps to also run on embedded things or create new apps based on what you already know about building apps for Android. Let’s start building our very first app for Android Things. Use a development board of your choice with Android Things OS image installed and the device booted up.
Pre-requisites
Before building apps for Things, these requirements must be fulfilled:
- Download Android Studio
- Update the SDK tools to version 24 or higher
- Update the SDK with Android 7.0 (API 24) or higher
- Create or update the app project to target Android 7.0 (API level 24) or higher in order to access new APIs for Things
Add the library
Android Things devices expose APIs through support libraries that are not part of the Android SDK.
-
Add the dependency artifact to the app-level
build.gradlefile:dependencies { ... provided 'com.google.android.things:androidthings:0.2-devpreview' } -
Add the things shared library entry to the app’s manifest file:
<application ...>
    <uses-library android:name="com.google.android.things"/>
    ...
</application>
Declare a home activity
An application intending to run on an embedded device must declare an activity in its manifest as the main entry point after the device boots. Apply an intent filter containing the following attributes:
<application
    android:label="@string/app_name">
    <uses-library android:name="com.google.android.things"/>
    <activity android:name=".MainActivity">
        <!-- Launch activity as default from Android Studio -->
        <intent-filter>
            <action android:name="android.intent.action.MAIN"/>
            <category android:name="android.intent.category.LAUNCHER"/>
        </intent-filter>

        <!-- Launch activity automatically on boot -->
        <intent-filter>
            <action android:name="android.intent.action.MAIN"/>
            <category android:name="android.intent.category.IOT_LAUNCHER"/>
            <category android:name="android.intent.category.DEFAULT"/>
        </intent-filter>
    </activity>
</application
Connect the Hardware
We will develop a push button application. A button sensor will be connected to the development board, which will generate an event every time it is pushed.
- Connect the GND pin of the button sensor to the GND of the device
- Connect the VCC of button to the 3.3V pin of the device
- Connect the SIG pin of button to any GPIO input pin.
Interact with Peripherals
Android Things Peripheral I/O APIs provide a way to discover and communicate with General Purpose Input Ouput (GPIO) ports.
- The system service responsible for managing peripheral connections is PeripheralManagerService
- Use this service to list the available ports for all known peripheral types.
public class HomeActivity extends Activity {
    private static final String TAG = "HomeActivity";
    @Override
    protected void onCreate(Bundle savedInstanceState) {
        super.onCreate(savedInstanceState);
        PeripheralManagerService service = new PeripheralManagerService();
        Log.d(TAG, "Available GPIO: " + service.getGpioList());
    }
}
To receive events when a button connected to GPIO is pressed:
- Use PeripheralManagerService to open a connection with the GPIO port wired to the button.
- Configure the port as input with DIRECTION_IN.
- Configure which state transitions will generate callback events with setEdgeTriggerType().
- Register a GpioCallback to receive edge trigger events.
- Return true within onGpioEdge() to continue receiving future edge trigger events.
- When the application no longer needs the GPIO connection, close the Gpio resource.
public class HomeActivity extends Activity {
    private static final String TAG =HomeActivity.class.getSimpleName();
    private static final String GPIO_PIN_NAME = “BCM23”;
    private Gpio mButtonGpio;
    @Override
    protected void onCreate(Bundle savedInstanceState) {
        super.onCreate(savedInstanceState);
        PeripheralManagerService service = new PeripheralManagerService();
	 Log.d(TAG, "Available GPIO: " + service.getGpioList());
        try {
            // Step 1. Create GPIO connection.
            mButtonGpio = service.openGpio(GPIO_PIN_NAME);
            // Step 2. Configure as an input.
            mButtonGpio.setDirection(Gpio.DIRECTION_IN);
            // Step 3. Enable edge trigger events.
            mButtonGpio.setEdgeTriggerType(Gpio.EDGE_FALLING);
            // Step 4. Register an event callback.
            mButtonGpio.registerGpioCallback(mCallback);
        } catch (IOException e) {
            Log.e(TAG, "Error on PeripheralIO API", e);
        }
    }
    // Step 4. Register an event callback.
    private GpioCallback mCallback = new GpioCallback() {
        @Override
        public boolean onGpioEdge(Gpio gpio) {
            Log.i(TAG, "GPIO changed, button pressed");
            // Step 5. Return true to keep callback active.
            return true;
        }
    };
    @Override
    protected void onDestroy() {
        super.onDestroy();
        // Step 6. Close the resource
        if (mButtonGpio != null) {
            mButtonGpio.unregisterGpioCallback(mCallback);
            try {
                mButtonGpio.close();
            } catch (IOException e) {
                Log.e(TAG, "Error on PeripheralIO API", e);
            }
        }
    }
}
Deploy the app
It’s time to deploy the app to the device. Connect to the device using adb. Deploy the app to the device by clicking on the Run button on the android studio and selecting the device. Press the button on the button sensor. The result can be seen on the logcat tab on the android studio. This app can be extended to include a LED sensor. Connect the LED to an output GPIO pin. Whenever the button press event is received, call the PeripheralManagerService to toggle the state of the LED.
public class BlinkActivity extends Activity {
    private static final String TAG = "BlinkActivity";
    private static final int INTERVAL_BETWEEN_BLINKS_MS = 1000;
    private static final String GPIO_PIN_NAME = ...;
    private Handler mHandler = new Handler();
    private Gpio mLedGpio;
    @Override
    protected void onCreate(Bundle savedInstanceState) {
        super.onCreate(savedInstanceState);\
        // Step 1. Create GPIO connection.
        PeripheralManagerService service = new PeripheralManagerService();
        try {
            mLedGpio = service.openGpio(GPIO_PIN_NAME);
            // Step 2. Configure as an output.
            mLedGpio.setDirection(Gpio.DIRECTION_OUT_INITIALLY_LOW);
            // Step 4. Repeat using a handler.
            mHandler.post(mBlinkRunnable);
        } catch (IOException e) {
            Log.e(TAG, "Error on PeripheralIO API", e);
        }
    }
    @Override
    protected void onDestroy() {
        super.onDestroy();
        // Step 4. Remove handler events on close.
        mHandler.removeCallbacks(mBlinkRunnable);
        // Step 5. Close the resource.
        if (mLedGpio != null) {
            try {
                mLedGpio.close();
            } catch (IOException e) {
                Log.e(TAG, "Error on PeripheralIO API", e);
            }
        }
    }
    private Runnable mBlinkRunnable = new Runnable() {
        @Override
        public void run() {
            // Exit if the GPIO is already closed
            if (mLedGpio == null) {
                return;
            }
            try {
                // Step 3. Toggle the LED state
                mLedGpio.setValue(!mLedGpio.getValue());
                // Step 4. Schedule another event after delay.
                mHandler.postDelayed(mBlinkRunnable, INTERVAL_BETWEEN_BLINKS_MS);
            } catch (IOException e) {
                Log.e(TAG, "Error on PeripheralIO API", e);
            }
        }
    };
}
Conclusion
This completes the hello world, and trying out the Raspberry PI with AndroidThings. We can utilise standard andorid concepts and still enjoy the IOT.
- One thing to remember is that, at the time of creating this article, Android Things is in the third iteration of its developer preview. This means that, because it’s an early release for testing and feedback, some features are currently unavailable or may be buggy as the platform is tested and built out.
- Currently, support for simple analog sensors is not included in the Android Things general-purpose input/output (GPIO) classes—though there is a technical reasoning for this, SPI and I2C can still be used.
- As this platform is still new, there are not many drivers for sensors or other hardware, so developers using the platform will need to either create their own drivers or make do with what is currently available or open sourced by other developers in the Android Things community.
References
- [1]. https://developer.android.com/things/index.html
- [2]. https://en.wikipedia.org/wiki/Android_Things
- [3]. http://www.androidauthority.com/project-brillo-google-io-612159/
- [4]. http://www.theverge.com/2015/5/28/8677119/google-project-brillo-iot-google-io-2015
- [5]. https://arstechnica.com/gadgets/2016/12/google-brillo-rebrands-as-android-things-googles-internet-of-things-os/
- [6]. https://blog.mindorks.com/google-released-the-developer-preview-of-android-things-iot-75cb49b9ce24#.6nxlbpte7
- [7]. https://developer.android.com/things/sdk/pio/gpio.html
- [8]. https://developer.android.com/things/sdk/drivers/index.html
- [9]. https://www.novoda.com/blog/writing-your-first-android-things-driver-p1/
I explored this while working at IoT Center of Excellence of Nagarro
#androidthings #IOT #android #os #tutorial #nagarro #raspberry pi #technology