Implementing a TCP Client in nRF Connect
- 8 minutes read - 1496 wordsIn a previous article, we implemented a Joiner that is programmatically provisioned by a Commissioner node to join a Thread network. Once an IoT device is part of the Thread network, the next step is to enable communication with other Thread nodes or external hosts. We previously discussed and tested UDP-based communication in Connecting Thread devices to Internet. In this article, we explore a similar approach with TCP OT CLI, and here we are implementing a custom TCP client that sends data to a TCP server programmatically.
TCP Client Concept
The TCP client implementation involves the following key steps:
- TCP Initialization — Initialize the TCP stack and configure the TCP endpoint.
- TCP Connection — Establish a connection to a TCP server using a specified host and port.
- TCP Data Transmission — Send data to the connected TCP server.
We will implement these steps using an nRF Connect application.
1. Project Setup
Continue from Joiner application we have built in previous article
2. Add TCP Configuration
To enable the TCP stack, add the following configurations in prj.conf:
CONFIG_NET_SOCKETS=y
CONFIG_NET_TCP=y
CONFIG_NET_UDP=y
CONFIG_NET_TCP_LOG_LEVEL_DBG=y
CONFIG_OPENTHREAD_TCP_ENABLE=y
CONFIG_NET_SOCKETS_LOG_LEVEL_DBG=y
3. Implement the TCP Client Logic
Create a new file, tcp_client.c, and include the necessary dependencies:
#include <stdio.h>
#include <string.h>
#include <zephyr/net/openthread.h>
#include <zephyr/logging/log.h>
#include <openthread/thread.h>
#include <openthread/instance.h>
#include <openthread/udp.h>
#include <openthread/tcp.h>
#include <openthread/ip6.h>
#include <openthread/message.h>
#include <openthread/nat64.h>
#include "tcp_client.h"
Add tcp_client.c to the CMake configuration.
3.1 TCP Initialization
Initialize the TCP endpoint and register callbacks to handle connection, disconnection, and data reception.
void tcpDisconnected(otTcpEndpoint *aEndpoint, otTcpDisconnectedReason aReason)
{
    LOG_INF("TCP connection closed. Reason: %d", aReason);
}

void tcpDataReceived(otTcpEndpoint *aEndpoint,size_t aBytesAvailable,bool aEndOfStream, size_t aBytesRemaining)
{
    LOG_INF("Received data!");
}

void tcpConnectionEstablished(otTcpEndpoint *aEndpoint)
{
    LOG_INF("ConnectionEstablished!");
}

void tcpSendDone(otTcpEndpoint *aEndpoint, otLinkedBuffer *aData){
  LOG_INF("Send done data");
}

void startTcpClient(char * ipv6_host, uint16_t port_no)
{
    LOG_DBG("Starting TCP Client for - %s:%d",ipv6_host,port_no)
    static otTcpEndpoint sEndpoint;
    static uint8_t sReceiveBuffer[OT_TCP_RECEIVE_BUFFER_SIZE_FEW_HOPS];
    otTcpEndpointInitializeArgs clientArgs;
    memset(&clientArgs, 0, sizeof(args));
    clientArgs.mDisconnectedCallback = tcpDisconnected;
    clientArgs.mReceiveAvailableCallback = tcpDataReceived;
    clientArgs.mReceiveBuffer = sReceiveBuffer;
    clientArgs.mReceiveBufferSize = OT_TCP_RECEIVE_BUFFER_SIZE_FEW_HOPS;
    clientArgs.mEstablishedCallback = tcpConnectionEstablished;
    clientArgs.mSendDoneCallback = tcpSendDone;

    // Initialize TCP
    if (otTcpEndpointInitialize(openthread_get_default_instance(), &sEndpoint, &clientArgs) == OT_ERROR_NONE)
    {
        LOG_DBG("TCP Endpoint initialized.");
    }
}
3.2 Establish a TCP Connection
After initializing TCP, establish a connection to the TCP server.
otSockAddr serverAddr;
memset(&serverAddr, 0, sizeof(serverAddr));
otIp6AddressFromString(ipv6_host, &serverAddr.mAddress);
serverAddr.mPort = port_no;

// Connect to the tcp server
if(otTcpConnect(&sEndpoint, &serverAddr, OT_TCP_CONNECT_NO_FAST_OPEN) != OT_ERROR_NONE)
{
    LOG_ERR("Could not connect tcp");
}
Upon successful connection, the mEstablishedCallback function is triggered, but when it is called with OT_TCP_CONNECT_NO_FAST_OPEN option, else it would just try make connection, but there is no guarantee that callback get’s called.
3.3 Send Data Over TCP
Implement data transmission logic in the tcpConnectionEstablished callback.
void tcpConnectionEstablished(otTcpEndpoint *aEndpoint)
{
LOG_DBG("Connection Established!");

    char payload[50];
    snprintf(payload,sizeof(payload), "{\"data\": %s}", rand());

    static otLinkedBuffer linkedBuffer;
    linkedBuffer.mNext = NULL;
    linkedBuffer.mData = (const uint8_t *)payload;
    linkedBuffer.mLength = strlen(payload);

    if (otTcpSendByReference(aEndpoint, &linkedBuffer, 0) == OT_ERROR_NONE)
    {
        LOG_DBG("Payload sent! %s", payload);
        otTcpSendEndOfStream(aEndpoint)
    }
    else
    {
        LOG_ERR("Error sending data");
    }
}
If we connect TCP with FAST mode enabled like — otTcpConnect(&sEndpoint, &serverAddr, 0) then we need to manually call the callback after successful connection.
As said earlier this is not guaranteed that this data will be sent to server. Not that No error will be reported if data is send before a connection is fully
established. Example shown below.
if(otTcpConnect(&sEndpoint, &serverAddr, OT_TCP_CONNECT_NO_FAST_OPEN) != OT_ERROR_NONE)
{
LOG_ERR("Could not connect tcp");
}
tcpConnectionEstablished(&sEndpoint)
3.4 Invoke TCP Client
Invoke the TCP client when the device joins the Thread network as a child. In thread_joiner.c do following
void otStateChangeCallback(otChangedFlags flags, struct openthread_context *ot_context, void *user_data)
{
    LOG_INF("Thread state changed(0x%08" PRIx32 ")", flags );

    if (flags & OT_CHANGED_THREAD_ROLE)
    {
        otDeviceRole currentRole = otThreadGetDeviceRole(openthread_get_default_instance());
        if(currentRole == OT_DEVICE_ROLE_CHILD)
        {
            LOG_INF("Device joined as clild successfully!");
            char * ipv6_host = "fd50:a5e0:d15f:2:0:0:adf:c59d";
            uint16_t port_no = 8083;
            startTcpClient(ipv6_host, port_no);
        }
    }
}
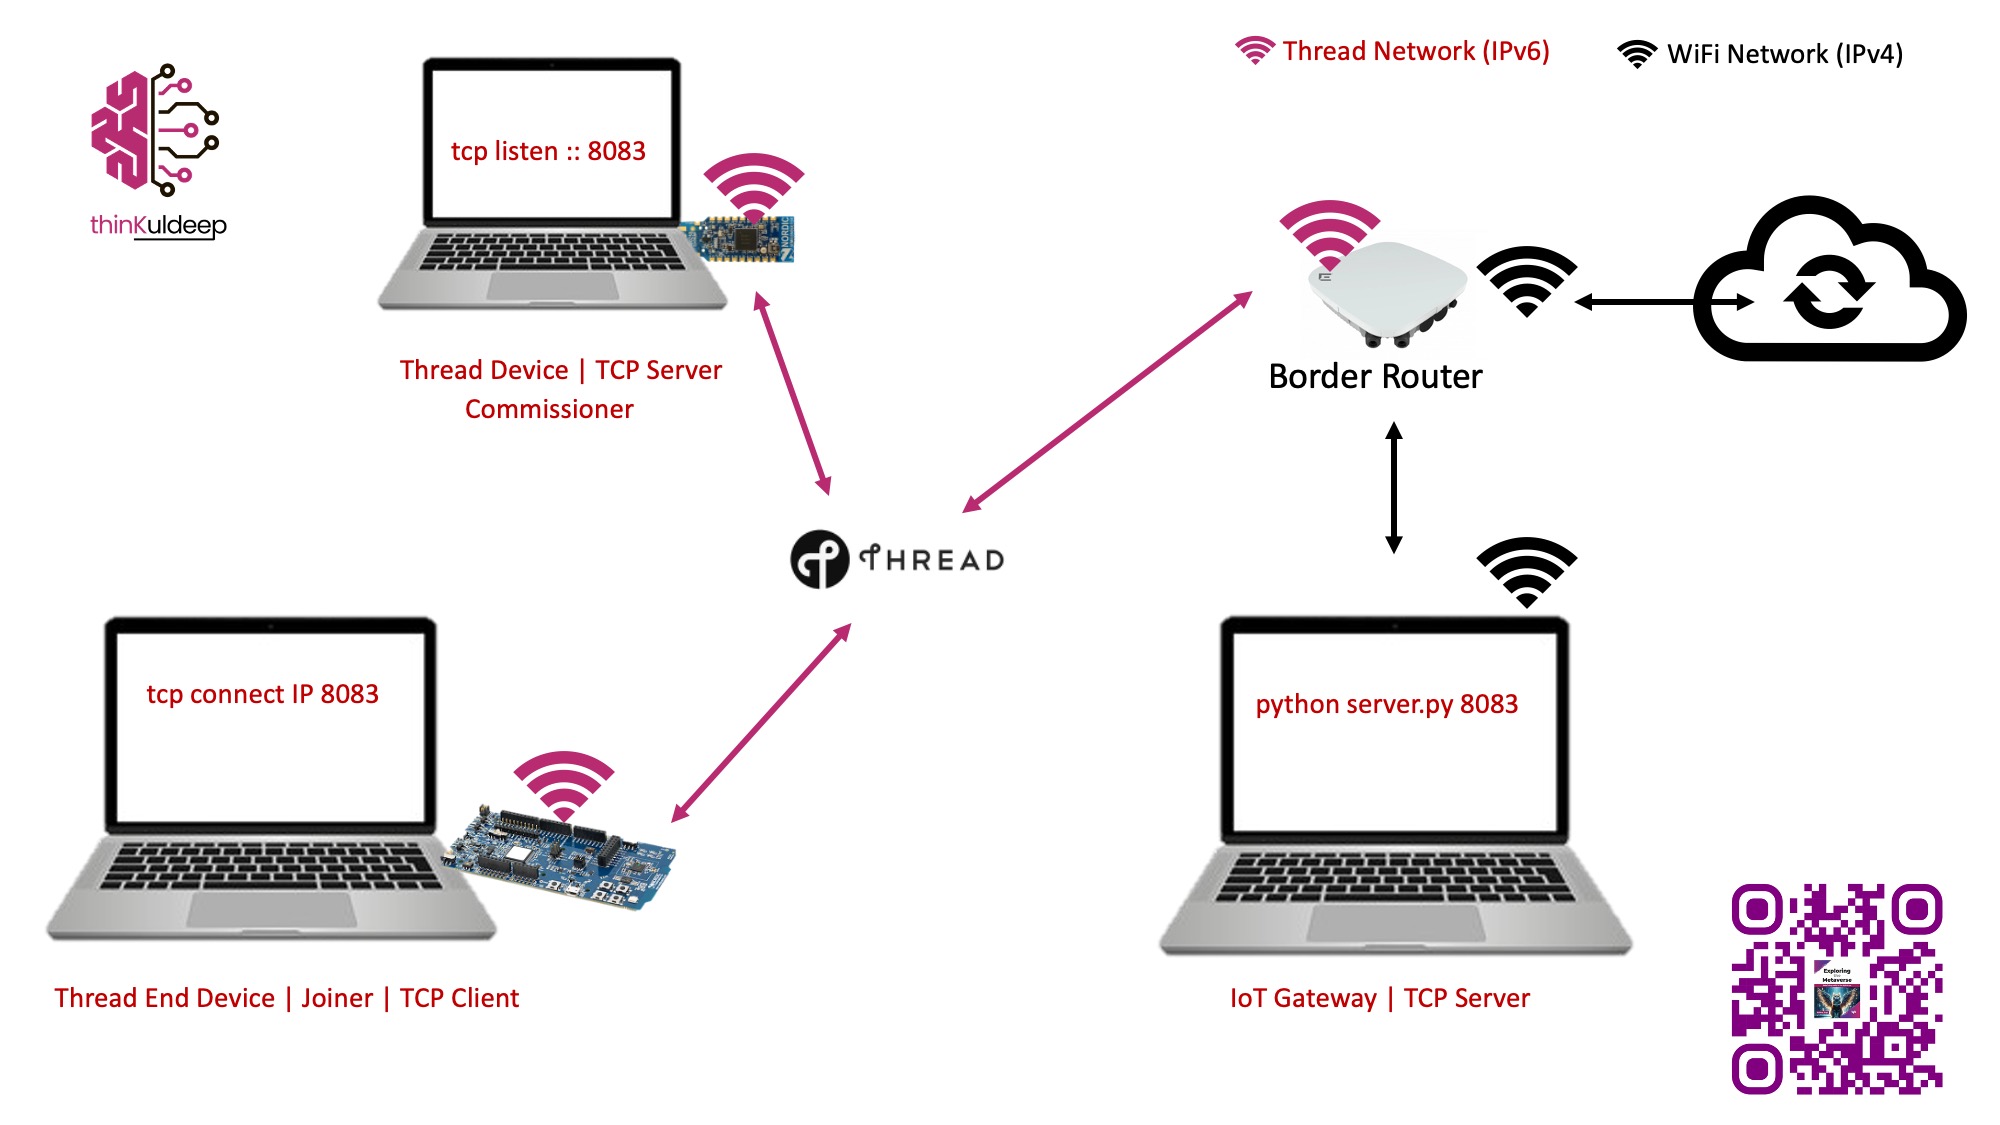
4. Setup a Thread Node as a TCP Server
Join the Thread network from another device and start listening on a TCP port. Commissioner node we setup last example is good enough.
> tcp init
Done
> tcp listen :: 8083
Done
>ipaddr
> ipaddr
fd50:a5e0:d15f:0:ff:fe00:fc34
fd50:a5e0:d15f:0:ff:fe00:fc00
fd50:a5e0:d15f:2:0:0:adf:c59d
fd53:d5eb:950a:5e85:e555:ed58:155c:8561
Done
> rloc16
c59d
Done
>
Note down the IPV6 Address ffd50:a5e0:d15f:0:ff:fe00:5c00
5: Test TCP Communication with Thread Network
Update ipv6_host and port_no in thread_joiner.c, build the project, and flash it onto a Thread-enabled device (nRF52840 DK). On bootup, logs should indicate successful communication.
<inf> thread_joiner: thread state changed(0x18040100)
<inf> thread_joiner: thread state changed(0x1800100f)
<inf> thread_joiner: thread state changed(0x301332b7)
<inf> thread_joiner: Device joined as clild successfully!
<dbg> TCP: startTcpClient: Starting TCP Client for - fd50:a5e0:d15f:2:0:0:adf:c59d:8083
<dbg> TCP: startTcpClient: TCP Endpoint initialized.
<dbg> TCP: tcpConnectionEstablished: Connection Established!
<dbg> TCP: tcpConnectionEstablished: Payload sent! {"Data": 145679}

uart:~$ ot ipaddr
fd51:2355:fe12:abcd:0:ff:fe00:f402
fd51:2345:fe12:abcd:56da:df86:1d35:aac7
fe80:0:0:0:100f:1516:e9e:2051
Done
uart:~$
Verify logs on TCP server node side as well, here is what you see there.
fd50:a5e0:d15f:2:0:0:adf:c59d
> rloc16
c59d
Done

Accepted connection from [fd51:2355:fe12:abcd:0:ff:fe00:f402]:49152
TCP: Connection established
TCP: Received 15 bytes: {"Data": 145679}
TCP: Reached end of stream
This proves working of TCP within thread network.
Note : — We also need to handle proper TCP disconnections and abort after use, else socket would remain open, and would not allow establishing another connection.
6. TCP Communication with an IOT Gateway
For communication with an IoT gateway outside the Thread network, a border router is required, follow the steps below:
6.1 Setup Border Router
Follow the steps in from article Connecting Thread Devices to the Internet to set up a border router.
6.2 Set Up an IoT Gateway
IOT gateway is edge computing server, stay in the same network as the border router. With same concept we can direct ingest data over internet as well, just that border router must configured to support internet access.
Use the following Python script to create a simple TCP server: tcpServer.py
#!/usr/bin/python3
# usage python3 tcpServer.py [bind IP]  [bind PORT]

import socket
import sys

# Create a TCP/IP socket
sock = socket.socket(socket.AF_INET, socket.SOCK_STREAM)
# Bind the socket to the port
server_address = ((sys.argv[1]), (int(sys.argv[2])))
sock.bind(server_address)
# Listen for incoming connections
sock.listen(1)

while True:
# Wait for a connection
print('waiting for a connection')
connection, client_address = sock.accept()

    try:
        print('connection from', client_address)

        # Receive the data in small chunks and retransmit it
        while True:
            data = connection.recv(16)
            print('received:', data)
            if data:
                print('sending data back to the client')
                connection.sendall(data)
            else:
                print('no more data from', client_address)
                break
    except socket.error as e:
        print('socket error: {e}')
    except Exception as e:
        print("Exceptoion : {e}")
    finally:
        # Clean up the connection
        connection.close()
Start this TCP Server on IOT gateway
$ ~ python3 tcpServer.py 192.223.10.20 8083
waiting for a connection
6.3 Receive Data over TCP
Implement data receive logic in the tcpConnectionEstablished callback. Make sure of calling otTcpCommitReceive to confirm tcp stack about state of data received.
void tcpReceived(otTcpEndpoint *aEndpoint,size_t aBytesAvailable,bool aEndOfStream, size_t aBytesRemaining)
{
    if (aBytesAvailable > 0)
    {
        const otLinkedBuffer *data;
        size_t totalReceived = 0;

        if (otTcpReceiveByReference(aEndpoint, &data) == OT_ERROR_NONE){
            for (; data != NULL; data = data->mNext)
            {
                LOG_INF("Received %.*s", data->mLength, data->mData);
                totalReceived += data->mLength;
            }
            if(aBytesAvailable != totalReceived){
                LOG_ERR("bytes available not matching with total received");
            }
            otTcpCommitReceive(aEndpoint, totalReceived, 0);
        }
    }
    if (aEndOfStream)
    {
        LOG_INF("Closing connection...");
        otTcpEndpointDeinitialize(aEndpoint);
    }
}
6.4 Synthesize IPv4 to IPv6
Since our TCP client accepts only IPv6 host address, we need to ask border router to provide mapped IPv6 address. Here is a method that can do it.
char *synthesizeIp6Address(char *ip4host)
{
otIp4Address ipv4Addr;
otIp6Address ipv6Addr;

    // Convert IPv4 string to otIp4Address
    otIp4AddressFromString(ip4host, &ipv4Addr);

    // Convert IPv4 to NAT64-mapped IPv6 address
    if(otNat64SynthesizeIp6Address(openthread_get_default_instance(), &ipv4Addr, &ipv6Addr)!=OT_ERROR_NONE){
        LOG_ERR("Could not get synthesizeIPv6 Address for IPv4:%s", ip4host);
        return "";
    }

    static char ip6host[40];

    otIp6AddressToString(&ipv6Addr, ip6host, sizeof(ip6host));
    LOG_INF("IPv4(%s) ==> IPv6(%s)",ip4host, ip6host);

    return ip6host;
}
Use this method in thread_joiner.c and convert IPv4 address and pass the IPv6 address to TCP client.
    void otStateChangeCallback(otChangedFlags flags, struct openthread_context *ot_context, void *user_data)
    {
    LOG_INF("Thread state changed(0x%08" PRIx32 ")", flags );

    if (flags & OT_CHANGED_THREAD_ROLE)
    {
        otDeviceRole currentRole = otThreadGetDeviceRole(openthread_get_default_instance());
        if(currentRole == OT_DEVICE_ROLE_CHILD)
        {
            LOG_INF("Device joined as clild successfully!");
            char * ipv6_host = synthesizeIp6Address("192.223.10.20");
            uint16_t port_no = 8083;
            startTcpClient(ipv6_host, port_no);
        }
    }
6.4 Build and Run
Build and flash it to nRF52840 DK and notice the logs
<inf> thread_joiner: thread state changed(0x18040100)
<inf> thread_joiner: thread state changed(0x1800100f)
<inf> thread_joiner: thread state changed(0x301332b7)
<inf> thread_joiner: Device joined as clild successfully!
<inf> thread_joiner: IPv4(192.223.10.20) ==> IPv6(fd50:a850:d15f:2:0:0:adf:c85d)
<dbg> TCP: startTcpClient: Starting TCP Client for - fd50:a850:d15f:2:0:0:adf:c85d:8083
<dbg> TCP: startTcpClient: TCP Endpoint initialized.
<dbg> TCP: tcpConnectionEstablished: Connection Established!
<dbg> TCP: tcpConnectionEstablished: Payload sent! {"Data": 509091}
<inf> TCP: Received : {"Data": 509091
<inf> TCP: Received : }
<inf> TCP: Received :
<inf> TCP: Closing connection...
TCP: TCP connection closed. Reason: 0
Logs on IOT Gateway Python Console
$ ~ python3 tcpServer.py 192.223.10.20 8083
waiting for a connection
connection from ('192.223.10.15', 49152)
received: b'{"Data": 509091'
sending data back to the client
received: b'}'
sending data back to the client
received: b''
waiting for a connection
Notice that IPv4 address ‘192.223.10.15’ is border router’s IP. This confirms the successful operation of TCP communication within and outside the Thread network.
Conclusion
By following these steps, we have implemented a TCP client and server within a thread node as well as on IoT Gateway. We are able to communicate successfully.
Find the IoT Practices Publication for more details.
#IOT #network #cloud #getting started #learning #technology #fundamentals #thread #openthread #tcp #nRF #SDK