Simplifying Thread Network Provisioning with Joiner and Commissioner
- 5 minutes read - 870 wordsIn previous articles, we explored the Thread protocol and connected Thread devices to the internet using a Border Router. We joined the Thread network by manually configuring each node with a full dataset containing network credentials such as the PAN ID, Network Key, Network Name, and more (refer to Step 6.1: Access Network Credentials). While this method works, it becomes impractical when provisioning hundreds of Thread devices in real-world scenarios.
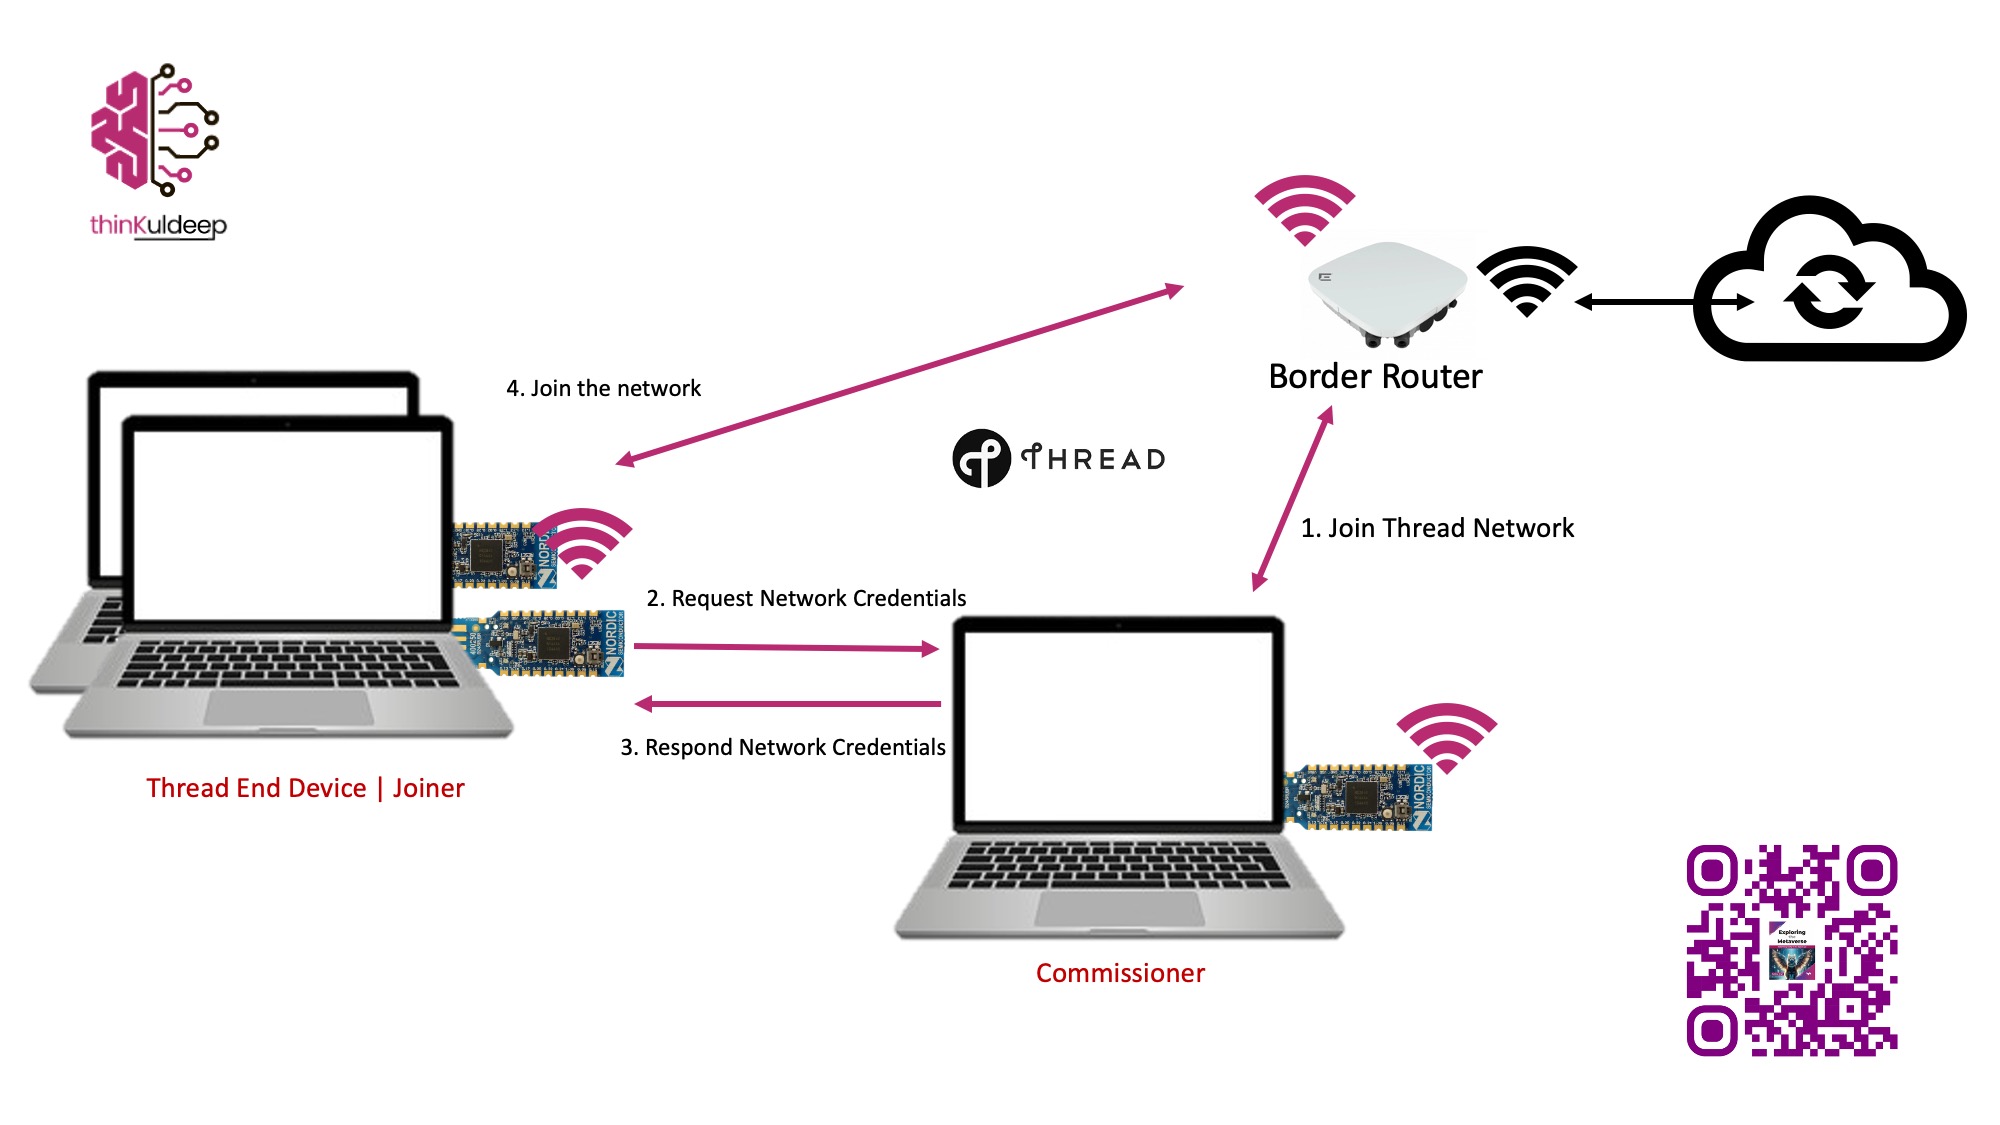
To address this challenge, the Thread protocol introduces the concepts of Joiner and Commissioner. A Joiner node can request network credentials, and a Commissioner node in the network can approve the request if the Joiner provides a valid Pre-Shared Key for Device (PSKd). Once approved, the Joiner can start the Thread network using the provided credentials.
In this guide, we’ll walk through the process of setting up a Joiner and Commissioner using two nRF52840 Dongles. Let’s get started!
Step 1: Build the Joiner and Commissioner Firmware
For this exercise, we’ll build a single OpenThread firmware image for the nRF52840 Dongle that includes both Joiner and Commissioner functionalities. This simplifies the process by allowing the same firmware to act as either a Joiner or Commissioner. However this is not recommended for production, nodes must have firmware as per their role for optimal resource utilisation.
Build the OpenThread firmware with Joiner(-DOT_JOINER=ON) and Commissioner(-DOT_COMMISSIONER=ON) features enabled
kuldeep@PC1 % cd /opt/workspace/
kuldeep@PC1 % git clone --recursive https://github.com/openthread/ot-nrf528xx.git

kuldeep@PC1 % cd ot-nrf528xx
kuldeep@PC1 % rm -rf build
kuldeep@PC1 % script/build nrf52840 USB_trans -DOT_JOINER=ON -DOT_COMMISSIONER=ON -DOT_DNS_CLIENT=ON -DOT_SRP_CLIENT=ON -DOT_ECDSA=ON -DOT_BOOTLOADER=USB -DOT_THREAD_VERSION=1.2

kuldeep@PC1 % cd build/bin
kuldeep@PC1 % arm-none-eabi-objcopy -O ihex ot-cli-ftd ot-cli-ftd.hex
kuldeep@PC1 % ls
kuldeep@PC1 % ot-cli-ftd ot-cli-ftd.hex ot-cli-mtd     ot-cli-radio   ot-ncp-ftd     ot-ncp-mtd     ot-rcp
This will generate ot-cli-ftd.hex, which we’ll flash onto both nRF52840 Dongles.
Step 2: Flash the Firmware
- Put the nRF52840 Dongle into DFU mode by pressing the small button next to the white button.
- Open the nRF Programmer App, select device and and flash the
ot-cli-ftd.hexfirmware.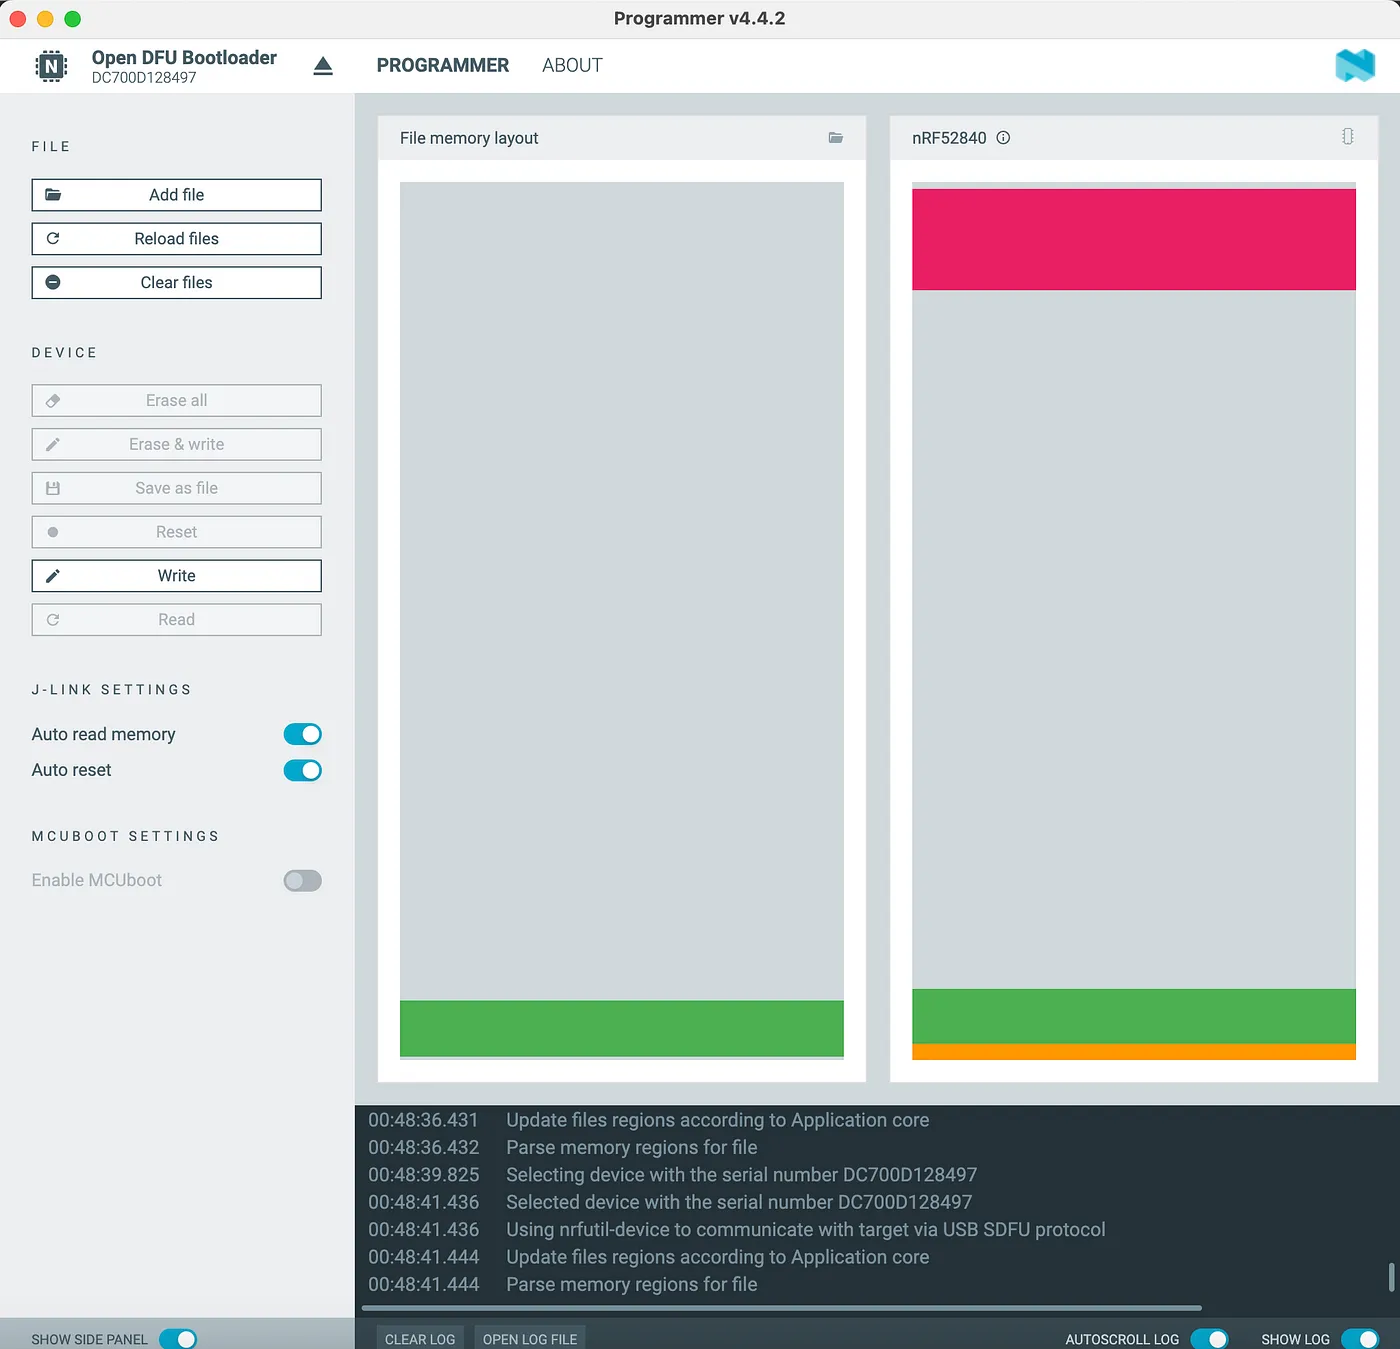
- Verify that the Dongle’s LED stops blinking, indicating a successful flash.
Step 3 — Start a Thread Network
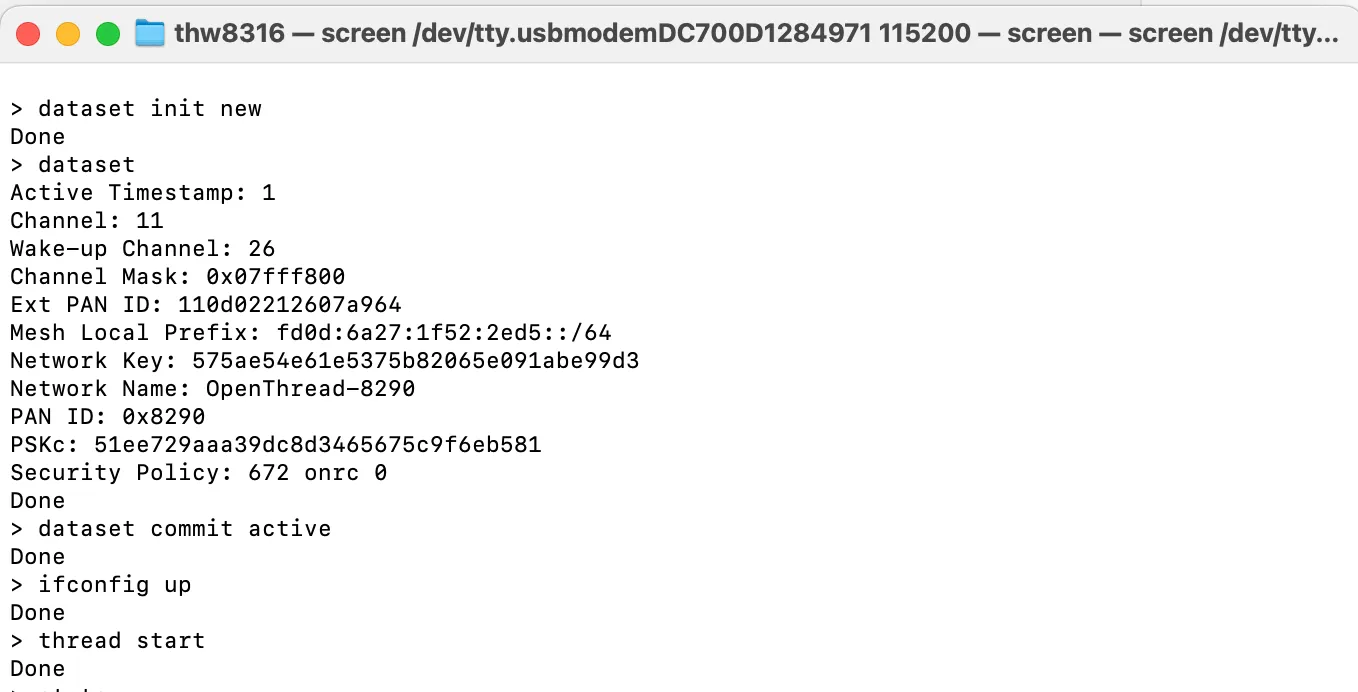
Connect one Dongle to your laptop and open a terminal to interact with it. Identify the USB device. Screen into this device. Initialize a new Thread network:
kuldeep@PC1 % ls /dev/tty.
tty.Bluetooth-Incoming-Port%  tty.usbmodemDC700D1284971%
tty.debug-console%
kuldeep@PC1 % screen /dev/tty.usbmodemDC700D1284971 115200

> dataset init new
Done
> dataset
Active Timestamp: 1
Channel: 11
Wake-up Channel: 26
Channel Mask: 0x07fff800
Ext PAN ID: 110d02212607a964
Mesh Local Prefix: fd0d:6a27:1f52:2ed5::/64
Network Key: 575ae54e61e5375b82065e091abe99d3
Network Name: OpenThread-8290
PAN ID: 0x8290
PSKc: 51ee729aaa39dc8d3465675c9f6eb581
Security Policy: 672 onrc 0
Done
> dataset commit active
Done
> ifconfig up
Done
> thread start
Done
This would start new thread network, and this device would become a leader after some time.
> state
leader
Done
>
Step 4 — Start the Commissioner
On the same Dongle, enable the Commissioner role and configure a joining rule with a pre-shared key (PSKd):
> commissioner start
Commissioner: petitioning
Done
> Commissioner: active
Add a Joiner rule. You can either allow all Joiners (*) or specify a Joiner’s EUI64 (factory-assigned IEEE EUI-64 identifier) and a PSKd:
> commissioner joiner add * KULD55P
Done
>
Here, we’ve used * to allow any Joiner with the PSKd KULD55P to request network credentials.
Step 5— Start the Joiner
Connect the second Dongle to your laptop and open a new terminal and screen into it, similar to Step 3.
kuldeep@PC1 % screen /dev/tty.usbmodemFC2938E0438B1 115200

> ifconfig up
Done
> joiner start KULD55P
Done
> Join success
On commissioner side you would see
> Commissioner: Joiner start 0ed58b6b7917a948
Commissioner: Joiner connect 0ed58b6b7917a948
Commissioner: Joiner finalize 0ed58b6b7917a948
Commissioner: Joiner end 0ed58b6b7917a948
Behind the scenes, the Joiner had scanned for available Thread networks, requested credentials using the PSKd, and received the dataset from the Commissioner, and set it to own dataset. But It is still not on joined the the network.
Step 6— Join the Thread Network
On the Joiner node, start the Thread network and verify its state and router table to confirm:
> thread start
Done

> state
router
Done
> router table
| ID | RLOC16 | Next Hop | Path Cost | LQ In | LQ Out | Age | Extended MAC     | Link |
+----+--------+----------+-----------+-------+--------+-----+------------------+------+
| 18 | 0x4800 |       63 |         0 |     3 |      3 |   4 | 3e46e88954e007b2 |    1 |
| 51 | 0xcc00 |       63 |         0 |     0 |      0 |   0 | ead7413c3cf8debd |    0 |

Done
>
Conclusion
This demonstration highlights how the Thread protocol simplifies network provisioning using the Joiner and Commissioner roles. Instead of manually configuring each device with the full dataset, you only need to share a pre-shared key (PSKd) with the Joiner. The Commissioner handles the secure distribution of network credentials, making it scalable for large deployments.
In real-world applications, the Commissioner can be a node within the network or an external device like a mobile app. Commissioner uses a separate joining credential (passphrase) and Pre-Shared Key for the Commissioner (PSKc) to connect with the Border Router and manage the network.
Next we learn about developing our own Joiner — Here
Keep learning, keep sharing, and explore the endless possibilities of IoT and Thread networking!
Find the IoT Practices Publication for more details.
#IOT #network #cloud #getting started #learning #technology #fundamentals #thread #openthread #security #nRF