Connecting Thread Devices to Internet
- 8 minutes read - 1561 wordsIn previous articles, we explored the Thread Network and its protocol, focusing on the formation, functionality, and topology of the network. Thread is a lightweight, low-power communication protocol for IoT devices, operating on IPv6. We discussed its ability to automatically establish a mesh network and maintain connectivity through its robust topology.
We simulated a Thread network using Docker. Now in this article, we’ll create a Thread network between physical devices and connect it to the internet.
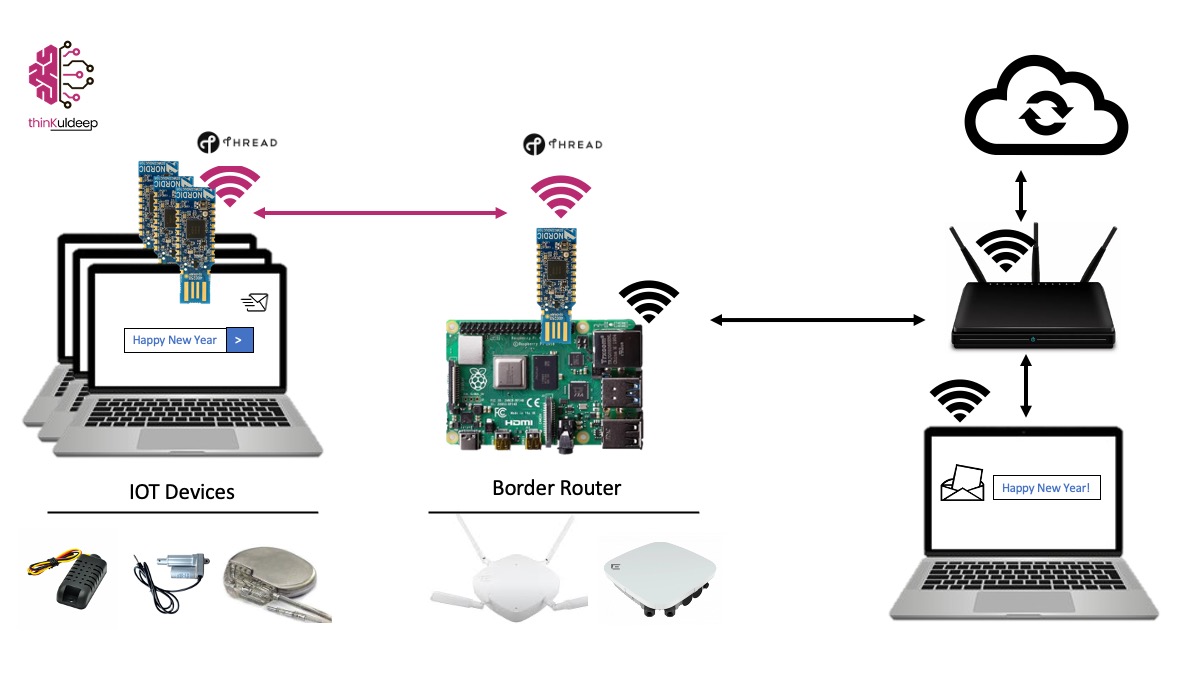
“Happy New Year 2025”
We’ll make a Thread end device wishing non-Thread devices and demonstrate the process in detail.
Why Internet Connectivity Matters for Thread Devices
Thread network devices are designed for low-power consumption and often run on small batteries. Unlike Wi-Fi or Ethernet network, which are power-intensive and impractical for such devices, Thread provides an efficient way to connect IoT devices to the internet. This is achieved through a Border Router, which maps IPv4 to IPv6 addresses, enabling seamless communication between the Thread network and the internet.
What You’ll Need:
- One Raspberry Pi 3/4 as Border Router
- Two nRF 52840 Dongle (or nRF 52840 Development Kits)
Step 1 — Setting Up the Thread Border Router
The Border Router bridges the Thread network with non-Thread networks (e.g., Wi-Fi or Ethernet). Three are few commercial routers available, but in this article we’ll use the open-source implementation provided by OpenThread Border Router (OTBR) to configure the Raspberry Pi as Border Router.
1.1 Download and Prepare the Raspberry Pi Image
- Download this Raspberry Pi image for OTBR and load it onto an SD card as described in our earlier article.
- Insert the SD card into the Raspberry Pi and configure your Wi-Fi AP and credentials during the initial setup:
kuldeep@thinkuldeep:~$ sudo raspi-config
1.2 Build and Configure OTBR
- Install Git and Clone OTBR Repo
kuldeep@thinkuldeep:~$ sudo apt update kuldeep@thinkuldeep:~$ sudo apt install git kuldeep@thinkuldeep:~$ git clone https://github.com/openthread/ot-br-posix.git --depth 1 - Build and Setup OTBR
kuldeep@thinkuldeep:~$ cd ot-br-posix kuldeep@thinkuldeep:~$ ./script/bootstrap kuldeep@thinkuldeep:~$ INFRA_IF_NAME=wlan0 ./script/setup - Reboot and Check OBTR Agent Service
kuldeep@thinkuldeep:~$ reboot

kuldeep@thinkuldeep:~$ sudo service otbr-agent status
● otbr-agent.service - Border Router Agent
    Loaded: loaded (/lib/systemd/system/otbr-agent.service; enabled; vendor preset: enabled)
    Active: activating (start-pre) (Result: exit-code) since Web 2025-01-01 17:43:38 GM
At this stage, the Border Router is set up but requires a Radio Co-Processor (RCP) to establish the Thread network.
Step 2: Setting Up the Development Environment
We’ll use Nordic Semiconductor’s nRF52840 chipset for this exercise. Follow these steps to set up the development environment for Mac:
- Download and install nRF Connect for Desktop.
- Open the Toolchain Manager and configure the SDK installation path (e.g.,
/opt/nordic/ncs/v2.8.0/) and install nRF Connect SDK. May skip VS Code installation for this exercise.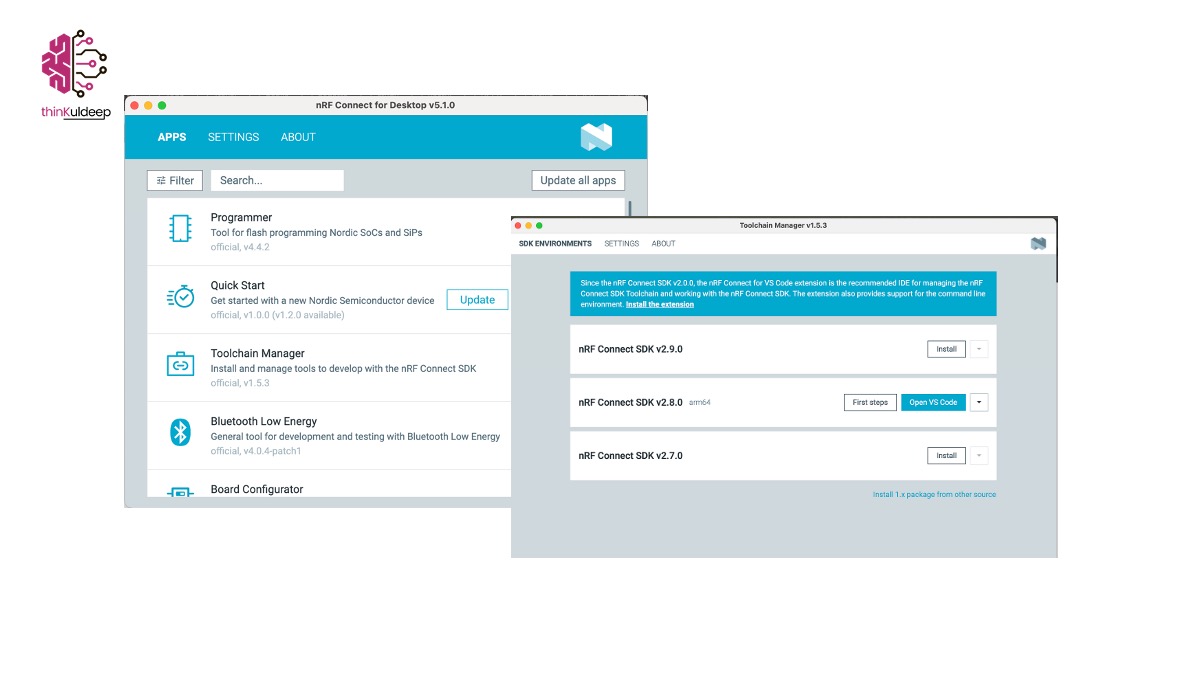
- Install Programmer App from nRF Connect for Desktop
- Ensure your system has the latest tools (xCode, and native build tools like gcc-arm, ccahe, screen)
kuldeep@PC1 % brew upgrade
kuldeep@PC1 % xcode-select --install
kuldeep@PC1 % brew install --cask gcc-arm-embedded
kuldeep@PC1 % brew install ccache
kuldeep@PC1 % brew install pipx
kuldeep@PC1 % brew install screen
Step 3: Preparing one nRF52840 Dongle as an RCP
Open Thread Border Router (OTBR) support Radio Co-Processor (RCP) mode of nRF chipset.
3.1 Build the RCP Firmware
Clone OpenThread repository and Build OT RCP Image as follows.
kuldeep@PC1 % cd /opt/nordic/ncs/v2.8.0
kuldeep@PC1 % git clone --recursive https://github.com/openthread/ot-nrf528xx.git

kuldeep@PC1 % cd ot-nrf528xx
kuldeep@PC1 % rm -rf build
kuldeep@PC1 % source /opt/nordic/ncs/v2.8.0/zephyr/zephyr-env.sh
kuldeep@PC1 % script/build nrf52840 USB_trans -DOT_BOOTLOADER=USB -DOT_THREAD_VERSION=1.2

kuldeep@PC1 % cd build/bin
kuldeep@PC1 % arm-none-eabi-objcopy -O ihex ot-rcp ot-rcp.hex
kuldeep@PC1 % ls
kuldeep@PC1 % ot-cli-ftd ot-cli-mtd ot-ncp-ftd ot-rcp ot-rcp.hex
3.2 Flash the Firmware
- Put the dongle in DFU mode by pressing the small button next to the white button.
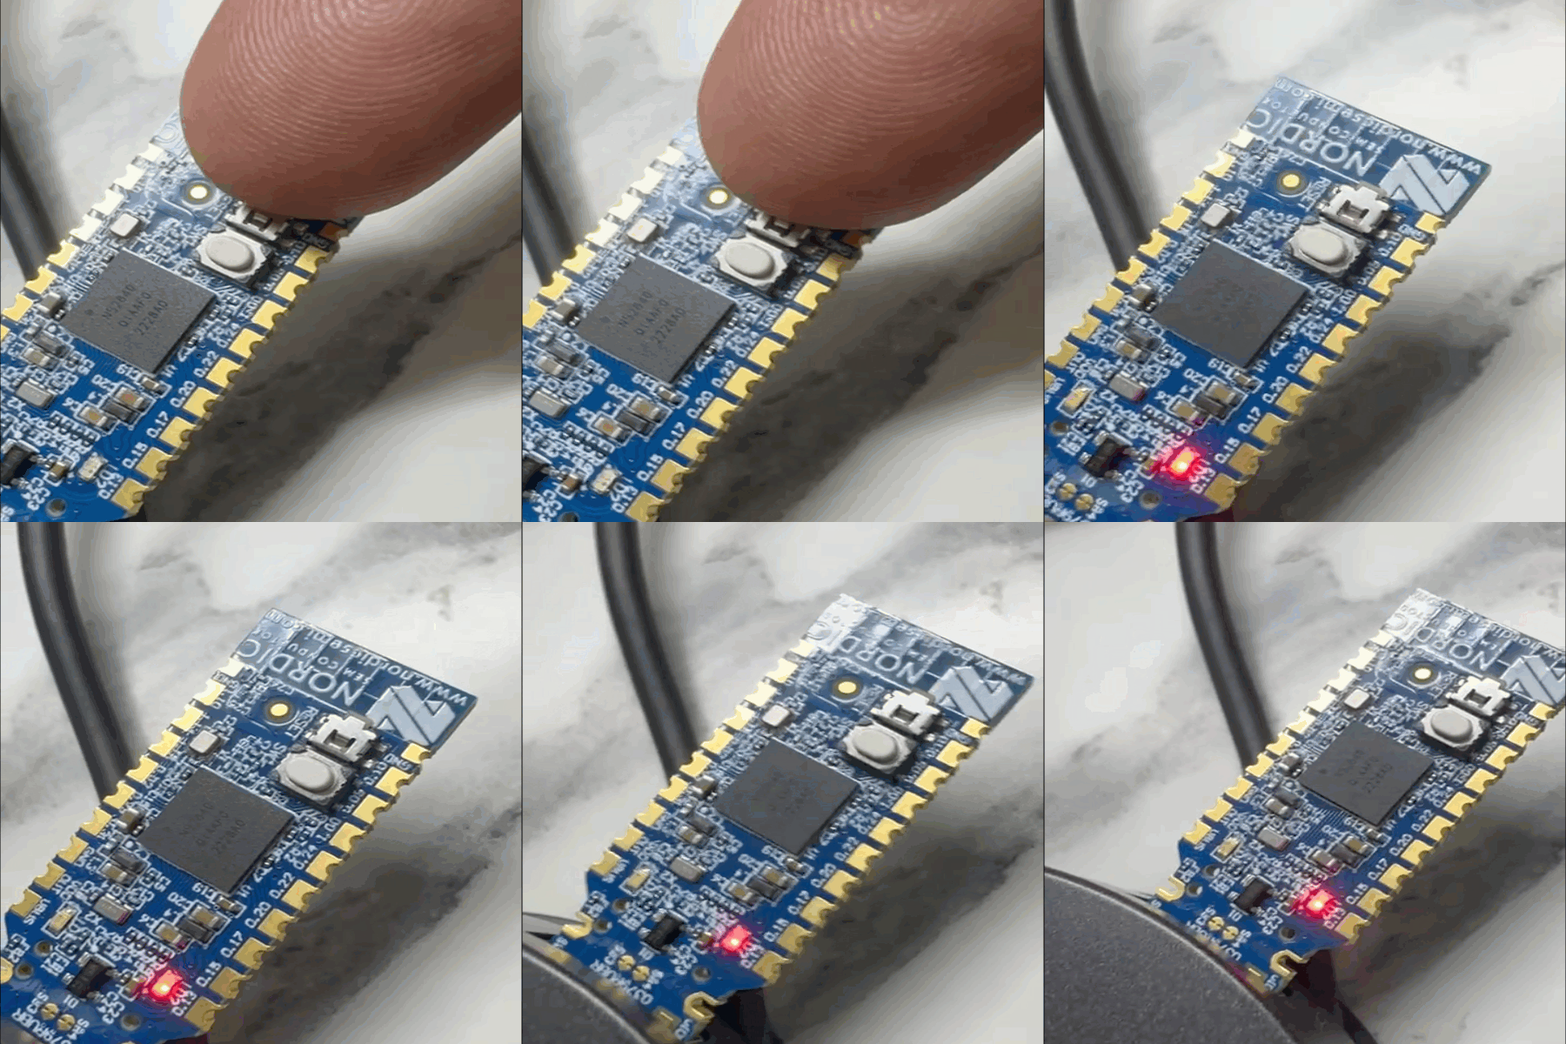
- Open the Programmer App, select device and and flash the
ot-rcp.hexfirmware.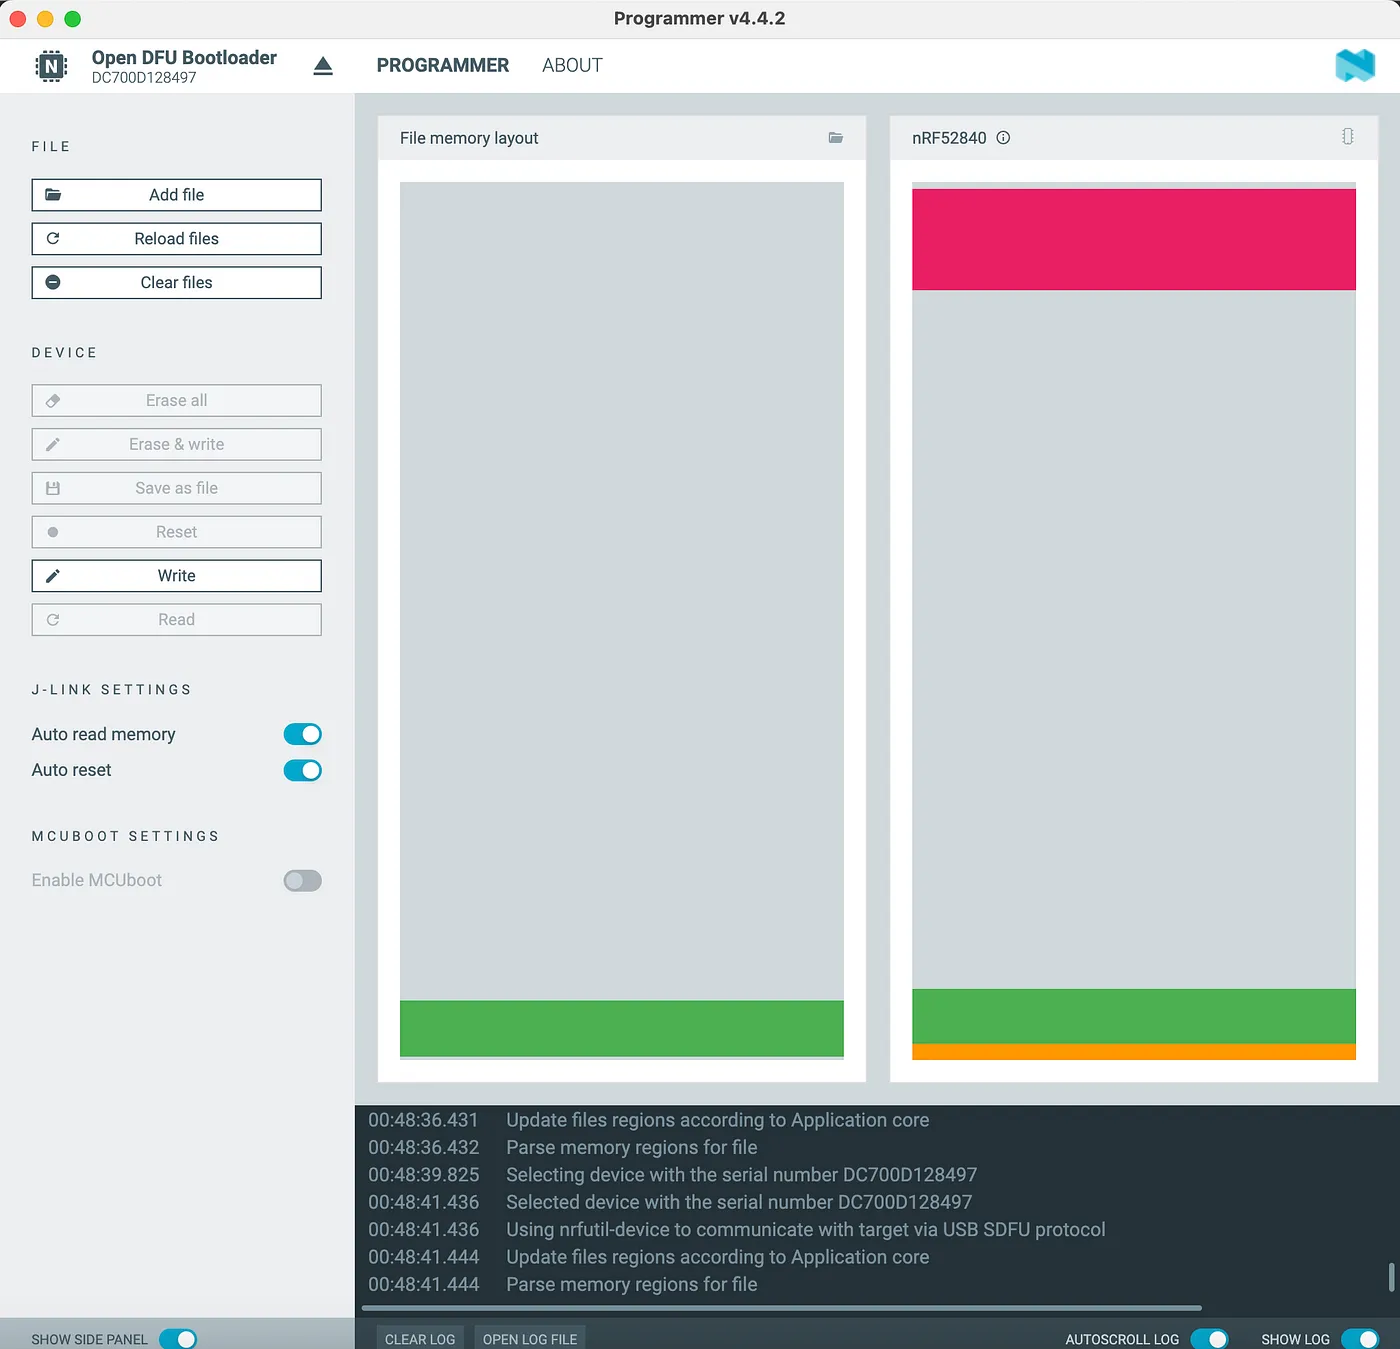
- Verify the dongle is no longer blinking, indicating successful flashing
Step 4: Starting the Thread Network
4.1 Connect the RCP to the Raspberry Pi
- Plug the dongle into the Raspberry Pi.
- Restart the OTBR agent, and wait till it is active.
kuldeep@thinkuldeep:~ $ sudo service otbr-agent restart

kuldeep@thinkuldeep:~ $ sudo service otbr-agent status
● otbr-agent.service - OpenThread Border Router Agent
   Loaded: loaded (/lib/systemd/system/otbr-agent.service; enabled; preset: enabled)
   Active: active (running) since Wed 2025-01-01 19:35:20 GMT; 1min 51s ago
   Process: 377 ExecStartPre=/usr/sbin/service mdns start (code=exited, status=0/SUCCESS)
   Main PID: 644 (otbr-agent)
   Tasks: 1 (limit: 1568)
   CPU: 855ms
   CGroup: /system.slice/otbr-agent.service
   └─644 /usr/sbin/otbr-agent -I wpan0 -B wlan0 spinel+hdlc+uart:///dev/ttyACM0 trel:>

Jan 01 19:36:58 thinkuldeep otbr-agent[644]: 00:01:07.750 [I] RoutingManager: Will evaluate rou>
Jan 01 19:36:58 thinkuldeep otbr-agent[644]: 00:01:07.750 [I] RoutingManager: Received RA from >
4.2 Start the Thread Network
kuldeep@thinkuldeep:~ $ sudo ot-ctl dataset init new
Done
kuldeep@thinkuldeep:~ $ sudo ot-ctl dataset commit active
Done
kuldeep@thinkuldeep:~ $ sudo ot-ctl ifconfig up
Done
kuldeep@thinkuldeep:~ $ sudo ot-ctl thread start
Done

kuldeep@thinkuldeep:~ $ sudo ot-ctl state
leader
Done
Understanding the netdata and generated ip address.
kuldeep@thinkuldeep:~ $ sudo ot-ctl netdata show
Prefixes:
fde7:469d:7d12:1::/64 paros low d800
Routes:
fde7:469d:7d12:2:0:0::/96 sn low d800
::/0 s med d800
Services:
44970 01 2d000500000e10 s d800 0
44970 5d fd1fcec150fab21a8ad16db6459e0989d120 s d800 1
Contexts:
fde7:469d:7d12:1::/64 1 c
Commissioning:
63726 - - -
Done

kuldeep@thinkuldeep:~ $ sudo ot-ctl ipaddr
fd1f:cec1:50fa:b21a:0:ff:fe00:fc11
fde7:469d:7d12:1:77bb:f0af:fa65:2529
fd1f:cec1:50fa:b21a:0:ff:fe00:fc10
fd1f:cec1:50fa:b21a:0:ff:fe00:fc38
fd1f:cec1:50fa:b21a:0:ff:fe00:fc00
fd1f:cec1:50fa:b21a:0:ff:fe00:d800
fd1f:cec1:50fa:b21a:8ad1:6db6:459e:989
fe80:0:0:0:6473:dd6:72a1:4f63
Done
Off-Mesh-Routable(OMR) prefix fde7:469d:7d12:1::/64 can be reached from the Wi-Fi/Ethernet network (IPv6 address of this node fde7:469d:7d12:1:77bb:f0af:fa65:2529 starts with the OMR prefix)
NAT64 Prefix fde7:469d:7d12:2:0:0::/96 is will be used by Thread devices when communicating with an IPv4 host.
Step 5: Preparing Thread End Device
5.1 Build the End Device Firmware
Build the Thread End Device Firmware from OpenThread’s CLI samples
kuldeep@PC1 % cd /opt/nordic/ncs/v2.8.0/nrf/samples/openthread/cli
kuldeep@PC1 % rm -rf build
kuldeep@PC1 % west build -b nrf52840dongle_nrf52840 ./ -- -DOVERLAY_CONFIG="nrf52840dongle_nrf52840.conf" -DDTC_OVERLAY_FILE="nrf52840dongle_nrf52840.overlay"
On success it will generate a firmware at /opt/nordic/ncs/v2.8.0/nrf/samples/openthread/cli/build/cli/zephyr/zephyr.hex
5.2 Flash Thread End Device
Plug second nRF52840 Dongle and Repeat the flashing steps from Step 3.2 using the zephyr.hex firmware.
Step 6: Joining the Thread Network
6.1 Access Network Credentials
SSH into the Raspberry Pi and retrieve the network credentials:
kuldeep@PC1 % ssh kuldeep@192.168.1.12
kuldeep@192.168.1.12's password:
Linux thinkuldeep 6.6.51+rpt-rpi-v7 #1 SMP Raspbian 1:6.6.51-1+rpt3 (2024-10-08) armv7l

The programs included with the Debian GNU/Linux system are free software;
the exact distribution terms for each program are described in the
individual files in /usr/share/doc/*/copyright.

Debian GNU/Linux comes with ABSOLUTELY NO WARRANTY, to the extent
permitted by applicable law.
Last login: Wed Jan  1 13:42:22 2025 from 192.168.1.4

kuldeep@thinkuldeep:~ $ sudo ot-ctl dataset active -x
0e08000000000001000000030000174a0300001735060004001fffe002082dbb9520c986a4900708fd1fcec150fab21a05105c9a2475b25dbba261b9d557a9a7fa33030f4f70656e5468726561642d656462620102edbb0410b35ee9c0bfef6733005b6a17e125953c0c0402a0f7f8
Done
6.2 Join the network
Start another terminal to log into Thread End Device using screen command.
kuldeep@PC1 % ls /dev/tty.
tty.Bluetooth-Incoming-Port%  tty.usbmodem1301%
kuldeep@PC1 % screen /dev/tty.usbmodem1301 115200

*** Booting nRF Connect SDK v2.8.0-a2386bfc8401 ***
*** Using Zephyr OS v3.7.99-0bc3393fb112 ***

uart:~$ ot dataset set active 0e08000000000001000000030000174a0300001735060004001fffe002082dbb9520c986a4900708fd1fcec150fab21a05105c9a2475b25dbba261b9d557a9a7fa33030f4f70656e5468726561642d656462620102edbb0410b35ee9c0bfef6733005b6a17e125953c0c0402a0f7f8
Done

uart:~$ ot ifconfig up
Done
uart:~$ ot thread start
Done

uart:~$ ot state
child
Done
Understand the netdata and ip address and it would match to OBTR network. We can well ping the OBTR.
uart:~$ ot ping fde7:469d:7d12:1:77bb:f0af:fa65:2529
16 bytes from fde7:469d:7d12:1:77bb:f0af:fa65:2529: icmp_seq=1 hlim=64 time=38ms
1 packets transmitted, 1 packets received. Packet loss = 0.0%. Round-trip min/avg/max = 38/38.0/38 ms.
Done
uart:~$
Step 7: Communicating Beyond the Thread Network
First, we’ll disable the Wi-Fi connection on this Thread End Device PC. Doing so will disconnect any SSH terminal sessions with the Raspberry Pi (OBTR). However, the Thread network will remain active, ensuring communication between the Thread end device and the Border Router (OBTR).
7.1. Pinging a Public Address from the Thread End Device
To verify external communication, we’ll ping a public address (e.g., Google DNS).
uart:~$ ot ping 8.8.8.8
Pinging synthesized IPv6 address: fde7:469d:7d12:2:0:0:808:808
16 bytes from fde7:469d:7d12:2:0:0:808:808: icmp_seq=5 hlim=118 time=138ms
1 packets transmitted, 1 packets received. Packet loss = 0.0%. Round-trip min/avg/max = 138/138.0/138 ms.
Done
This demonstrates successful communication from the Thread end device to an external public network.
7.2 Communicating with an IPv4 Host
Next, let’s communicate with a PC in the same Wi-Fi network, which is running a UDP server. The host’s IP address is 192.168.1.4, and it listens over UDP using Netcat:
$ nc -u -l 0.0.0.0 12345
From the Thread end device, establish a UDP connection with the host and send the message “Happy_New_Year_2025”.
uart:~$ ot udp open
Done
uart:~$ ot udp connect 192.168.1.4 12345
Connecting to synthesized IPv6 address: fde7:469d:7d12:2:0:0:c0a8:104
Done
uart:~$ ot udp send Happy_New_Year_2025
Done
The host immediately receives the message:
$ nc -u -l 0.0.0.0 12345
Happy_New_Year_2025
Bi-Directional Communication Since the UDP session remains open, the host can also send messages back to the Thread end device. Simply type a response, and it will be transmitted:
$ nc -u -l 0.0.0.0 12345
Happy_New_Year_2025
Thanks and Same to You
The Thread end device receives the message:
uart:~$ ot udp send Happy_New_Year_2025
Done
2 bytes from fde7:469d:7d12:2:0:0:c0a8:104 12345
23 bytes from fde7:469d:7d12:2:0:0:c0a8:104 12345 Thanks and Same to You
uart:~$
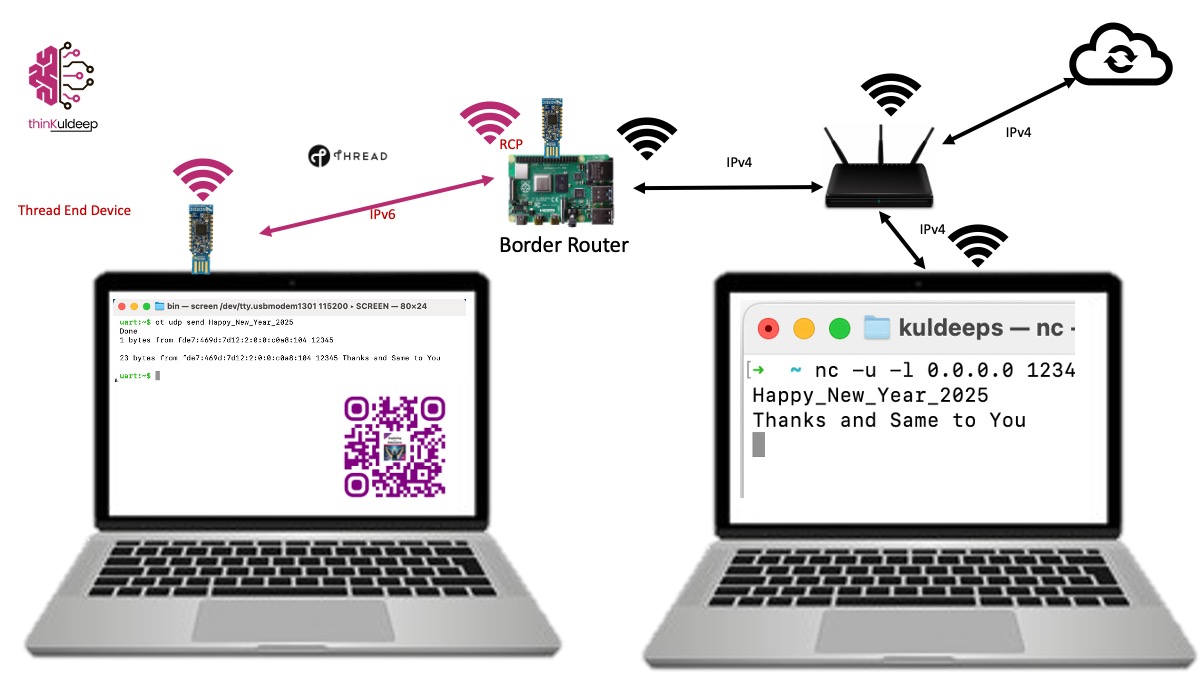
Conclusion Your Thread network is now connected to the internet! Devices in this network can communicate seamlessly with non-Thread devices via the Border Router. As a demonstration, send a “Happy New Year” message from a Thread device to a non-Thread device. This guide covered the essentials of setting up a Thread network with physical devices.
Stay tuned for more hands-on experiments with Thread technology! In future articles, we’ll explore how IoT connects with the broader internet ecosystem, and shaping up it’s practices, and its role in the emerging metaverse. In Chapter 4 of my book 📕Exploring the Metaverse, I discuss how IoT will shape our connected future, and XR devices are the evolved IoT.
Find the IoT Practices Publication for more details.
#IOT #network #cloud #getting started #learning #technology #fundamentals #thread #openthread #nRF #router