Connecting Thread Devices to the Internet over CoAP
- 5 minutes read - 1063 wordsIn my earlier IoT series, we explored Thread networks and protocols—how they form self-healing IPv6 mesh networks designed for low-power IoT environments.
We looked at connectivity over UDP and TCP/HTTP protocols, and how Thread devices can reach the internet using a Border Router.
In this article, we move one step further by implementing CoAP (Constrained Application Protocol) — a lightweight, REST-style protocol built on UDP and optimized for constrained devices and low-bandwidth networks.
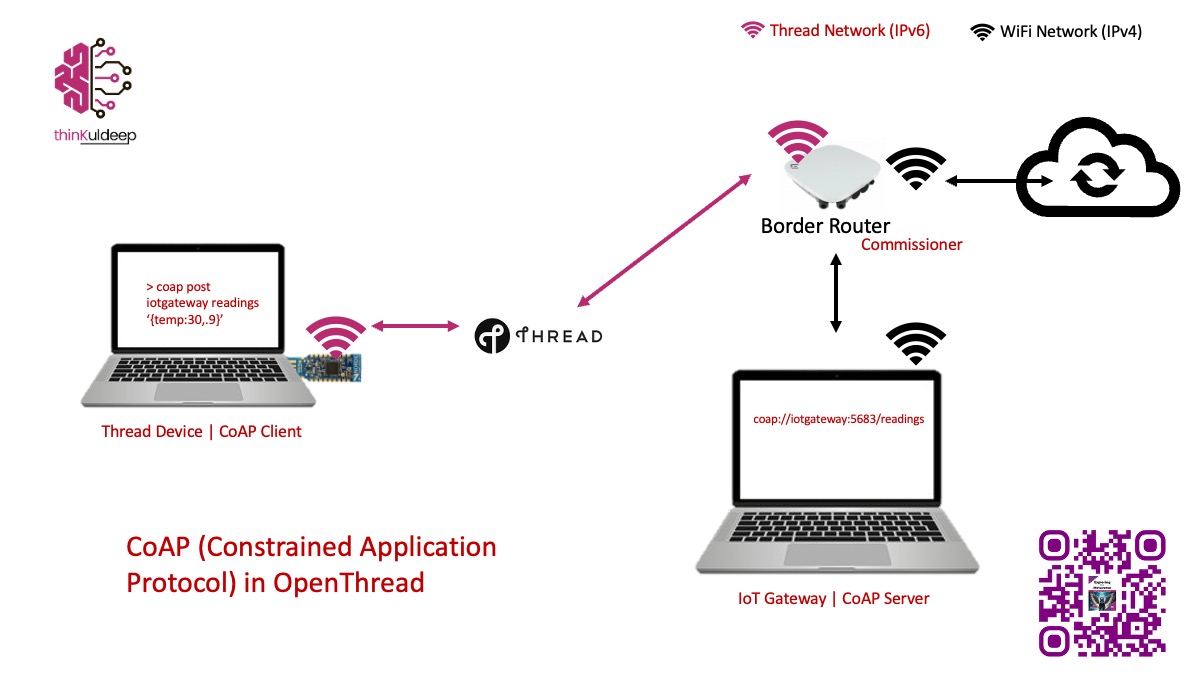
CoAP is a natural fit for Thread.
- By the end of this guide, you’ll have:
- A CoAP server running on an IoT gateway
- A Thread device acting as a CoAP client
What You’ll Need:
- One Raspberry Pi 3/4 as a Border Router
- Two nRF 52840 Dongle (or nRF 52840 Development Kits)
- A development machine A development machine acting as CoAP IoT Gateway
1. Building a CoAP Server (IoT Gateway)
We’ll create a simple CoAP server using Spring Boot and Eclipse Californium. Complete code for the CoAP server is available in this GitHub repository
Step 1 – Add Dependency
Just add the following dependency in your pom.xml file:
<dependency>
    <groupId>org.eclipse.californium</groupId>
    <artifactId>californium-core</artifactId>
    <version>3.9.0</version>
</dependency>
Step 2 - CoAP Server Setup
Start the coap server in a spring boot application. Create a configuration class CoAPServerConfig and add the following code to it:
@Configuration
public class CoAPServerConfig {
    private static final Integer COAP_PORT = 5683;

    @PostConstruct
    public void start() {
        CoapConfig.register();
        var config = org.eclipse.californium.elements.config.Configuration.getStandard();
        config.set(CoapConfig.MAX_MESSAGE_SIZE, 2048);
        config.set(CoapConfig.PREFERRED_BLOCK_SIZE, 512);
        config.set(CoapConfig.COAP_PORT, COAP_PORT);

        CoapServer server = new CoapServer(config); // default CoAP port
        server.add(new ReadingsController());

        server.start();
        logger.info("CoAP server started on port: {}" , coapPort);
    }
}
Step 3 – Create Resource Endpoint
Create a resource class ReadingsController that extends CoapResource and add the following code to it. This resource will handle POST requests to the /readings endpoint and log the received payload,
and respond with status ok.
public class ReadingsController extends CoapResource {
    public ReadingsController() {
        super("readings");   // coap://gateway/readings
    }

    @Override
    public void handlePOST(CoapExchange exchange) {
        byte[] payload = exchange.getRequestPayload();

        if (payload == null || payload.length == 0) {
            exchange.respond(CoAP.ResponseCode.BAD_REQUEST);
            return;
        }

        String readings = new String(payload);
        logger.info("Received: {}" , readings);

        exchange.respond(CoAP.ResponseCode.CONTENT, "{\"status\":\"ok\"}");
    }
}
Step 4 - Run CoAP Server
Build your project and run the spring boot application. You should see the log message indicating that the CoAP server has started on port 5683.
➜  coap-iot-gateway >  mvn clean package
....
[INFO] ------------------------------------------------------------------------
[INFO] BUILD SUCCESS
[INFO] ------------------------------------------------------------------------
----
➜  target  > java -jar coap-iot-gateway-0.0.1-SNAPSHOT.jar
  :: Spring Boot ::                (v4.0.2)
2026-02-12 13:31:33 INFO  c.tk.coap.CoapIotGatewayApplication - Starting CoapIotGatewayApplication v0.0.1-SNAPSHOT using Java 20.0.2 with PID 29144 (/Users/kuldeeps/Workspaces/IoT/coap-iot-gateway/target/coap-iot-gateway-0.0.1-SNAPSHOT.jar started by kuldeeps in /Users/kuldeeps/Workspaces/IoT/coap-iot-gateway/target)
2026-02-12 13:31:34 INFO  o.e.c.core.network.CoapEndpoint - coap Started endpoint at coap://[0:0:0:0:0:0:0:0]:5683
2026-02-12 13:31:34 INFO  com.tk.coap.CoAPServerConfig - CoAP server started on port: 5683
2026-02-12 13:31:34 INFO  c.tk.coap.CoapIotGatewayApplication - Started CoapIotGatewayApplication in 1.26 seconds (process running for 2.023)
Step 5 - Test locally
Install a command-line CoAP client, such as [coap-client] from the [libcoap] library, and send a POST request to the CoAP server:
➜  IoT > brew install libcoap

➜  IoT>  coap-client -m post -b 64 -e '{"temp":24.5}' coap://localhost:5683/readings
{"status":"ok"}
On server side we should see the following log indicating that the payload was received successfully:
2026-02-12 13:31:34 INFO  c.tk.coap.CoapIotGatewayApplication - Started CoapIotGatewayApplication in 1.26 seconds (process running for 2.023)
2026-02-12 13:31:41 INFO  c.t.c.controller.ReadingsController - Received: {"temp":24.5}
You may try the same from other machines in the same network by replacing localhost with the IP address of the CoAP server.
2. Making a Thread Device a CoAP Client
To communicate with this CoAP server from thread network, we need a border router, Find here the steps for settings up OpenThread Border Router and thread network using a nRF52840 dongle and Raspberry Pi.
Step 1 - Enable CoAP in OpenThread Firmware
We now enable CoAP in the OpenThread firmware for the nRF52840.
➜  IoT > git clone --recursive https://github.com/openthread/ot-nrf528xx.git

➜  IoT > cd ot-nrf528xx
➜  ot-nrf528xx > rm -rf build
➜  ot-nrf528xx > script/build nrf52840 USB_trans -DOT_JOINER=ON -DOT_COMMISSIONER=ON -DOT_DNS_CLIENT=ON -DOT_SRP_CLIENT=ON -DOT_ECDSA=ON -DOT_BOOTLOADER=USB -DOT_THREAD_VERSION=1.2 -DOT_COAP=ON -DOT_COAP_SERVER=ON -DOT_COAP_CLIENT=ON -DOT_CLI_COAP=ON

➜  ot-nrf528xx > cd build/bin
➜  bin > arm-none-eabi-objcopy -O ihex ot-cli-ftd ot-cli-ftd.hex
➜  bin > ls
➜  bin > ot-cli-ftd ot-cli-ftd.hex ot-cli-mtd     ot-cli-radio   ot-ncp-ftd     ot-ncp-mtd     ot-rcp
This will generate ot-cli-ftd.hex, which we’ll flash onto the nRF52840 dongle to make it a CoAP client. Flash Firmware to nRF52840 Dongle
- Put the dongle in DFU mode by pressing the small button next to the white button.
- Open the Programmer App, select device and and flash the
ot-cli-ftd.hexfirmware.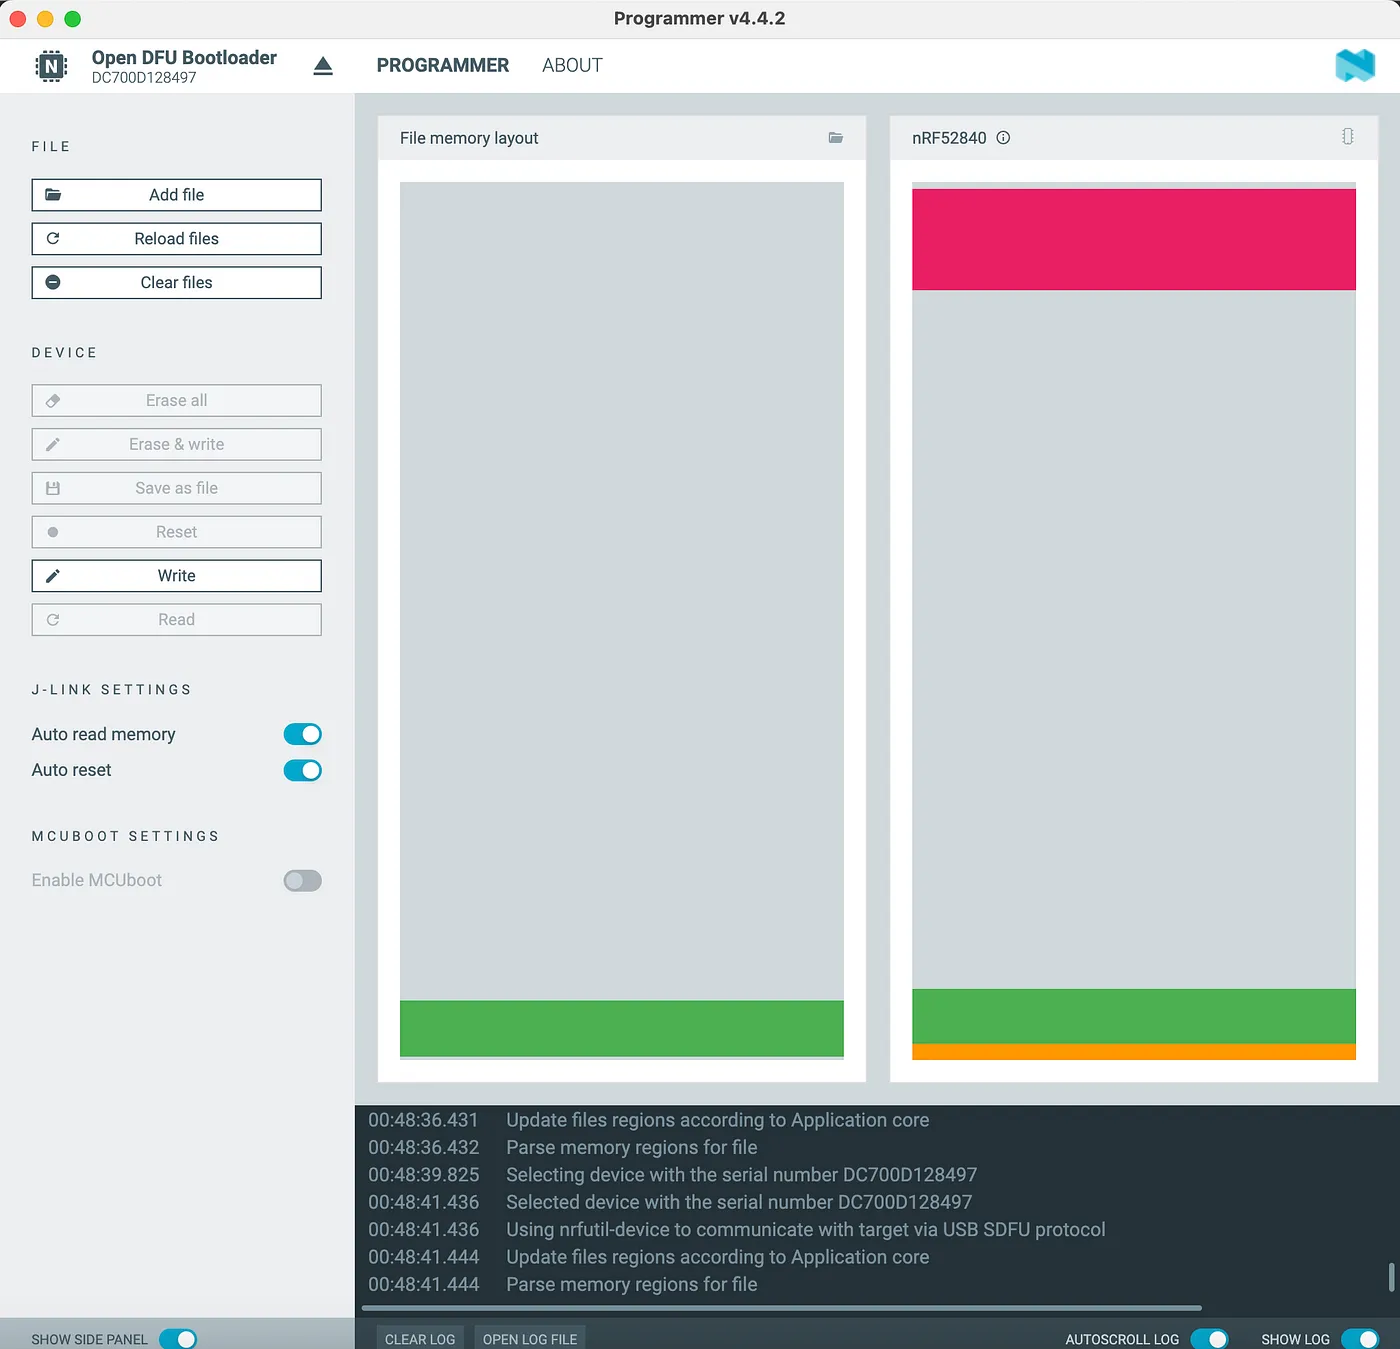
- Verify the dongle is no longer blinking, indicating successful flashing
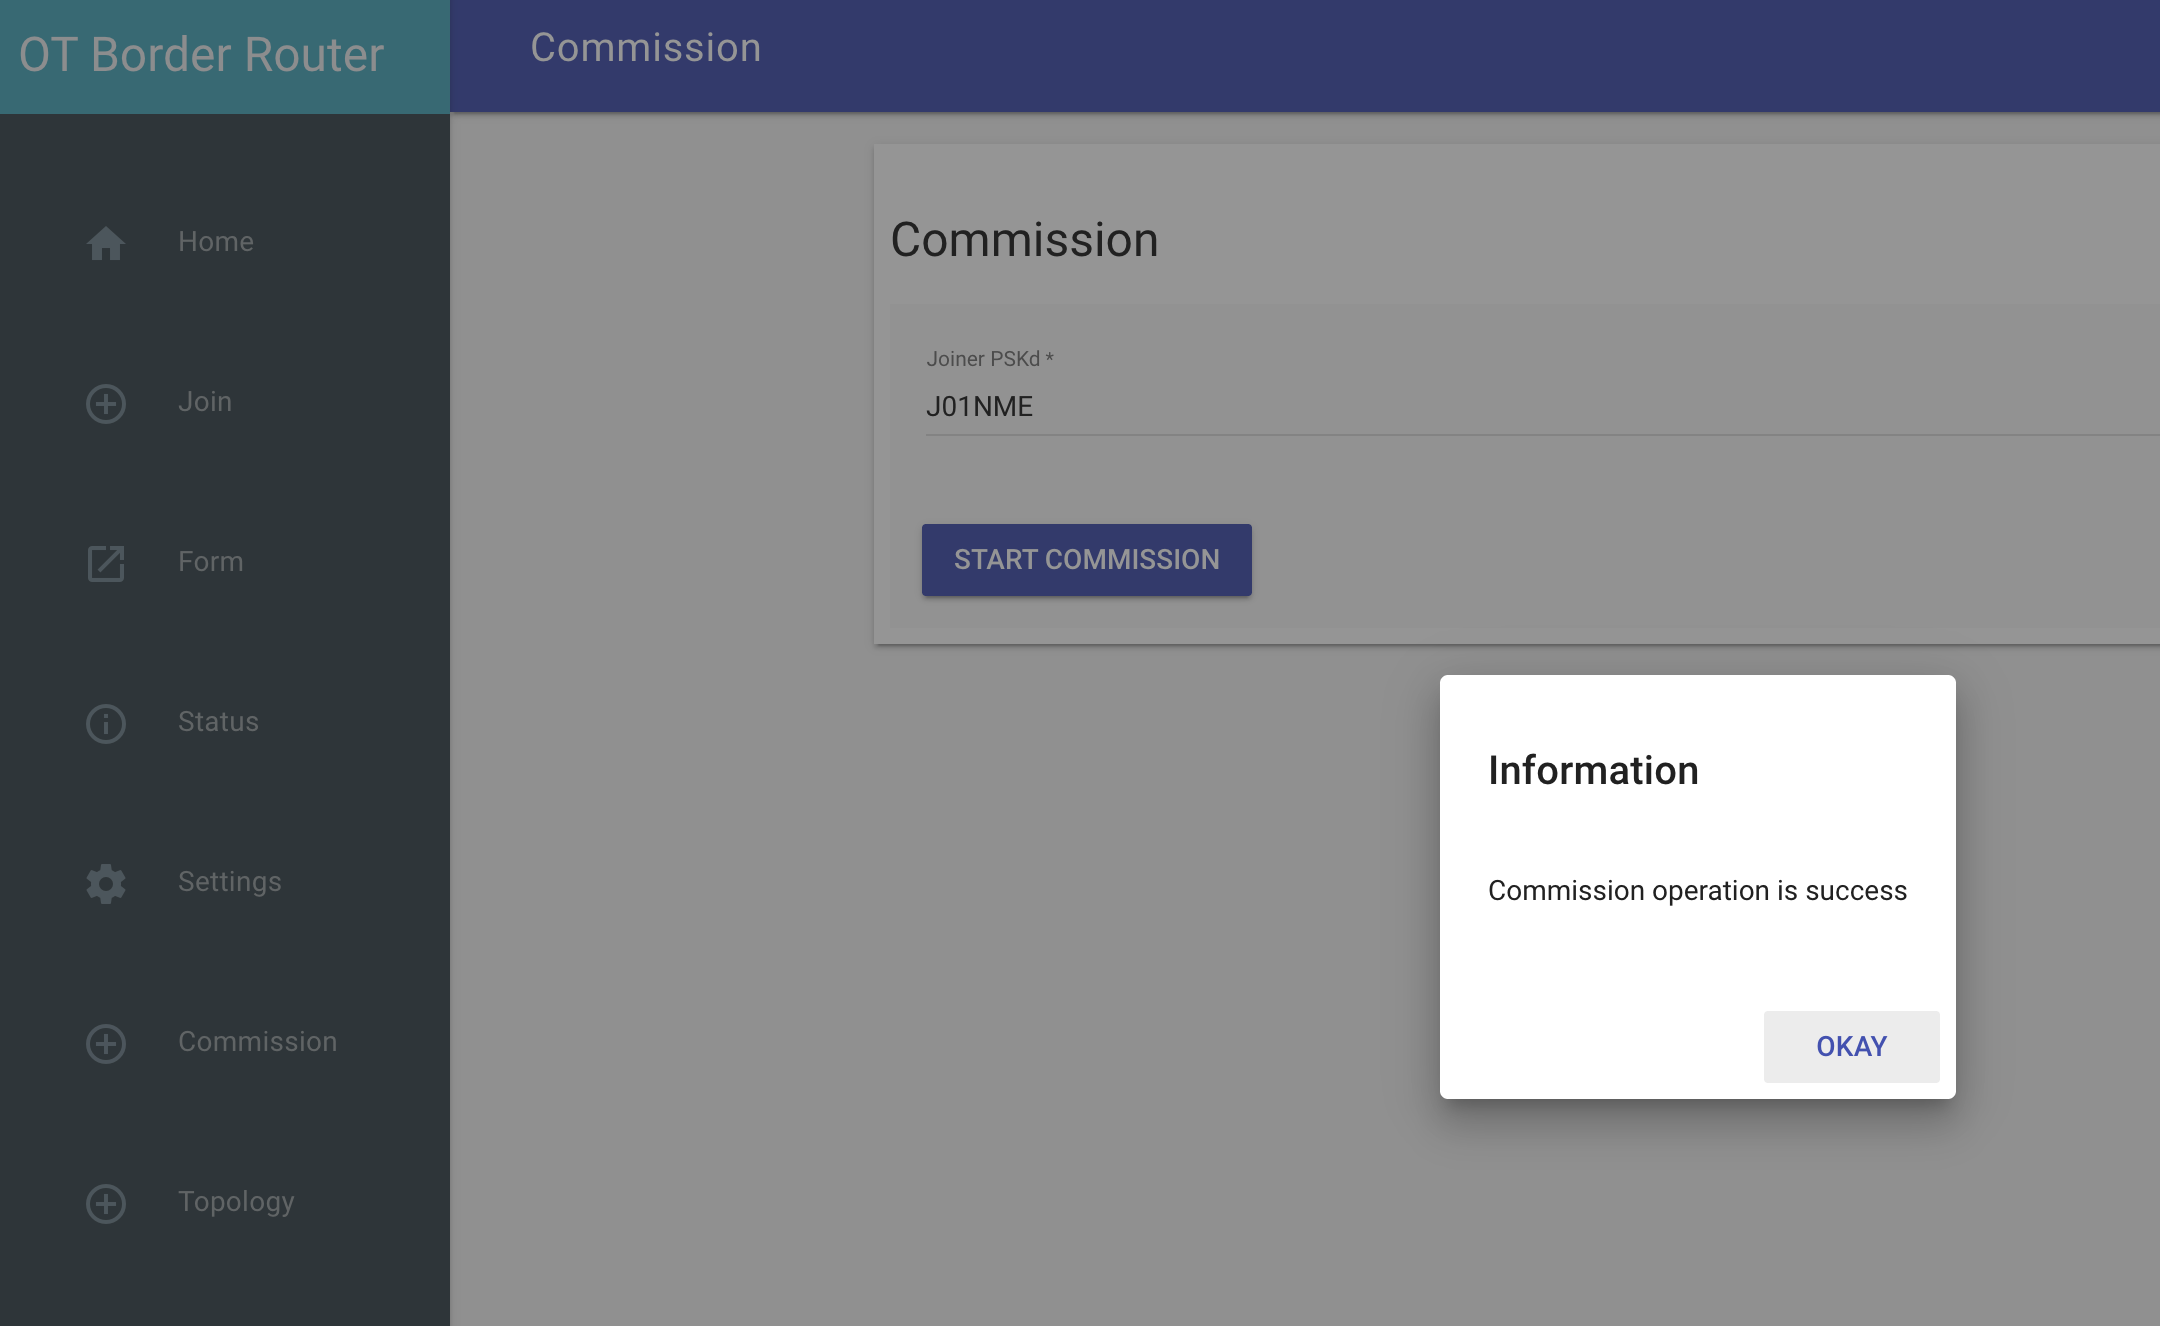
Step 2 - Join the Thread Network
Make sure commissioner is running on the border router. Border router is running in Raspberry Pi https://BRHost, on the web interface we can start commissioner
Then connect to the dongle using screen command and run the following commands to join the thread network as a child device.
> ifconfig up
Done
>

> joiner start J01NME
Done
Join success

> thread start
Done
> state
child
Done
Step 3 - Send Sensor Data over CoAP
Get the IPv6 address of your CoAP server (via Border Router) and send via the CLI interface of the nRF52840 dongle.
> ping 192.168.1.3
Pinging synthesized IPv6 address: fdcf:573d:2e53:2:0:0:c0a8:103
1 packets transmitted, 0 packets received. Packet loss = 100.0%.
Done

> coap start
Done
> coap post fdcf:573d:2e53:2:0:0:c0a8:103 readings con '{"temp":30.9}'
oap post fdcf:573d:2e53:2:0:0:c0a8:103 readings con '{"temp":30.9}'
Done
> coap response from fdcf:573d:2e53:2:0:0:c0a8:103 with payload: 7b22737461747573223a226f6b227d
Make sure request type is “con” - confirmable, so that it can listen to response from the server. Notice the response payload is in hexadecimal format, which is the default format for CoAP responses.
Server side log should show the following message indicating that the CoAP request was received successfully from the thread device:
2026-02-12 13:35:49 INFO c.t.c.controller.ReadingsController - Received: {"temp":30.9}
Check responses value by converting it from hexadecimal to string. You can use xxd command for that:
➜  bin > echo 7b22737461747573223a226f6b227d | xxd -r -p
{"status":"ok"}%
🎉 Your Thread device is now communicating with the internet over CoAP.
What We Achieved
- ✔ Thread mesh network
- ✔ Border Router internet access
- ✔ CoAP server on gateway
- ✔ CoAP client on device
- ✔ Lightweight IoT communication
This is exactly how modern low-power IoT stacks are built.
What’s Next? - Embed CoAP directly in firmware logic
Refer :
- https://openthread.io/reference/cli/concepts/coap
- https://openthread.io/reference/cli/commands#coap_post
- https://openthread.io/reference/group/api-coap more details on CoAP commands in OpenThread CLI.
Find the IoT Practices Publication for more details.
#IOT #network #cloud #getting started #learning #technology #fundamentals #thread #openthread #nRF #router #coap