Understanding the Thread Protocol and Network
- 6 minutes read - 1193 wordsIn previous articles, we explored MQTT in-depth, even setting up a web-based remote controller that simulated a physical button. We did this in a “Soft IoT” way, avoiding hardware intricacies. However, in IoT, networking between devices plays a crucial role. Not all IoT devices are connected to the Internet or can communicate via MQTT over the internet, as shown in our earlier examples. These devices need a low-latency, low-power network that can auto-discover and manage device communication seamlessly. Popular protocols like Zigbee, Matter, and Thread are designed for this purpose. In this article, we’ll focus on Thread, discussing its fundamentals and building a virtual Thread network — no physical hardware required.
🤔 About Thread
Thread is a lightweight, low-power communication protocol for IoT devices. It operates on IPv6 and IEEE 802.15.4 mesh networking, providing secure, scalable, and reliable connectivity. Google’s OpenThread is an open-source implementation of the Thread protocol, widely used in smart home devices like Google Nest.
OpenThread also offers a simulation of network nodes, including roles like leader, router, and child nodes, with automatic adjustments when nodes go offline. The protocol allows for efficient network discovery and seamless router selection, ensuring continuous connectivity.
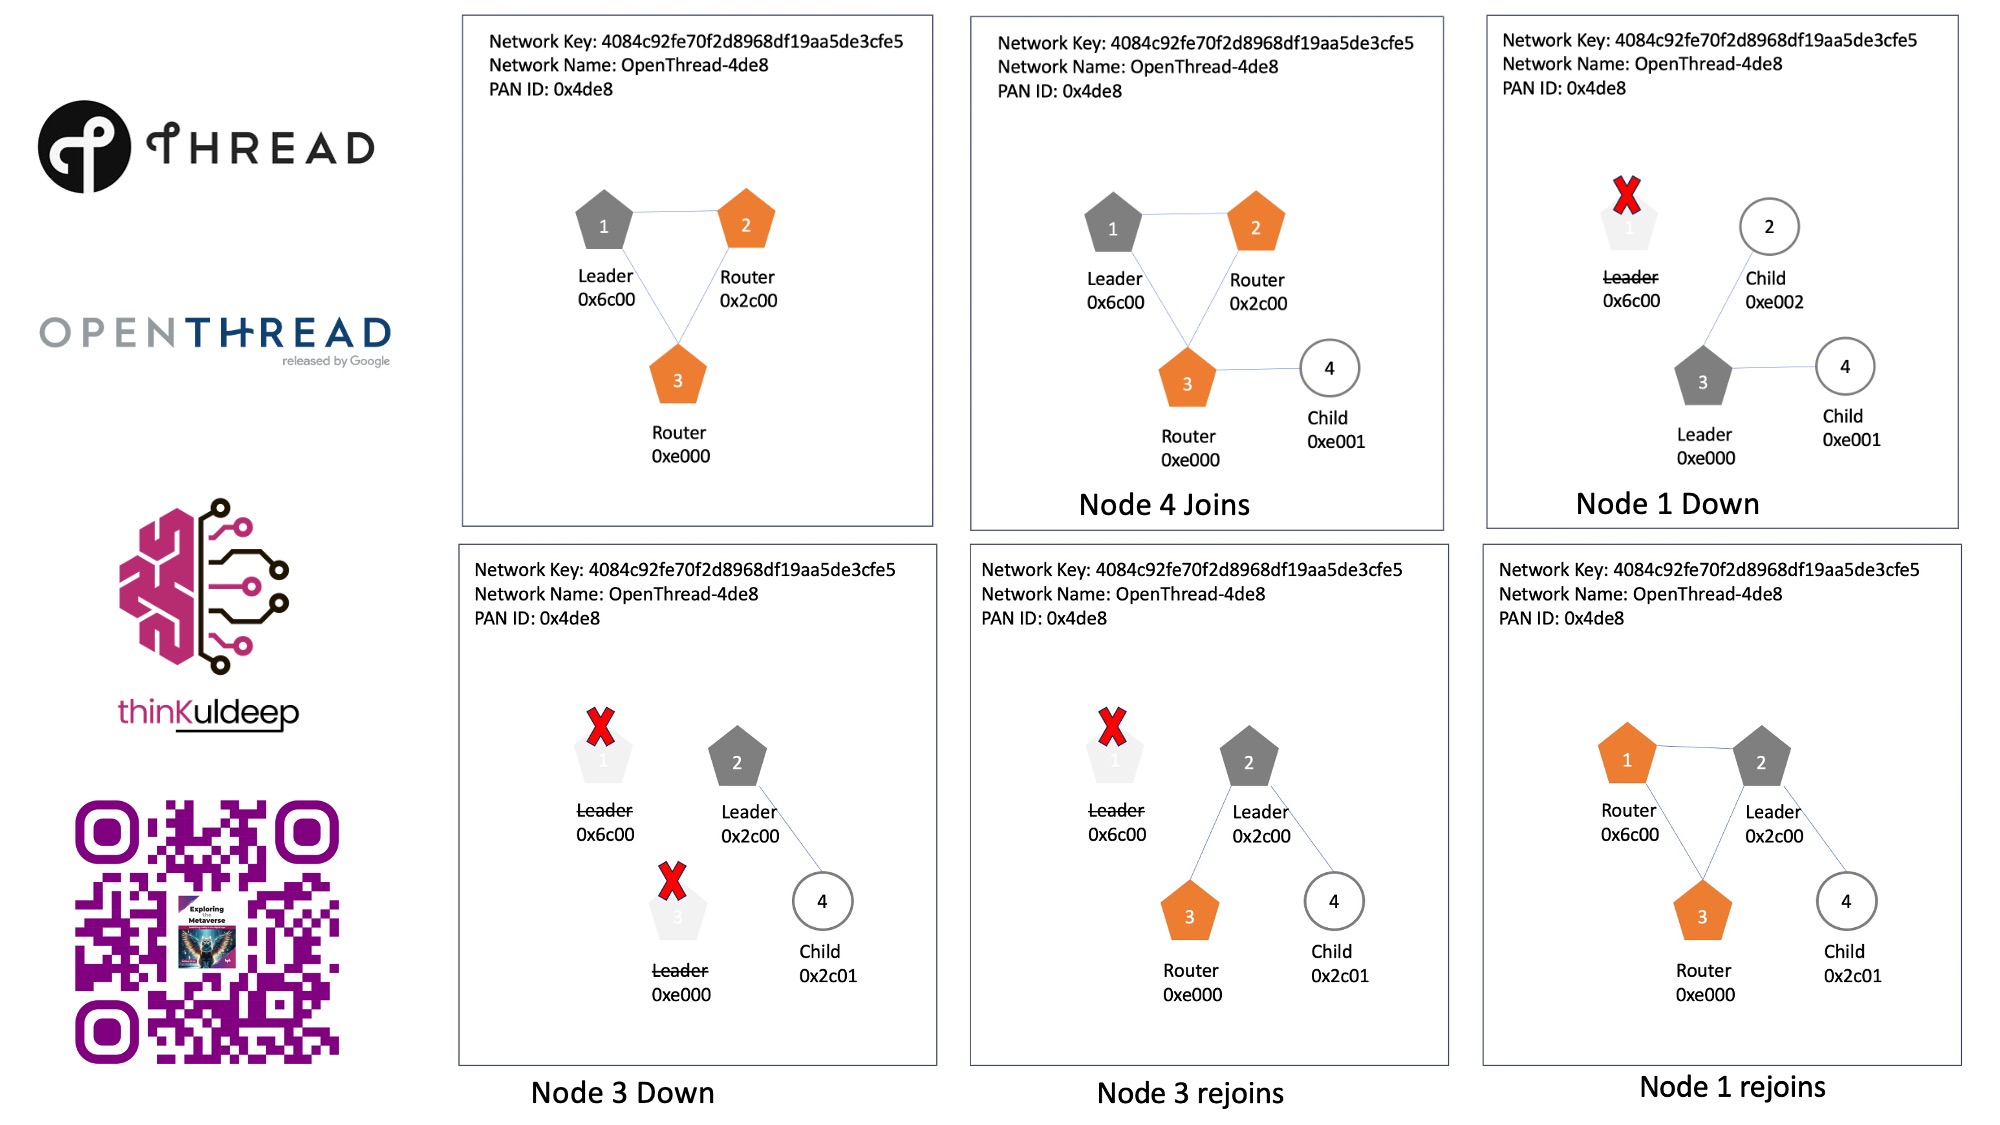
Learn more about node types and IPv6 addressing for Thread networks from the OpenThread Primer.
🛜 Creating a Virtual Thread Network
To see Thread in action, we’ll simulate a Thread network using Docker, creating virtual nodes that form a mesh network.
Step 1: Set Up Docker
First, download and install Docker Desktop. Then, pull the OpenThread image using the following command:
➜ ~ docker pull openthread/environment:latest
Once the image is downloaded, run it in interactive mode with network administration capabilities and IPv6 enabled:
➜  ~ docker run --name codelab_otsim_ctnr -it --sysctl net.ipv6.conf.all.disable_ipv6=0 --cap-add=net_admin openthread/environment bash
root@a5cce65da408:/#
Step 2: Start an Emulated Thread Device
The OpenThread Docker image includes a pre-built binary called ot-cli-ftd, a command-line tool for creating emulated Thread devices.
root@a5cce65da408:/# cd /openthread/build/examples/apps/cli/
root@a5cce65da408:/openthread/build/examples/apps/cli# ./ot-cli-ftd 1
>
Next, assign a random dataset to the device, which includes a unique network ID, network keys, and a network name:
> dataset init new
Done
> dataset
Active Timestamp: 1
Channel: 17
Wake-up Channel: 25
Channel Mask: 0x07fff800
Ext PAN ID: abf8abcc3dd0daaf
Mesh Local Prefix: fd16:2a3a:b22f:3dfe::/64
Network Key: 4084c92fe70f2d8968df19aa5de3cfe5
Network Name: OpenThread-4de8
PAN ID: 0x4de8
PSKc: bd48fa9ca97d01c2052e18951b312e25
Security Policy: 672 onrc 0
Done
>
Now, bring up the interface and start the Thread network:
> dataset commit active
Done
> ifconfig up
Done
> thread start
Done
> state
leader
Done
>
Check the device’s state — it should show as a “leader” in few seconds, indicating that this node has become the leader of the network.
> ipaddr
fd16:2a3a:b22f:3dfe:0:ff:fe00:fc00
fd16:2a3a:b22f:3dfe:0:ff:fe00:6c00
fd16:2a3a:b22f:3dfe:5f94:95df:d7e6:d730
fe80:0:0:0:180e:a1f8:2561:9953
Done
>
Note the IP address, as per the IPv6 addressing, ff:fe00 addresses are router locator (RLOC), while fd16:2a3a:b22f:3dfe:5f94:95df:d7e6:d730 is the end point indentifier (EID) for this node.
Step 3: Add More Nodes to form the Network
Now, let’s add a second device to the network. Open a new terminal and start a second instance of the Docker container:
➜  ~ docker exec -it codelab_otsim_ctnr bash
root@a5cce65da408:/# /openthread/build/examples/apps/cli/ot-cli-ftd 2
>
Ensure the new device uses the same network key and PAN ID as the first node:
> dataset networkkey 4084c92fe70f2d8968df19aa5de3cfe5
Done
> dataset panid 0x4de8
Done
> dataset commit active
Done
> ifconfig up
Done
> thread start
Done
This device will initially join the network as a child node, and after some time, it will promote itself to a router.
> state
child
Done

>state
router
Done
>ipaddr
fd16:2a3a:b22f:3dfe:0:ff:fe00:2c00
fd16:2a3a:b22f:3dfe:ea5e:d106:d0ad:7a4
fe80:0:0:0:84ca:6d98:48:4c34
Done
>
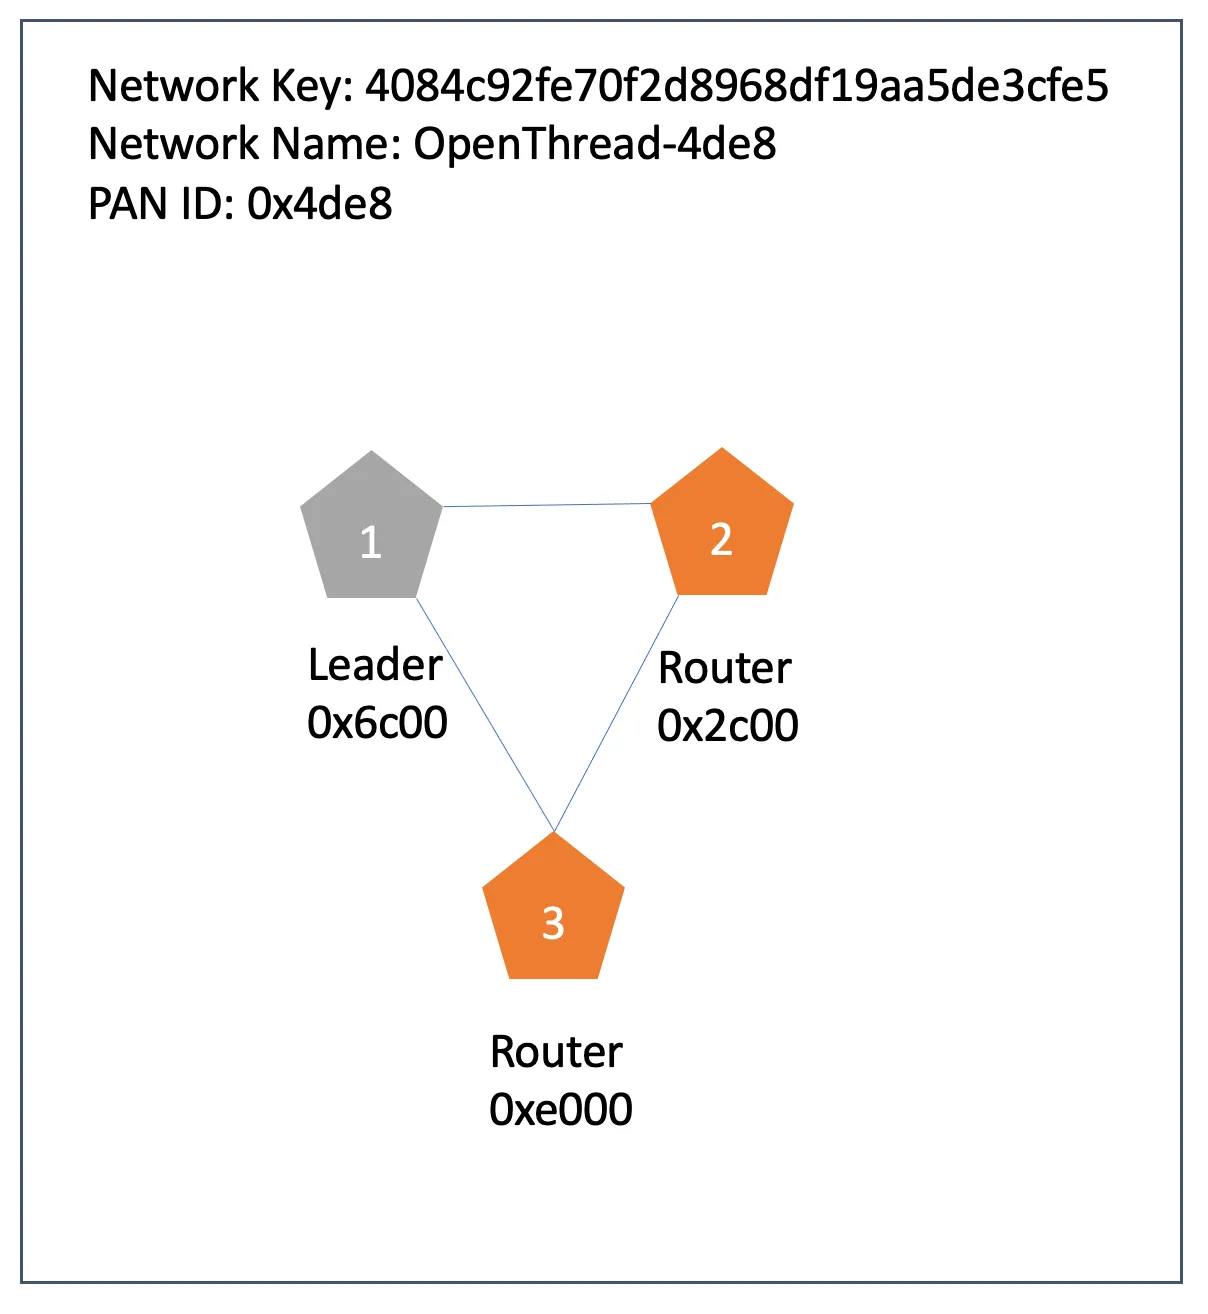
This creates the a Thread network of two nodes. In similar way you may add more nodes. I added one more node with RLOC16 as 0xe000 (last 16 bit of Addr)
Step 4: Verify the Network
To check the network, use the router table command to verify that all router nodes are part of the mesh network:
> router table
| ID | RLOC16 | Next Hop | Path Cost | LQ In | LQ Out | Age | Extended MAC     | Link |
+----+--------+----------+-----------+-------+--------+-----+------------------+------+
| 11 | 0x2c00 |       56 |         1 |     3 |      3 |   1 | 86ca6d9800484c34 |    1 |
| 27 | 0x6c00 |       63 |         0 |     0 |      0 |   0 | 1a0ea1f825619953 |    0 |
| 56 | 0xe000 |       11 |         1 |     3 |      3 |   4 | d2be59ce650916de |    1 |
You should see the RLOC16 (Router Locator) entries of each node in the table. Nodes can also communicate with each other by pinging their IPv6 addresses.
> ping fd16:2a3a:b22f:3dfe:0:ff:fe00:2c00
16 bytes from fd16:2a3a:b22f:3dfe:0:ff:fe00:2c00: icmp_seq=1 hlim=64 time=4ms
1 packets transmitted, 1 packets received. Packet loss = 0.0%. Round-trip min/avg/max = 4/4.0/4 ms.
Done
>
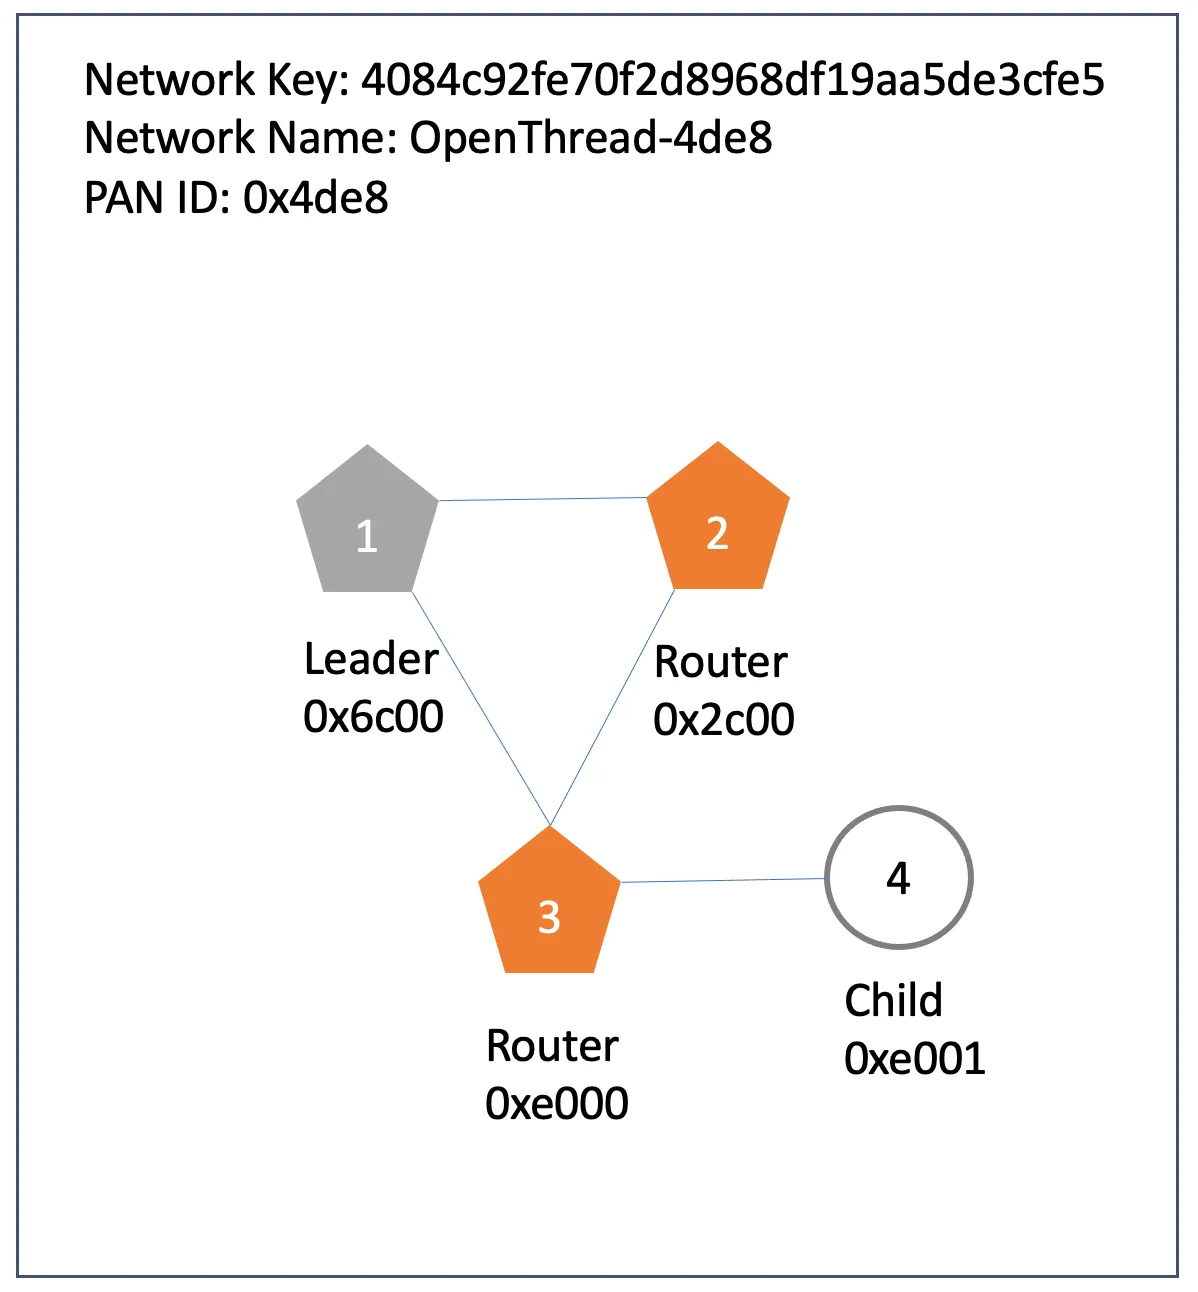
You may try adding more nodes in similar way. You may also create emulated device of type MTD (Minimal Thread Device) using command ot-cli-mtd, and this can act as child only, it would not be promoted to router. Follow all similar steps to get in on the same network.
root@a5cce65da408:/# /openthread/build/examples/apps/cli/ot-cli-mtd 4
>
I have added a node 4 using this, and it got linked to router node 3.
Now let’s test the network behaviour.
Step 5: Simulate Network Behavior
Now, let’s test how the Thread network behaves under different conditions:
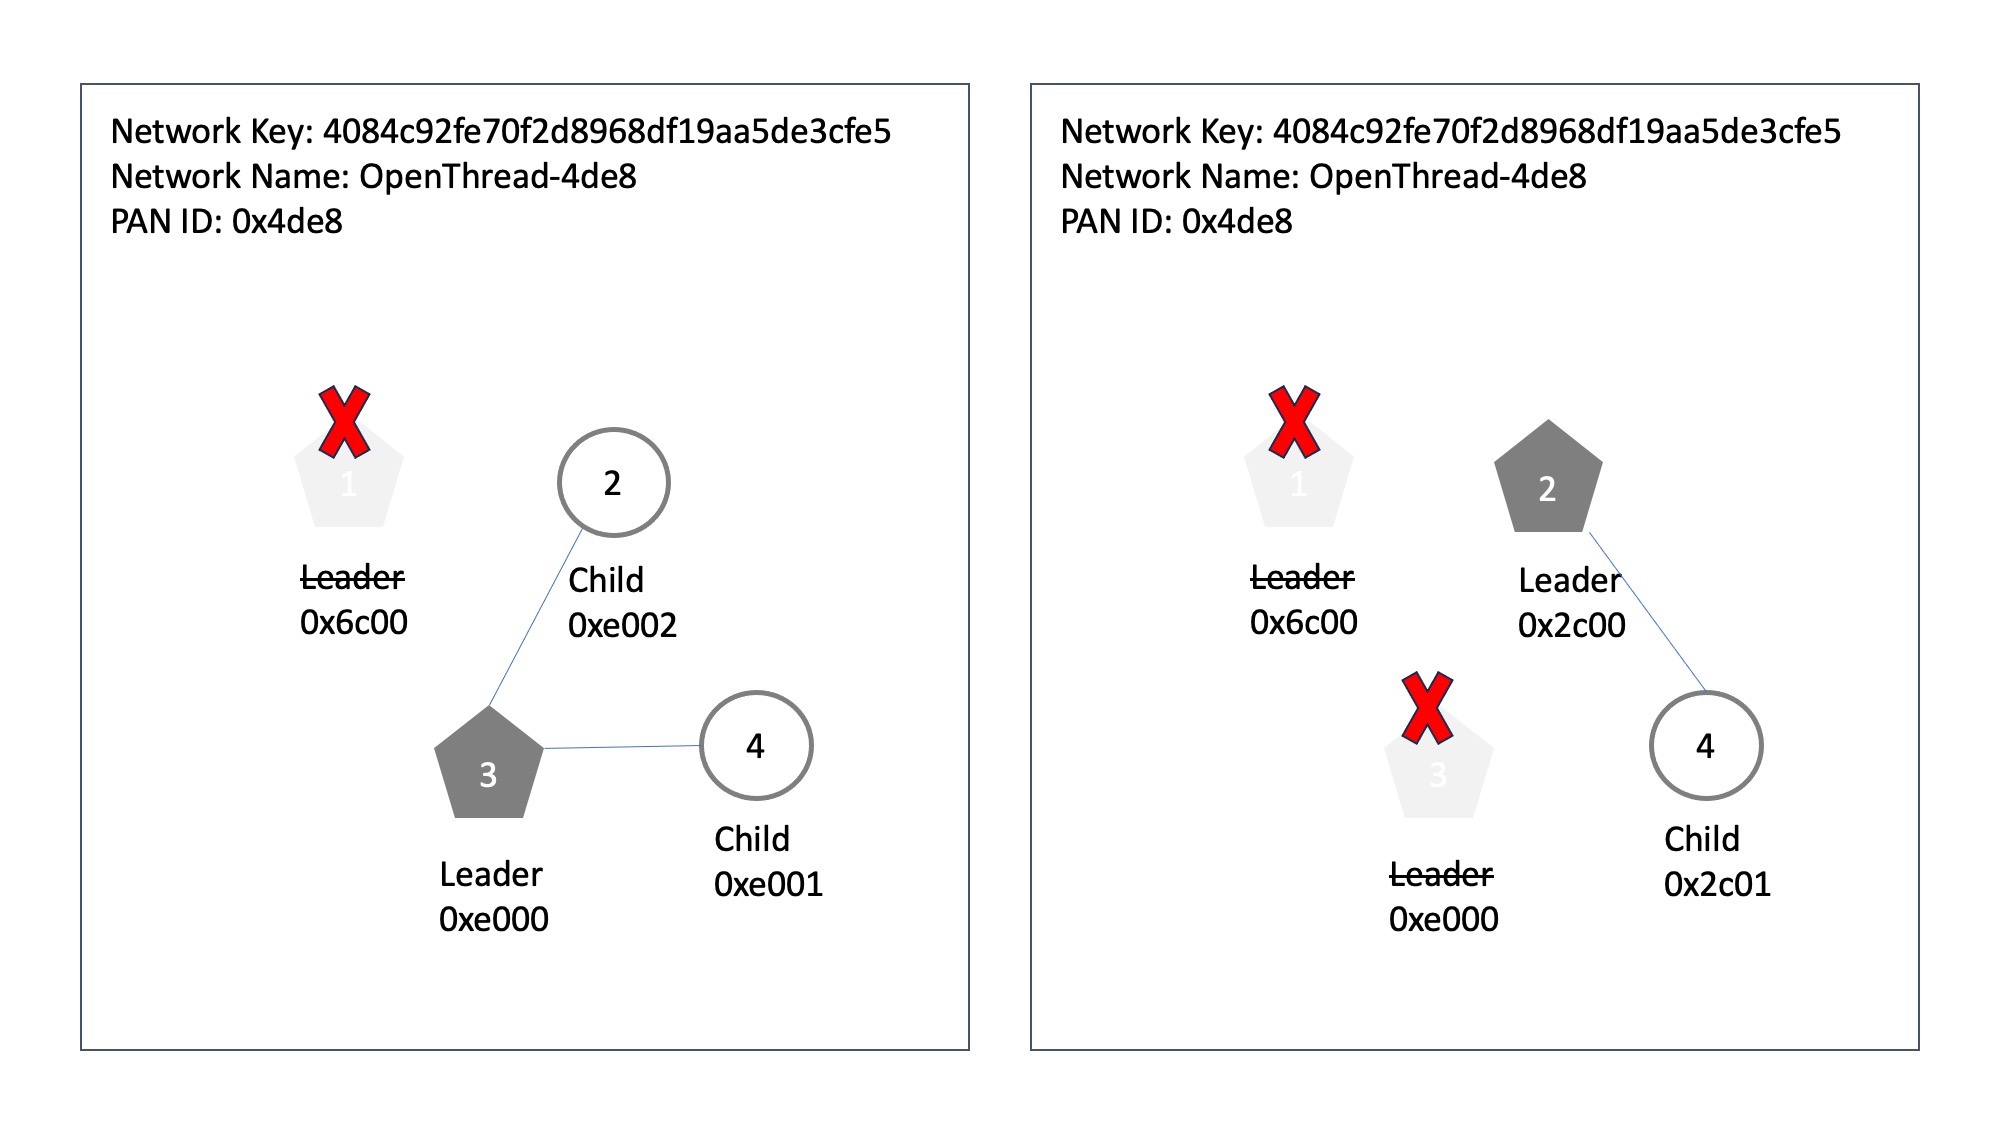
Node Failure
If one node goes down, another node will take over its role. For example, if the leader goes offline, one of the other routers will be promoted to leader.
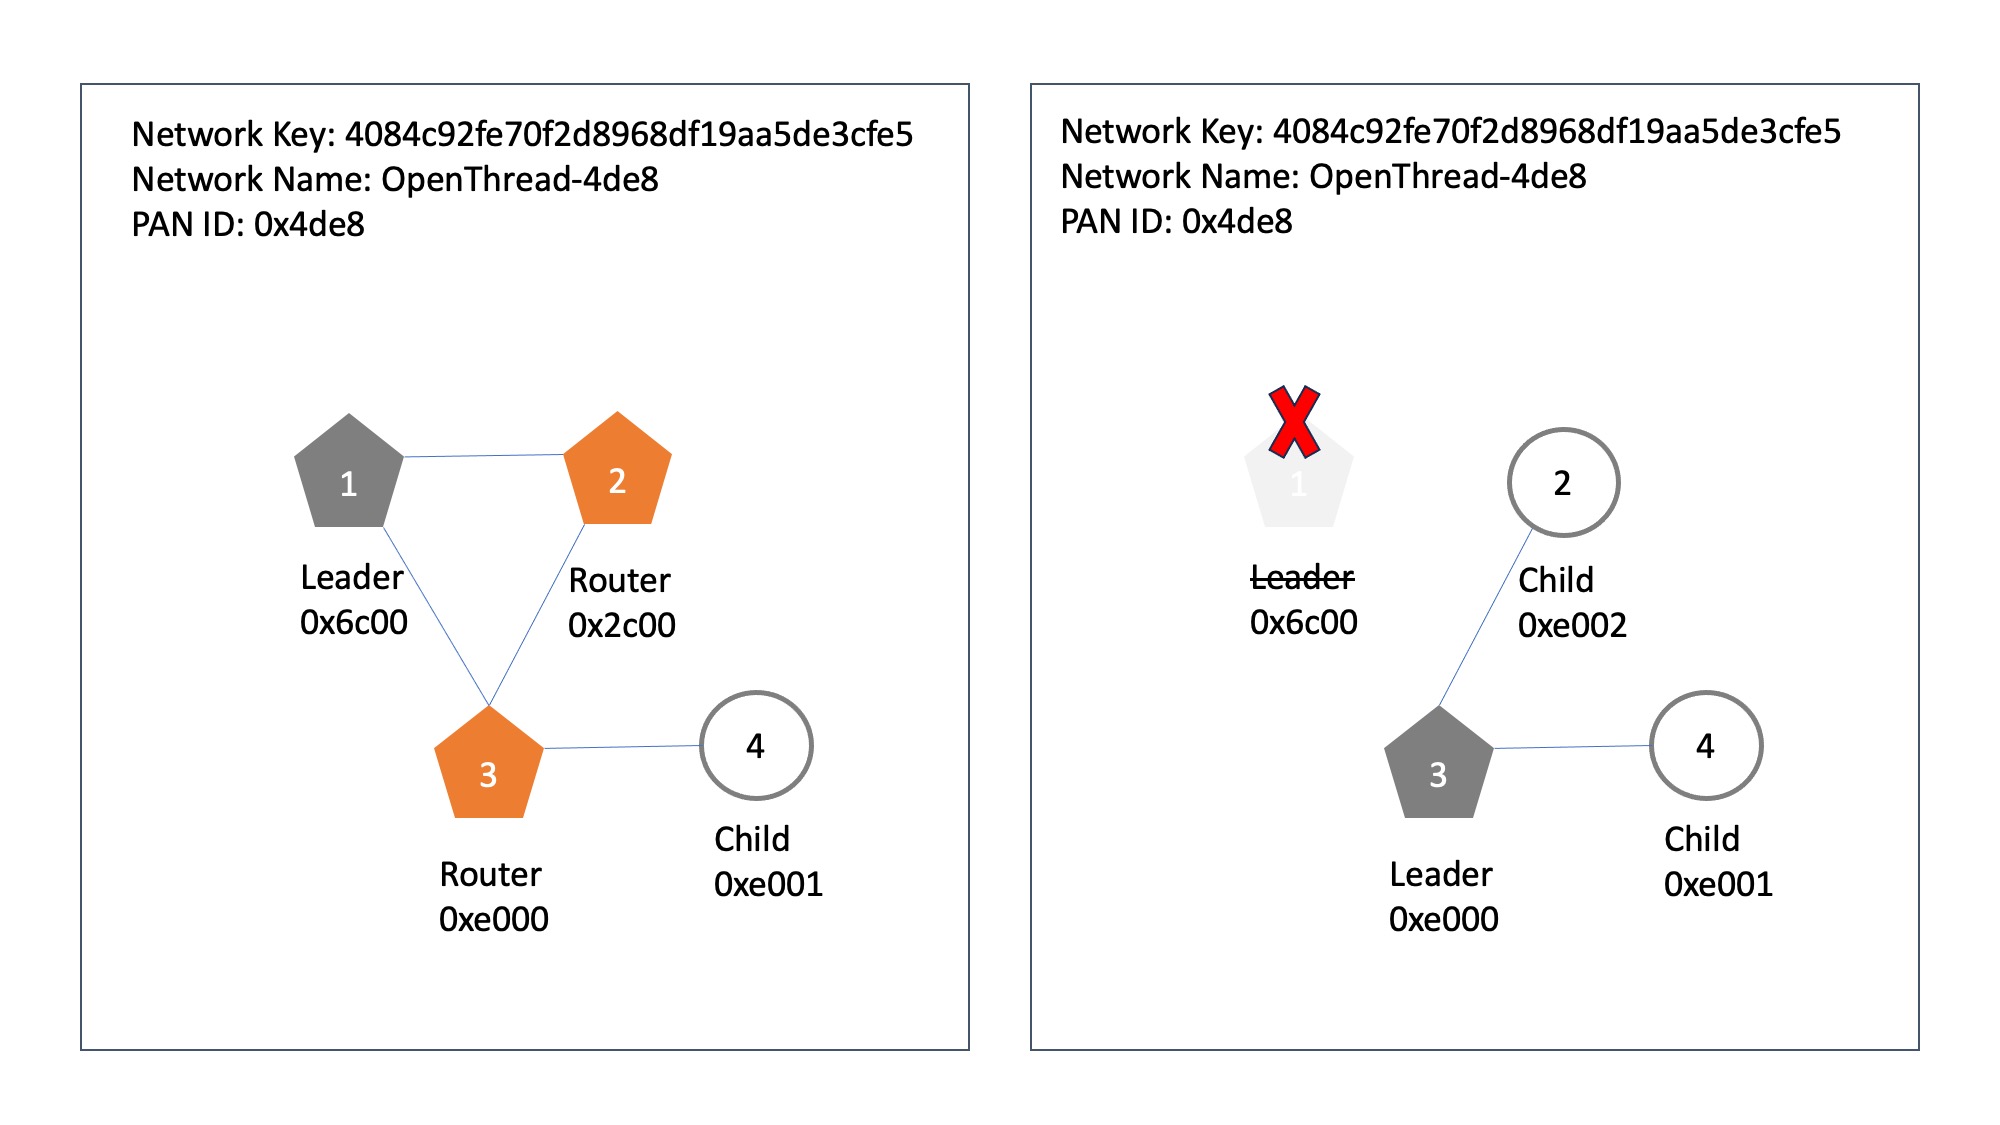
Node 1 — disabled
> thread stop
Done
> state
disabled
Done
Node 2 — downgraded to a child
> state
router
Done
...
> state
child
Done
Node 3 — promoted to leader
> state
router
Done
...
> state
leader
Done
Node 4 remains as child.
Similarly we can try stopping node 3 as well, it would cause node 2 to become router again, and attach node 4 to node 2. Its IP addr also chances as per the IPv6 addressing for childs
Node Rejoining
When a node re-joins the network, it first attaches as a child node and may later promote itself to a router as needed.
> thread start
Done
> state
router
Done
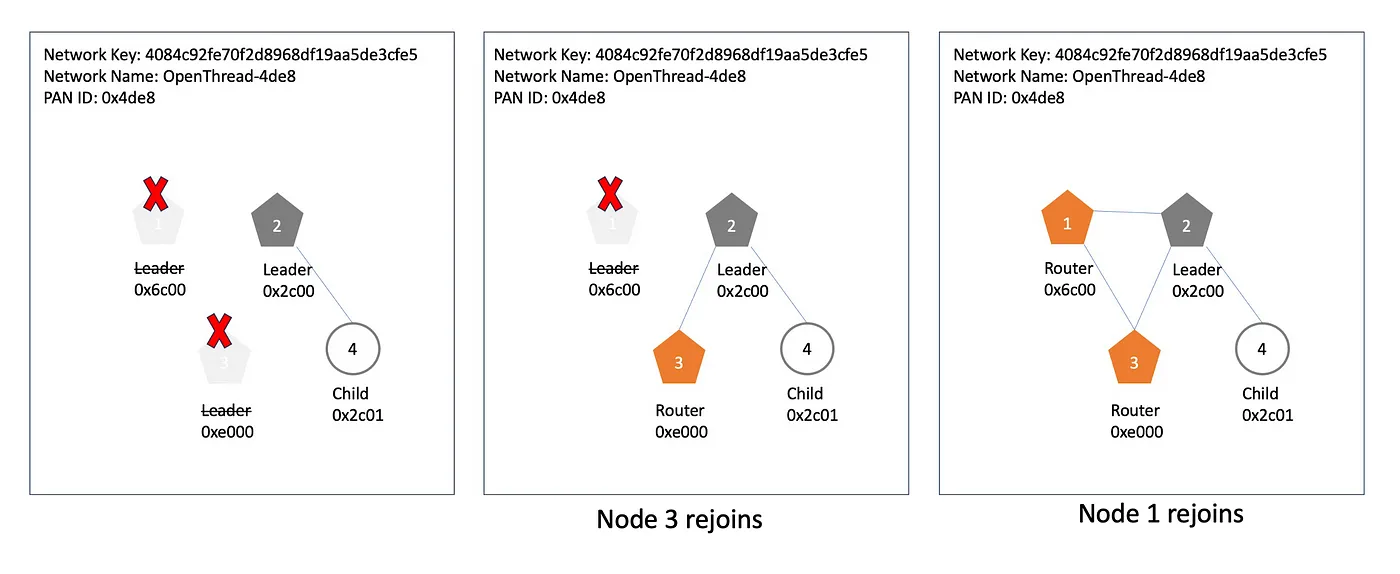
This demonstrates how Thread’s self-healing capabilities ensure the network remains stable and operational, even when nodes go offline or rejoin. Additional features, like configuring authentication, making Leader as a Commissioner to control which devices can join the network, provide further customization. For more in-depth guidance, refer to the codelab.
Conclusion
This article introduced the fundamentals of the Thread protocol and demonstrated how to create a virtual Thread network using Docker. We saw how Thread’s mesh networking ensures robust and dynamic device communication. In the next tutorial, we’ll extend this setup with real hardware and explore how to connect a Thread network to the web for broader accessibility.
In Chapter 4 of my book 📕Exploring the Metaverse, I discuss how IoT will shape our connected future, and XR devices are the evolved IoT.

☞ Click here for availability and discounts in your region
☞ Read: Exploring the Metaverse - Synopsis
Stay tuned for more! Keep learning, keep experimenting, and keep sharing.
Find the IoT Practices Publication for more details.
#IOT #network #cloud #getting started #learning #technology #fundamentals #thread #openthread #docker