Implementing a Proxy for Single Sign-On (SSO) Authentication
- 4 minutes read - 677 wordsEnterprise integrations almost always require authentication and authorization. In particular, Single Sign-On (SSO) with Multi-Factor Authentication (MFA) has become a standard practice in modern enterprise applications.
But here’s the challenge:
When experimenting with new integrations, building spikes, or running proofs of concept (POCs), setting up a full SSO environment upfront can be cumbersome. Sometimes all you need is a way to quickly test APIs that are locked behind SSO.
That’s where a lightweight SSO proxy comes in handy.
This article walks through how to build such a proxy using Node.js and Puppeteer. The proxy lets you open an SSO login page in a browser, capture the authenticated cookies, and reuse them to fetch data from SSO-protected APIs.
Note:- This is not for production use, but rather a simple tool to facilitate development and testing.
Why an SSO Proxy?
A simple proxy can be a lifesaver when you want to:
- Showcase integration with existing portal APIs that require SSO—even before SSO is fully configured.
- Develop and test integrations locally without waiting for enterprise SSO setup.
- Debug authentication flows with minimal overhead.
Run the proxy locally, pass in the API you want to test, and it will handle authentication for you.
SSO Proxy Architecture
We will use Node.js with Express to create a simple web server that listens for incoming requests to proxy. When a request is made to the proxy endpoint, the server will:
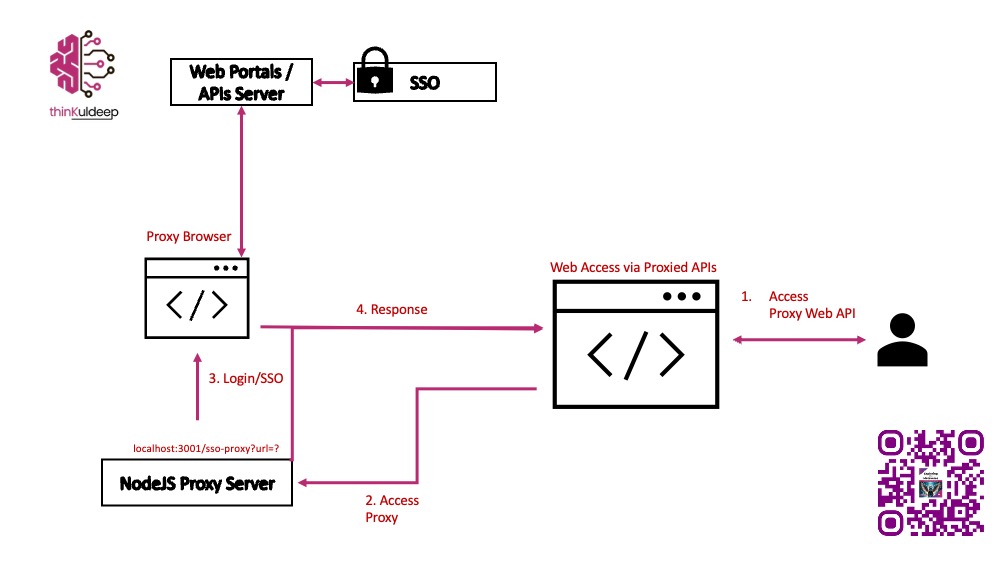
- Launch a browser with Puppeteer.
- Navigate to the SSO login page.
- Wait for the user to complete authentication (including MFA).
- Capture cookies set by the SSO provider.
- Use these cookies to fetch the target API and return the JSON response.
- Reuse cookies for future calls to the same host.
- Handle errors gracefully (timeouts, login failures, etc.).
Source code: GitHub Repository →
Implementation
1. Proxy Endpoint
The proxy exposes a GET endpoint (/sso-proxy) that accepts:
url→ The target API URLssoUrl(optional) → The login URL if different from the API endpoint
app.get('/sso-proxy', async (req, res) => {
    try {
        const ssoURL = req.query.ssoUrl;
        const targetURL = req.query.url;

        reqResContainer.req = req;
        reqResContainer.res = res;
        console.log(`Proxying: ${targetURL} via ${ssoURL}`);

        if (loggedInHostMap.has(getHost(targetURL))) {
            console.log('Already logged in, accessing URL directly...');
            await page.goto(targetURL, { waitUntil: 'domcontentloaded' });
        } else {
            await loadPage(ssoURL || targetURL);
            if (ssoURL) {
                console.log('Accessing targetURL now...');
                await page.goto(targetURL, { waitUntil: 'domcontentloaded' });
            }
        }
    } catch (error) {
        console.error('Error loading page via proxy:', error);
        res.status(500).json({ error: error.message, action: "Please restart proxy" });
    }
});
2. Handling SSO Login with Puppeteer
The loadPage function manages login and listens for responses:
async function loadPage(url) {
  if (!page) {
    const browser = await puppeteer.launch({
      headless: false, // visible for login
      defaultViewport: null
    });
    page = await browser.newPage();

    page.on('response', async (response) => {
      const url = response.url();
      console.log("Response: " + url + " " + response.status());

      const ssoURL = reqResContainer.req.query.ssoUrl;
      const targetURL = reqResContainer.req.query.url;
      const host = getHost(targetURL);

      // Mark host logged in
      if (!loggedInHostMap.has(host) && ssoURL && url.startsWith(ssoURL) && [200,304].includes(response.status())) {
        loggedInHostMap.set(host, true);
        console.log('Logged in, waiting for API call...');
      }

      // Capture API response
      if (url.startsWith(targetURL) && [200,304].includes(response.status())) {
        if (!ssoURL) loggedInHostMap.set(host, true); // no separate login
        console.log('API call detected: ' + url);
        try {
          const contentType = response.headers()['content-type'] || '';
          const data = await response.text();
          reqResContainer.res.type(contentType).send(data);
        } catch (err) {
          console.error('Failed to parse API response', err);
        }
      }
    });
  }

  console.log('Navigating to: ' + url);
  await page.goto(url, { waitUntil: 'domcontentloaded' });
  console.log('Waiting for redirect...');
  await page.waitForNavigation({ waitUntil: 'networkidle2', timeout: 60000 });
}
3. Using the Proxy in Your App
You can call the proxy from your frontend or scripts like this:
const response = await fetch(`${PROXY_URL}?url=${API_URL_GET_CLAIMS}&ssoUrl=${SSO_URL}`);
const jsonData = (await response.json()).SearchResults || [];
jsonData.forEach(row => {
    table.row.add(row).draw();
});
Example usage:
Conclusion
This SSO Proxy has proven very useful for:
- Showcasing integrations with APIs behind SSO before enterprise setup.
- Speeding up local development and testing.
- Reducing the friction of MFA and SSO when working with early-stage POCs.
It’s a practical tool to bridge the gap between prototyping and production-ready integrations.