Working with Enterprise Service Bus
- 8 minutes read - 1579 wordsThis article starts from basic terms of ESB worlds and then provides details of the FuseESB with various examples.
It contains step by step guide to install FuseESB, and develop and deploy OSGi bundle on FuseESB.
Lets understand terminologies of the ESB world :
ESB
An Enterprise Service Bus (ESB) is a software architecture model used for designing and implementing the interaction and communication between mutually interacting software applications in Service Oriented Architecture. As software architecture model for distributed computing, it is a specialty variant of the more general client server software architecture model and promotes strictly asynchronous message oriented design for communication and interaction between applications.
OSGi
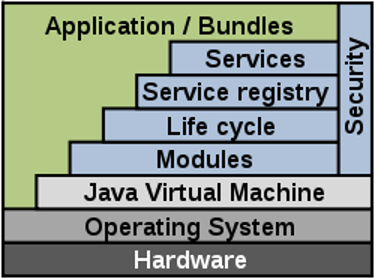
The Open Services Gateway initiative (OSGi) framework is a module system and service platform for the Java programming language that implements a complete and dynamic component model.
Applications or components (coming in the form of bundles for deployment) can be remotely installed, started, stopped, updated and uninstalled without requiring a reboot; management of Java packages/classes is specified in great detail.
 Application life cycle management (start, stop, install, etc.) is done via APIs that allow for remote downloading of management policies. The service registry allows bundles to detect the addition of new services, or the removal of services, and adapt accordingly.
MANIFEST.MF file with OSGi Headers:
- Bundle-Name: Defines a human-readable name for this bundle, Simply assigns a short name to the bundle.
- Bundle-SymbolicName: The only required header, this entry specifies a unique identifier for a bundle, based on the reverse domain name convention (used also by the java packages)
- Bundle-Description: A description of the bundle’s functionality.
- Bundle-ManifestVersion: This little known header indicates the OSGi specification to use for reading this bundle.
- Bundle-Version: Designates a version number to the bundle.
- Bundle-ClassPath: Class path of classes.
- Bundle-Activator: Indicates the class name to be invoked once a bundle is activated.
- Export-Package: Expresses what Java packages contained in a bundle will be made available to the outside world.
- Import-Package: Indicates what Java packages will be required from the outside world, in order to fulfill the dependencies needed in a bundle.
Apache KARAF
Apache Karaf is a small OSGi based runtime which provides a lightweight container onto which various components and applications can be deployed Key points of Karaf, Hot deployment, Dynamic configuration, Logging System, Provisioning, Remote access, Security framework, Managing instances
Apache ServiceMix
Apache ServiceMix is an enterprise-class open-source distributed enterprise service bus (ESB) and service-oriented architecture (SOA) toolkit. and released under the Apache License.
ServiceMix 4 fully supports OSGi and Java Business Integration (JBI) specification JSR 208. ServiceMix is lightweight and easily embeddable, has integrated Spring support and can be run at the edge of the network (inside a client or server), as a standalone ESB provider or as a service within another ESB. You can use ServiceMix in Java SE or a Java EE application server.
ServiceMix uses ActiveMQ to provide remoting, clustering, reliability and distributed failover. The basic frameworks used by ServiceMix are Spring and XBean.
ServiceMix is often used with Apache ActiveMQ, Apache Camel and Apache CXF in SOA infrastructure projects.
Enterprise subscriptions for ServiceMix is available from independent vendors including the FuseSource Corp. The FuseSource team offers an enterprise version of ServiceMix called Fuse ESB that is tested, certified and supported.
ServiceMix Runtime
At the core of ServiceMix 4.x is the small and lightweight OSGi based runtime. This provides a small lightweight container onto which various bundles can be deployed.
The directory layout of the ServiceMix Runtime is as follows
    servicemix/
        bin/
	        servicemix.sh    # shell scripts to boot up SMX
	        servicemix.bat
        wrapper/         # Java Service Wrapper binaries
        system/           # the system defined OSGi bundles (i.e. the stuff shipped in the distro) which 				generally shouldn't be edited by users
        deploy/           # where bundles should be put to be hot-deployed - in jar or expanded format 				(the latter is good to let folks edit spring.xml files etc)
 	    etc/              # some config files for describing which OSGi container to use; also a text file to be 			able to describe the maven repos & mvn bundles to deploy
        data/             # directory used to store transient data (logs, activemq journal, transaction log, 			embedded DB, generated bundles)
	    logs/
		  generated-bundles/
		  activemq/
Apache Service Mix NMR
Apache ServiceMix NMR is the core Bus of Apache ServiceMix 4. It is built as a set of OSGi bundles and meant to be deployed onto any OSGi runtime, but mainly built on top of Apache ServiceMix Kernel. The NMR project is also where the Java Business Integration 1.0 (JBI) specification is implemented.
Working with Fuse ESB
Fuse ESB is certified, productized and fully supported by the people who wrote the code. Fuse ESB has a pluggable architecture that allows organizations to use their preferred service solutions in their SOA. Any standard JBI or OSGi-compliant service engine or binding component – including BPEL, XSLT or JMX engines – may be deployed to a Fuse ESB container, and Fuse ESB components may be deployed to other ESBs.
Install and Run FuseESB
-
Windows
- Unzip the downloaded zip(from http://fusesource.com/products/enterprise-servicemix/) at C:\ApacheServiceMix, let’s call it
FUSE_ESB_HOME. - Open a command line console and change directory to
FUSE_ESB_HOME. To start the server, run the following command in Windows
servicemix.bat - Unzip the downloaded zip(from http://fusesource.com/products/enterprise-servicemix/) at C:\ApacheServiceMix, let’s call it
-
Linux
-
Download Fuse ESB binaries for Linux from http://fusesource.com/product_download_now/fuse-esb-apache-servicemix/4-4-1-fuse-01-13/unix
-
Extract the archive “apache-servicemix-4.4.1-fuse-01-13.tar.gz” to installation directory, let’s say it is ‘/usr/local/FuseESB’
Go to Installation directory ‘/usr/local/FuseESB’ Extract the content:
$ cd /usr/local/FuseESB

$tar -zxvf  /root/apache-servicemix-4.4.1-fuse-01-13.tar.gz
We will refer the installation directory “/usr/local/FuseESB /apache-servicemix-4.4.1-fuse-01-13“as
FUSE_ESB_HOMEin this document. -
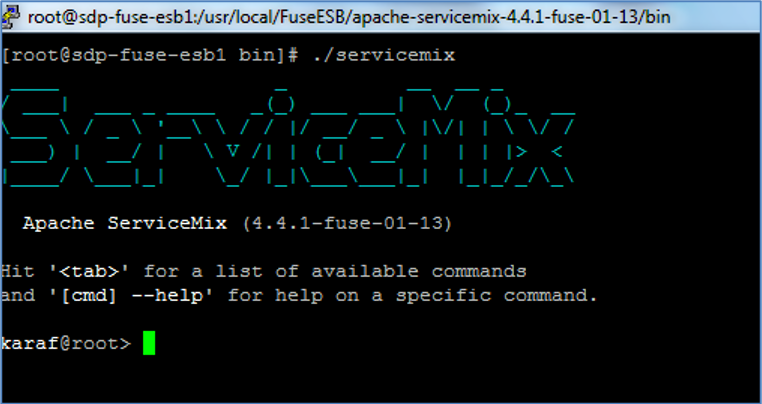
Run Fuse ESB on Linux as follows :
- Go to FUSE_ESB_HOME/bin
- Run following command to start FuseESB console

-
Run following command to start FuseESB console in background
./start -
Use following command to re-connect the FuseESB server as client.
./client -a 8101 -h localhost -u smx -p smx
-
OSGI WAR packaging and deployment
Create an OSGi WAR using eclipse
-
Create Dynamic Web Project
- Open Eclipse Galileo for a Workspace (say D:/Workspaces/ESBRnD)
- Go to File > New > Project > Web > Dynamic Web Project
- Name it , say “ESB_Test”
-
Create a JSP file
- Right click on Project and Select New > JSP
- Name it, say “index.jsp”
- Put some content in jsp file.
<% page language=”java” contentType=”text/html”> <!DOCTYPE html> <html lang="en"> <head> <meta charset="UTF-8"> <title>This is first ESB test page.</title> </head> <body> <h1>This is first Apache Service Mix Project</h1> <h2>Welcome to the world of ESB and OSGi Packaging</h2> </body> </html> -
Create a Bundle Activator
- Add required osgi jars in class path, right click on your project choose: Properties > Java Build Path > Add External JARs
- Choose the file org.eclipse.osgi_*.jar from the eclipse plugin directory
- Now create a class for Bundle Activator, Right click on Project and Select New > Class
- Name the class and package, say MyActivator under package com.tk.bundle and implement it from org.osgi.framework.BundleActivator , click finish
- Provide implementation for unimplemented methods
package com.tk.bundle;

import org.osgi.framework.BundleActivator

public class MyActivator implements BundleActivator {

  @Override
  public void start(BundleContext ctx) throws Exception {
    System.out.println("MyActivator.start()");
  }

  @Override
  public void start(BundleContext ctx) throws Exception {
    System.out.println("MyActivator.stop()");
  }
}
-
Update Menifest File as per OSGi Bundle - Provide all bundle properties as described in OSGi section.
/WebContent/META-INF/MANIFEST.MFManifest-Version: 1.0 Bundle-Name: ESB_Test Bundle-SymbolicName: ESB_Test Bundle-Description: This is the first OSGi war Bundle-ManifestVersion: 2 Bundle-Version: 1.0.0 Bundle-ClassPath: .,WEB-INF/classes Bundle-Activator: com.tk.bundle.MyActivator Import-Package: org.osgi.framework:version="1.3.0" -
Create WAR
- Export the project as WAR, right click on project and select Export>WAR
- Name the war file, say it “ESB_Test.war”
Create an OSGi WAR using Maven
Other way is to create the WAR using maven.
-
Create Maven Web Project
- Open Eclipse Galileo for a Workspace (say D:/Workspaces/ESBRnD)
- Go to File > New > Project > Web > Maven Project
- Select “Create Simple Project” provide the data and Finish
-
Create a JSP file as described in last section. In ‘webapp’ folder.
-
Create a web.xml in ‘webapp’ folder, copy the default web app generated from last section.
<?xml version="1.0" encoding="UTF-8"?> <web-app id="WebApp_ID" version="2.4" xmlns="http://java.sun.com/xml/ns/j2ee" xmlns:xsi="http://www.w3.org/2001/XMLSchema-instance" xsi:schemaLocation="http://java.sun.com/xml/ns/j2ee http://java.sun.com/xml/ns/j2ee/web-app_2_4.xsd"> <display-name>ESB_Test</display-name> <welcome-file-list> <welcome-file>index.html</welcome-file> <welcome-file>index.htm</welcome-file> <welcome-file>index.jsp</welcome-file> <welcome-file>default.html</welcome-file> <welcome-file>default.htm</welcome-file> <welcome-file>default.jsp</welcome-file> </welcome-file-list> </web-app> -
Now update pom.xml for following - Add dependency for osgi.core
<dependencies>
<dependency>
      <groupId>org.apache.felix</groupId>
      <artifactId>org.osgi.core</artifactId>
      <version>1.0.0</version>
 </dependency>
</dependencies>
Add Build configuration for war and OSGi Bundle.
<build> <defaultGoal>install</defaultGoal> <plugins> <plugin> <groupId>org.apache.maven.plugins</groupId> <artifactId>maven-compiler-plugin</artifactId> <version>2.3.2</version> <configuration> <source>1.6</source> <target>1.6</target> <encoding>UTF-8</encoding> </configuration> </plugin> <plugin> <groupId>org.apache.maven.plugins</groupId> <artifactId>maven-resources-plugin</artifactId> <version>2.4.3</version> <configuration> <encoding>UTF-8</encoding> </configuration> </plugin> <plugin> <artifactId>maven-war-plugin</artifactId> <version>2.1-alpha-1</version> <executions> <execution> <id>default-war</id> <phase>package</phase> <goals> <goal>war</goal> </goals> </execution> </executions> <configuration> <archive> <manifestFile>${project.build.outputDirectory}/META-INF/MANIFEST.MF</manifestFile> </archive> </configuration> </plugin> <plugin> <groupId>org.apache.felix</groupId> <artifactId>maven-bundle-plugin</artifactId> <version>2.2.0</version> <extensions>true</extensions> <executions> <execution> <id>bundle-manifest</id> <phase>process-classes</phase> <goals> <goal>manifest</goal> </goals> </execution> </executions> <configuration> <supportedProjectTypes> <supportedProjectType>jar</supportedProjectType> <supportedProjectType>bundle</supportedProjectType> <supportedProjectType>war</supportedProjectType> </supportedProjectTypes> <instructions> <Bundle-SymbolicName>${project.artifactId}</Bundle-SymbolicName> <Bundle-Activator>com.tk.bundle.MyActivator</Bundle-Activator> <Bundle-ClassPath>.,WEB-INF/classes</Bundle-ClassPath> <Bundle-RequiredExecutionEnvironment>J2SE-1.5</Bundle-RequiredExecutionEnvironment> <Import-Package>org.osgi.framework;version="1.3.0"</Import-Package> </instructions> </configuration> </plugin> </plugins> </build> -
Now execute maven to run goal install
mvn clean installor right click on pom.xml and select Run As > Maven Install, it will generate the war file ‘esb_test1-0.0.1-SNAPSHOT.war’ in target folder.
Deploy WAR
-
Console Based deployment
- Go to FuseESB Console
- Install WAR file to Apache Server Mix by running following command
osgi:install war:<File URL>It will give a bundle id ( say 221), Run following command to start the installed bundle
$ osgi:start <bundle id>$ osgi:install war:file://kuldeeps/test/Esb_Test.war Bungle ID : 221 $ osgi:start 221 MyActivator.start() -
Manual Deployment (alternative to console based deployment) Just drop the war file in FUSE_ESB_HOME>/deploy directory. It will invoke the Bundle Activator’s Start method. See the console log
-
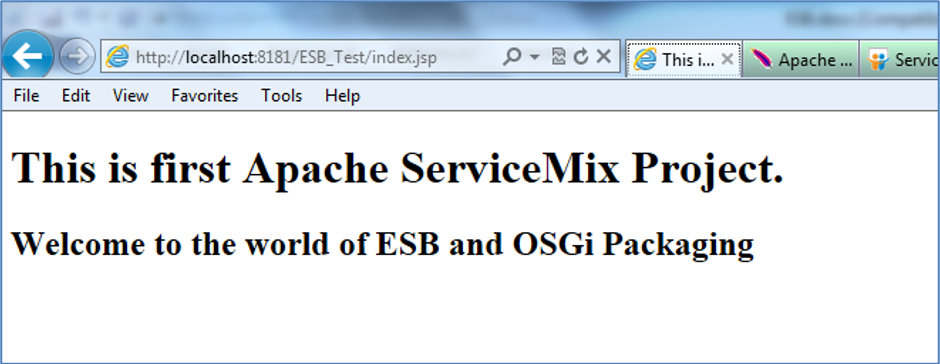
After you see above message, try to access following URL in browser
http://localhost:8181/ESB_Test/
It will open the web application deployed here.

You may also try osgi:update, osgi:uninstall, osgi.stop commands.
This completes and basic introduction, to ESB. In the next article we will cover how apache camel and CXF based webservices are deployed on ESB.
#ESB #java #Apache Service Mix #OSGi #FuseESB #XML #Apache Camel #enterprise #integration #technology